SpringBoot登录认证前后端实现方案:SpringBoot + Mybatis + JWT(图文实例)
8人参与 • 2025-10-25 • Java
本文简介
目的:
spring生态为java后端开发提供了强大支持,但将分散的技术点整合成完整解决方案往往令人困惑。本文将以登录接口为切入点,系统演示如何将ioc/di、mybatis数据持久化、md5加密、session/cookie管理、jwt令牌和拦截器机制融合运用,打造企业级认证方案
技术栈:
- 前端:html + css + javascript + jquery
- 后端:springboot + mybatis + jwt
搭建环境:
- 数据库:mysql8.4.0
- 项目结构:maven
- 前端框架:jquery
- 后端框架:springboot
- jdk:17
- 编译器:idea
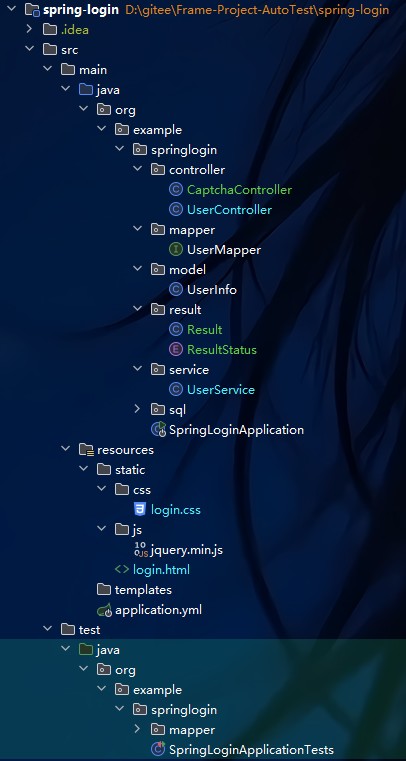
目录结构:
项目搭建及配置
1.创建springboot3.0.0+项目并添加依赖:spring web、mybatis framework、mysql driver、lombok
2.初始化数据库:
create database spring_blog_login charset utf8mb4;
use spring_blog_login;
create table user_info (id int primary key auto_increment,user_name varchar(128) unique ,
                        password varchar(128) not null,delete_flag int default 0,
                        create_time datetime default now(),update_time datetime default now()
);
insert into user_info (user_name,password) values
                                               ('张三','123456'),
                                               ('李四','123456'),
                                               ('王五','123456');
3.将application.properties修改为application.yml并添加如下配置:
spring:
  datasource:
    url: jdbc:mysql://127.0.0.1:3306/spring_blog_login?characterencoding=utf8&usessl=false
    username: root
    password: 123456
    driver-class-name: com.mysql.cj.jdbc.driver
mybatis:
  configuration:
    map-underscore-to-camel-case: true #自动驼峰转换
server:
  port: 8080 #不显式设置默认为8080
按住ctrl + f5,如果程序能运行成功则说明搭建及配置都没问题(mysql服务器必须要处于运行状态)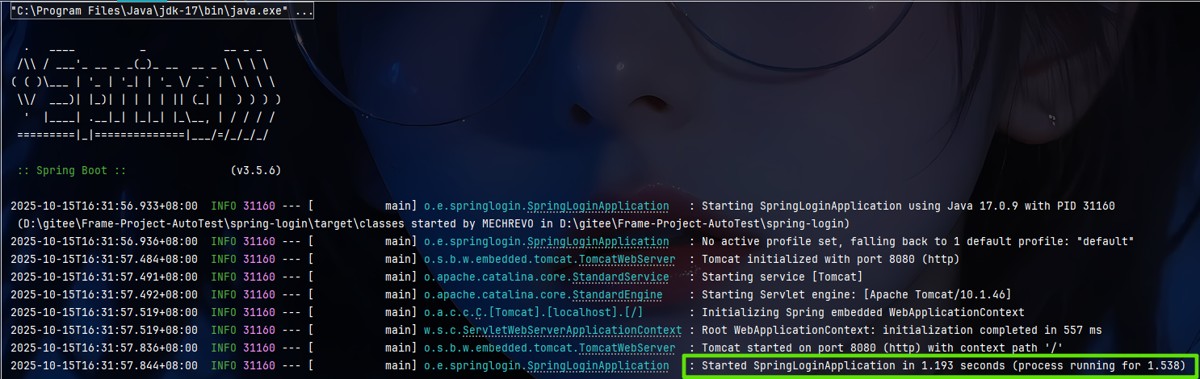
1.登录认证全栈实现 ->基础版
1.1 后端实现
1.1.1 架构设计
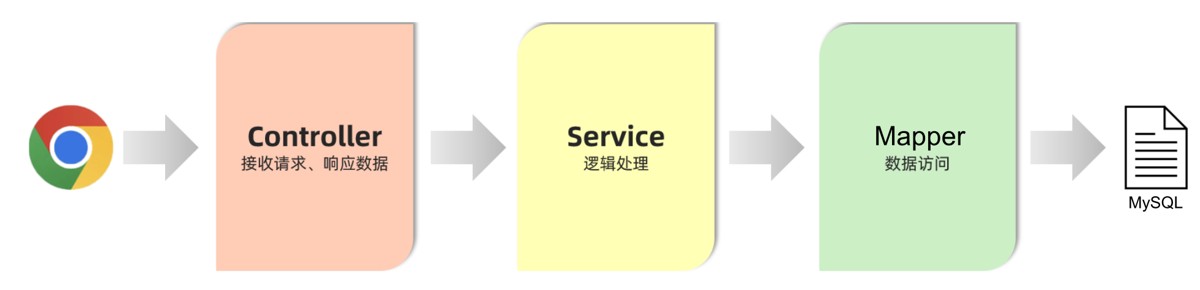
本次登录功能采用controller、service、mapper三层架构:controller层依赖于service层来执行业务逻辑并获取处理结果,而service层又依赖于mapper层来进行数据持久化操作
1.1.2 实体类
实体类用于封装业务数据,需要与数据库表结构一一对应
import lombok.data;
import java.util.date;
@data
public class userinfo {
    private integer id;
    private string username;
    private string password;
    private integer deleteflag;
    private date createtime;
    private date updatetime;
}
1.1.3 controller
处理http请求、参数校验、返回响应
import org.example.springlogin.service.userservice;
import org.springframework.beans.factory.annotation.autowired;
import org.springframework.util.stringutils;
import org.springframework.web.bind.annotation.requestmapping;
import org.springframework.web.bind.annotation.restcontroller;

@restcontroller
@requestmapping("/user")
public class usercontroller {

    private final userservice userservice;

    @autowired
    public usercontroller(userservice userservice) {
        this.userservice = userservice;
    }

    @requestmapping("/login")
    public string login(string username,string password) {
        if (!stringutils.haslength(username) || !stringutils.haslength(password)) {
            return "用户或密码为空";
        }
        return userservice.getuserinfobyusername(username,password);
    }
}
1.1.4 service
业务逻辑处理
import org.example.springlogin.mapper.usermapper;
import org.example.springlogin.model.userinfo;
import org.springframework.beans.factory.annotation.autowired;
import org.springframework.stereotype.service;

@service
public class userservice {

    private final usermapper usermapper;

    @autowired
    public userservice(usermapper usermapper) {
        this.usermapper = usermapper;
    }

    public string getuserinfobyusername(string username,string password) {
        userinfo userinfo = usermapper.getuserinfobyusername(username);
        if (userinfo == null) {
            return "用户不存在";
        }
        if (!password.equals(userinfo.getpassword())) {
            return "密码错误";
        }
        return "登录成功";
    }
}
1.1.5 mapper
数据持久化操作
import org.apache.ibatis.annotations.mapper;
import org.apache.ibatis.annotations.select;
import org.example.springlogin.model.userinfo;

@mapper
public interface usermapper {

    @select("select * from user_info where user_name = #{username}")
    userinfo getuserinfobyusername(string username);
}
1.2 前端实现
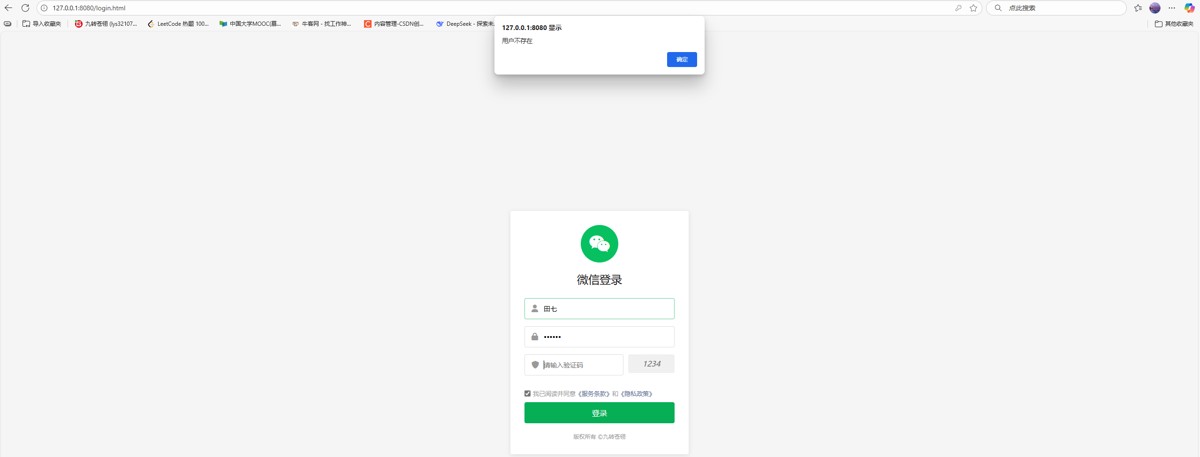
gitee:项目前端代码:https://gitee.com/lys3210728077/test.-java-ee-advanced/tree/master/spring-login/src/main/resources/static,gitee上的前端代码是最新提交的,如下效果图仅作参考效果演示:
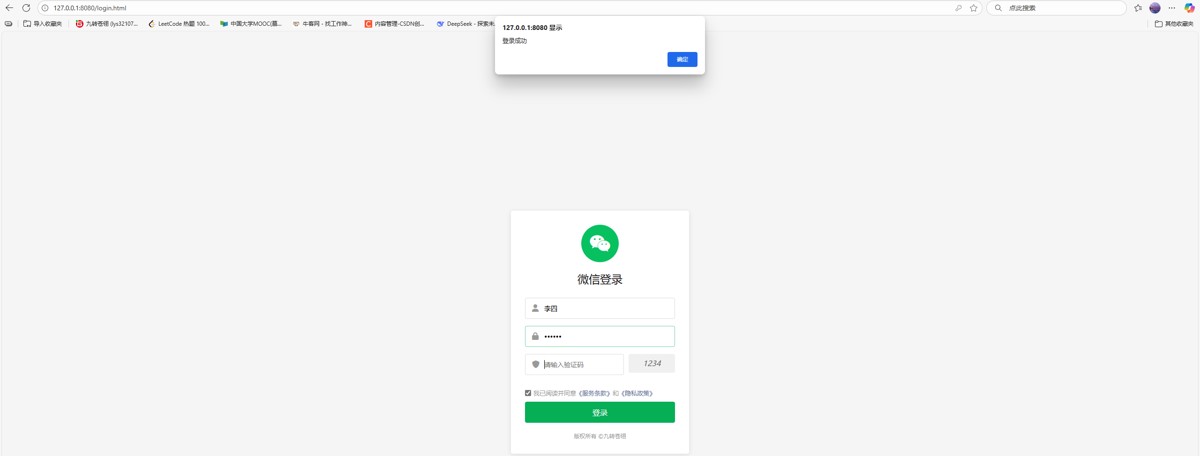
- 1.用户或密码为空

- 2.用户不存在
- 3.密码错误
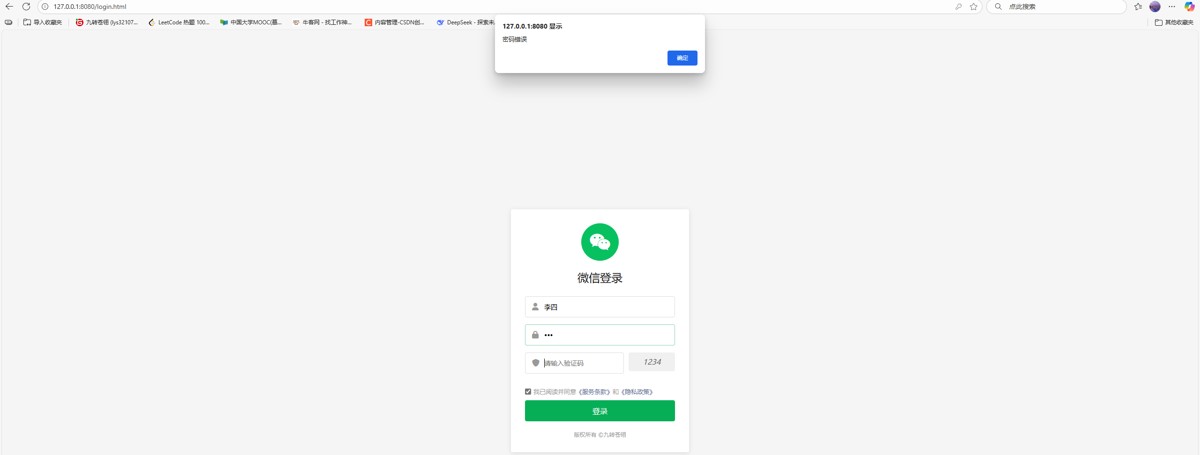
- 4.登录成功
2.cookie/session
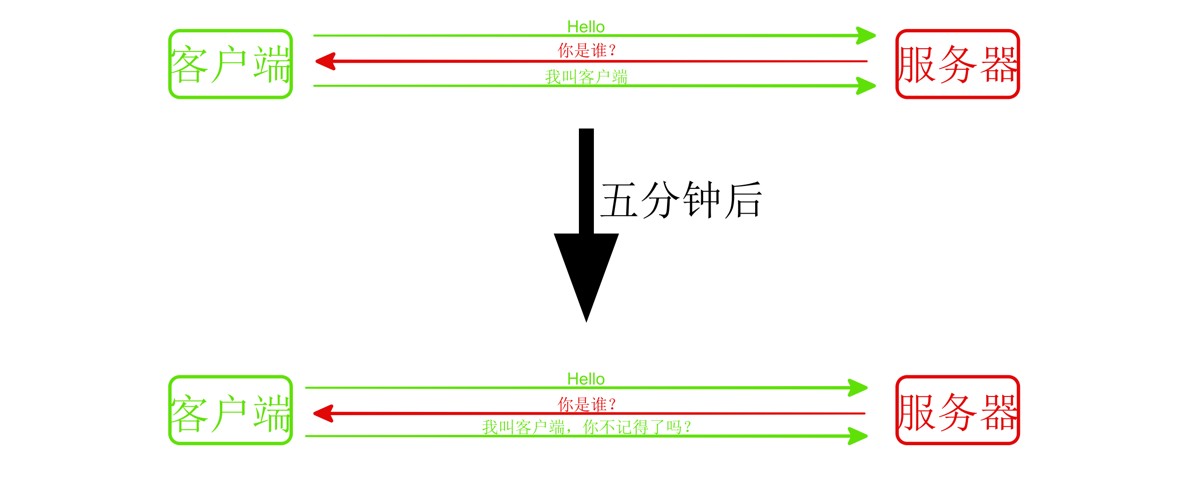
http(超文本传输协议)设计为无状态协议,指服务器默认不保留客户端请求之间的任何状态信息。每个请求独立处理,服务器不会记忆之前的交互内容(如下图)
优点:
- 请求独立性:每次请求被视为新请求,服务器不依赖历史请求数据
- 简单高效:无状态设计降低服务器资源消耗,简化实现逻辑
缺点:
- 身份识别困难:需通过额外机制(如cookies、session)跟踪用户状态
- 重复传输数据:每次请求需携带完整信息,可能增加冗余(如认证信息)
cookie:是存储在客户端(浏览器)的小型文本数据,由服务器通过http响应头set-cookie发送给客户端,并在后续请求中自动携带
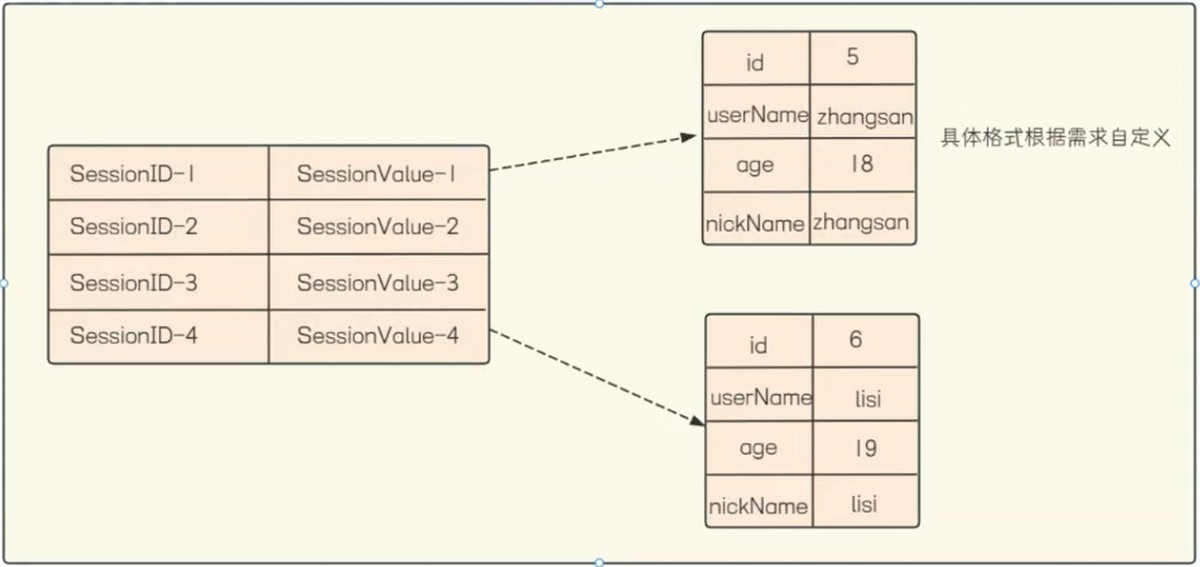
session:是存储在服务器端的用户状态信息,通常通过一个唯一的session id标识,该id可能通过cookie或url传递
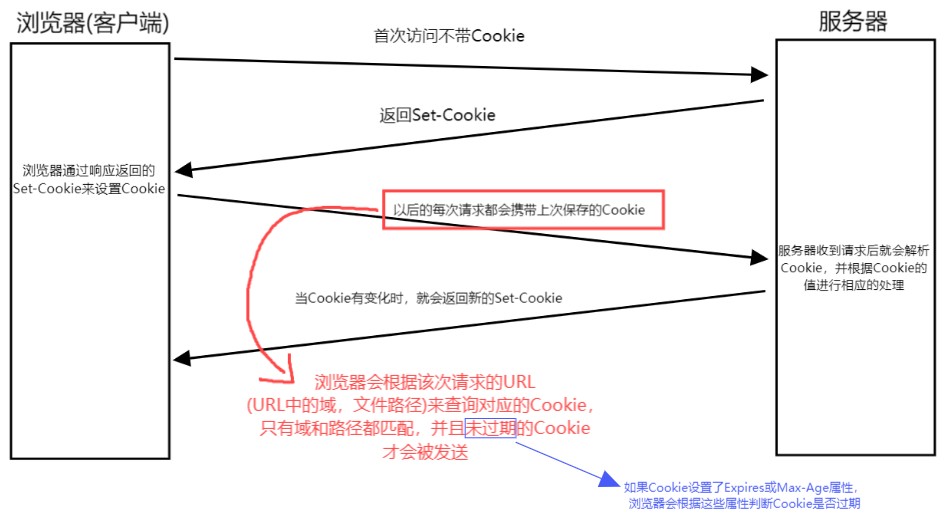
如上图片引用自我的博客:java ee(13)——网络原理——应用层http协议,服务器内部实际上专门开辟了一个session空间用于存储用户信息,每当新用户发送第一次请求时服务器会将用户信息存储在session中并生成一个session id通过set-cookie方法返回给客户端,即cookie
session结构如下:
修改controller类代码:
import jakarta.servlet.http.httpsession;
import lombok.extern.slf4j.slf4j;
import org.example.springlogin.service.userservice;
import org.springframework.beans.factory.annotation.autowired;
import org.springframework.util.stringutils;
import org.springframework.web.bind.annotation.requestmapping;
import org.springframework.web.bind.annotation.restcontroller;
import java.util.hashmap;

@restcontroller
@requestmapping("/user")
@slf4j
public class usercontroller {

    private final userservice userservice;

    @autowired
    public usercontroller(userservice userservice) {
        this.userservice = userservice;
    }

    @requestmapping("/login")
    public string login(string username, string password, httpsession session) {
        log.info("接收到参数,username:{},password:{}",username,password);
        if (!stringutils.haslength(username) || !stringutils.haslength(password)) {
            return "用户或密码为空";
        }
        string result = userservice.getuserinfobyusername(username, password);
        if (result.equals("登录成功")){
            hashmap<string,string> map = new hashmap<>();
            map.put("username",username);
            map.put("password",password);
            //将map作为用户信息存储到session/会话中
            session.setattribute("cookie", map);
            log.info("登录成功");
        }
        return result;
    }
修改前端代码:
    function login() {
      $.ajax({
        url: '/user/login',
        type: "post",
        data:{
          username:$('#username').val(),
          password:$('#password').val(),
        },
        success: function(result) {
          alert(result);
        },
      })
    }
fiddler抓包结果:
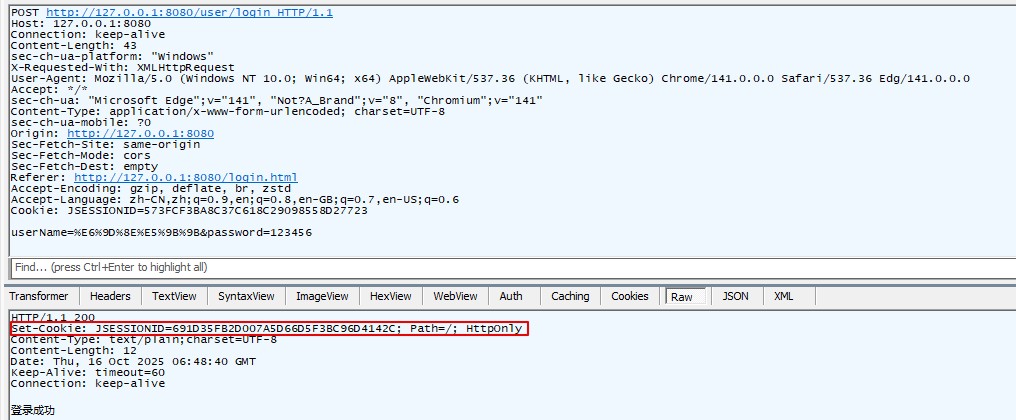
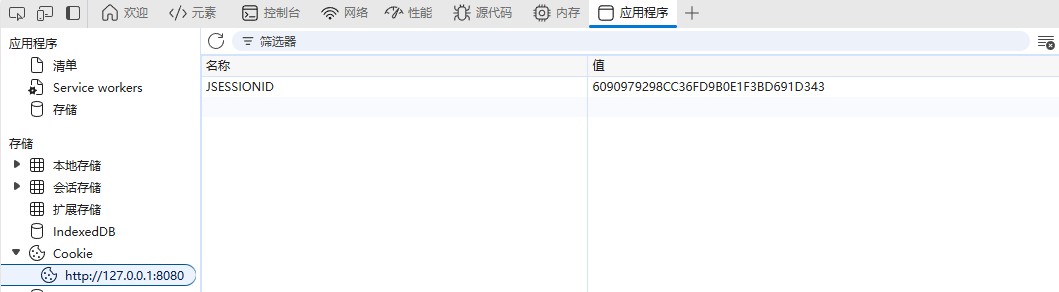
前端/浏览器按住ctrl + shift + i打开控制台点击应用程序/application,打开cookie:
3.统一返回结果封装
统一返回结果封装是后端开发中的重要设计模式,能够保持api响应格式的一致性,便于前端处理
1.创建枚举类:统一管理接口或方法的返回状态码和描述信息,标准化业务逻辑中的成功或失败状态
import lombok.getter;
@getter
public enum resultstatus {
    success(200,"成功"),
    fail(-1,"失败"),
    ;

    private final integer code;
    private final string message;

    resultstatus(integer code, string message) {
        this.code = code;
        this.message = message;
    }
}
2.创建result< t >类:主要用于规范服务端返回给客户端的响应数据格式。通过固定结构(状态码、错误信息、数据)确保前后端交互的一致性
import lombok.data;
@data
//通过泛型<t>设计,可以灵活封装任意类型的数据对象到data字段
public class result<t> {
    //业务码
    private resultstatus code;
    //错误信息
    private string errormessage;
    //数据
    private t data;

    public static <t> result<t> success(t data) {
        result<t> result = new result<>();
        result.setcode(resultstatus.success);
        result.seterrormessage(null);
        result.setdata(data);
        return result;
    }

    public static <t> result<t> fail(string errormessage) {
        result<t> result = new result<>();
        result.setcode(resultstatus.fail);
        result.seterrormessage(errormessage);
        result.setdata(null);
        return result;
    }
}
3.修改controller代码:
@restcontroller
@requestmapping("/user")
@slf4j
public class usercontroller {

    private final userservice userservice;

    @autowired
    public usercontroller(userservice userservice) {
        this.userservice = userservice;
    }

    @requestmapping("/login")
    public result<string> login(string username, string password, httpsession session) {
        log.info("接收到参数,username:{},password:{}",username,password);
        if (!stringutils.haslength(username) || !stringutils.haslength(password)) {
            return result.fail("用户或密码为空");
        }
        string result = userservice.getuserinfobyusername(username, password);
        if (!result.equals("登录成功")){
            return result.fail(result);
        }
        hashmap<string,string> map = new hashmap<>();
        map.put("username",username);
        map.put("password",password);
        //将map作为用户信息存储到session/会话中
        session.setattribute("cookie", map);
        log.info("登录成功");
        return result.success(result);
    }
}
4.修改前端代码:
    function login() {
      $.ajax({
        url: '/user/login',
        type: "post",
        data:{
          username:$('#username').val(),
          password:$('#password').val(),
        },
        success: function(result) {
          if (result.code === "success") {
            alert(result.data)
          }else {
            alert(result.error)
          }
        },
      })
    }
4.图形验证码
图形验证码(captcha)是一种区分用户是人类还是自动化程序的技术,主要通过视觉或交互任务实现。其核心意义体现在以下方面:
- 防止自动化攻击:通过复杂图形或扭曲文字,阻止爬虫、暴力破解工具等自动化程序批量注册或登录,降低服务器压力
- 提升安全性:在敏感操作(如支付、修改密码)前增加验证步骤,减少数据泄露或恶意操作风险
hutool提供了captchautil类用于快速生成验证码,支持图形验证码和gif动态验证码。在pom.xml文件中添加图下配置:
<dependency>
    <groupid>cn.hutool</groupid>
    <artifactid>hutool-all</artifactid>
    <!-- 版本号应与springboot版本兼容 -->
    <version>5.8.40</version>
</dependency>
1.创建captchacontroller类,用于生成验证码并返回给前端
import cn.hutool.captcha.captchautil;
import cn.hutool.captcha.linecaptcha;
import jakarta.servlet.http.httpservletresponse;
import jakarta.servlet.http.httpsession;
import lombok.extern.slf4j.slf4j;
import org.springframework.web.bind.annotation.requestmapping;
import org.springframework.web.bind.annotation.restcontroller;
import java.io.ioexception;

@restcontroller
@requestmapping("/captcha")
@slf4j
public class captchacontroller {
    //设置过期时间
    public final static long delay = 60_000l;

    @requestmapping("/get")
    public void getcaptcha(httpsession session, httpservletresponse response) {
        log.info("getcaptcha");
        linecaptcha linecaptcha = captchautil.createlinecaptcha(200, 100);
        //设置返回类型
        response.setcontenttype("image/jpeg");
        //禁止缓存
        response.setheader("pragma", "no-cache");
        try {
            //通过响应输出生成的图形验证码
            linecaptcha.write(response.getoutputstream());
            //保存code
            session.setattribute("captcha_session_code", linecaptcha.getcode());
            //保存当前时间
            session.setattribute("captcha_session_date", system.currenttimemillis());
            //关闭输出流
            response.getoutputstream().close();
        } catch (ioexception e) {
            throw new runtimeexception(e);
        }
    }
}
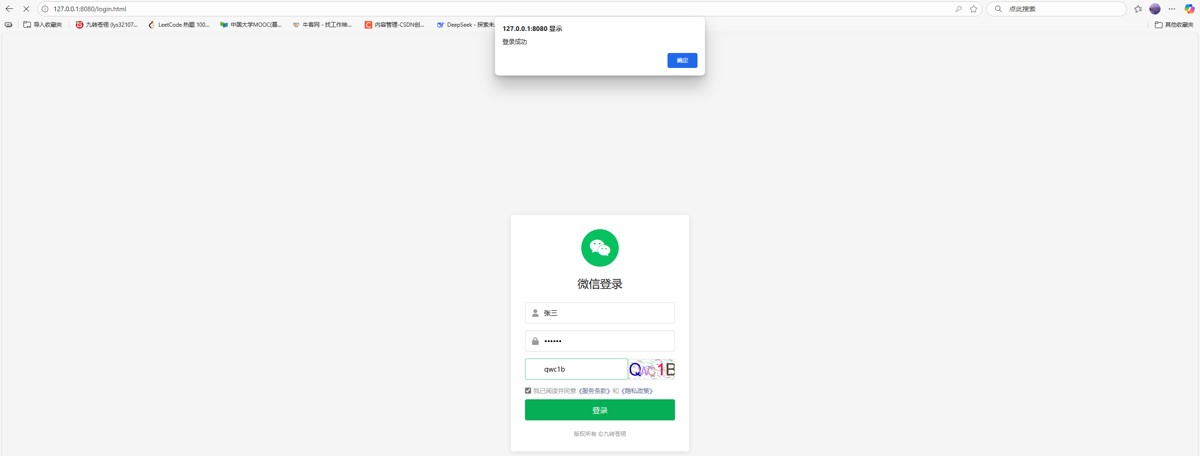
2.修改前端代码:最终版
<!doctype html>
<html lang="zh-cn">
<head>
  <meta charset="utf-8">
  <meta name="viewport" content="width=device-width, initial-scale=1.0">
  <title>微信登录</title>
  <link rel="stylesheet" href="https://cdnjs.cloudflare.com/ajax/libs/font-awesome/6.0.0/css/all.min.css" rel="external nofollow" >
  <link rel="stylesheet" href="css/login.css" rel="external nofollow" >
</head>
<body>
  <div class="login-container">
    <div class="logo">
      <i class="fab fa-weixin"></i>
    </div>
    <h2>微信登录</h2>
    <form id="loginform">
      <div class="input-group">
        <i class="fas fa-user"></i>
        <label for="username"></label><input type="text" id="username" placeholder="请输入用户名" required>
      </div>
      <div class="input-group">
        <i class="fas fa-lock"></i>
        <label for="password"></label><input type="password" id="password" placeholder="请输入密码" required>
      </div>
      <div class="input-group">
        <div class="captcha-container">
          <label for="inputcaptcha"></label><input type="text" id="inputcaptcha" class="captcha-input" placeholder="输入验证码">
          <img id="verificationcodeimg" src="/captcha/get" class="captcha-img" title="看不清?换一张" alt="验证码">
        </div>
      </div>
      <div class="agreement">
        <input type="checkbox" id="agreecheck" checked>
        <label for="agreecheck">我已阅读并同意<a href="#" rel="external nofollow"  rel="external nofollow" >《服务条款》</a>和<a href="#" rel="external nofollow"  rel="external nofollow" >《隐私政策》</a></label>
      </div>
      <button type="submit" class="login-btn" onclick="login()">登录</button>
    </form>
    <div class="footer">
      <p>版权所有 ©九转苍翎</p>
    </div>
  </div>
  <!-- 引入jquery依赖 -->
  <script src="js/jquery.min.js"></script>
  <script>
    //刷新验证码
    $("#verificationcodeimg").click(function(){
      //new date().gettime()).fadein()防止前端缓存
      $(this).hide().attr('src', '/captcha/get?dt=' + new date().gettime()).fadein();
    });
    //登录
    function login() {
      $.ajax({
        url: '/user/login',
        type: "post",
        data:{
          username:$('#username').val(),
          password:$('#password').val(),
          captcha:$('#inputcaptcha').val(),
        },
        success: function(result) {
          console.log(result);
          if (result.code === "success") {
            alert(result.data)
          }else {
            alert(result.error)
          }
        },
      })
    }
  </script>
</body>
</html>
3.在usercontroller类新增captcha形参接收来自captchacontroller类的请求,并传递给userservice
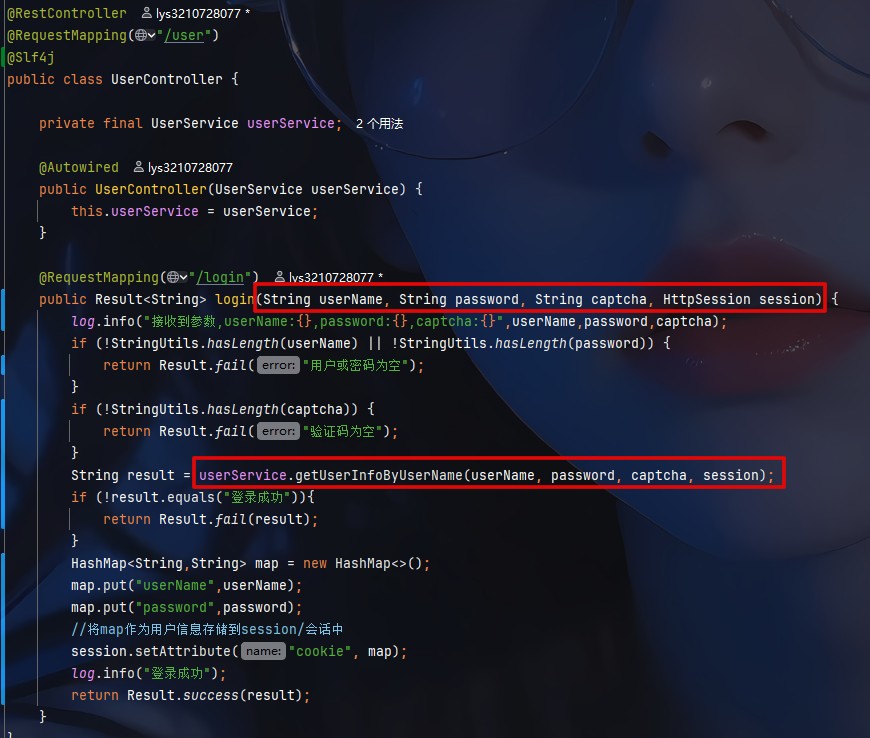
import jakarta.servlet.http.httpsession;
import org.example.springlogin.controller.captchacontroller;
import org.example.springlogin.mapper.usermapper;
import org.example.springlogin.model.userinfo;
import org.springframework.beans.factory.annotation.autowired;
import org.springframework.stereotype.service;

@service
public class userservice {

    private final usermapper usermapper;

    @autowired
    public userservice(usermapper usermapper) {
        this.usermapper = usermapper;
    }

    public string getuserinfobyusername(string username, string password, string captcha, httpsession session) {
        userinfo userinfo = usermapper.getuserinfobyusername(username);
        if (userinfo == null) {
            return "用户不存在";
        }
        if (!password.equals(userinfo.getpassword())) {
            return "密码错误";
        }
        long savetime = (long)session.getattribute("captcha_session_date");
        if (system.currenttimemillis() - savetime > captchacontroller.delay) {
            return "验证码超时";
        }
        if (!captcha.equalsignorecase((string) session.getattribute("captcha_session_code"))) {
            return "验证码错误";
        }
        return "登录成功";
    }
}
实现效果:
5.md5加密
md5(message-digest algorithm 5)是一种广泛使用的哈希函数,可将任意长度数据生成固定长度(128位,16字节)的哈希值,通常表示为32位十六进制字符串,常用于校验数据完整性或存储密码。但因其安全性不足,通常结合盐值(salt)配合使用
- 不可逆性:无法通过哈希值反推原始数据
- 唯一性:理论上不同输入产生相同哈希值的概率极低(哈希碰撞)
- 固定长度:无论输入数据大小,输出均为32位十六进制字符串
1.创建securityutil类用于生成和验证密文
import org.springframework.util.digestutils;
import org.springframework.util.stringutils;
import java.util.uuid;

public class securityutil {
    //加密
    public static string encrypt(string inputpassword){
        //生成随机盐值
        string salt = uuid.randomuuid().tostring().replaceall("-", "");
        //(密码+盐值)进行加密
        string finalpassword = digestutils.md5digestashex((inputpassword + salt).getbytes());
        return salt + finalpassword;
    }
    //验证
    public static boolean verify(string inputpassword, string sqlpassword){
        if (!stringutils.haslength(inputpassword)){
            return false;
        }
        if (sqlpassword == null || sqlpassword.length() != 64){
            return false;
        }
        //取出盐值
        string salt = sqlpassword.substring(0,32);
        //(输入密码 + 盐值)重新生成 加密密码
        string finalpassword = digestutils.md5digestashex((inputpassword + salt).getbytes());
        //判断数据库中储存的密码与输入密码是否一致
        return (salt + finalpassword).equals(sqlpassword);
    }

    public static void main(string[] args) {
        system.out.println(securityutil.encrypt("123456"));
    }
}
2.将数据库中的密码替换为加密后的值
3.修改验证密码的逻辑(userservice类)
        if (!securityutil.verify(password,userinfo.getpassword())) {
            return "密码错误";
        }
6.拦截器
spring拦截器(interceptor)是一种基于aop的机制,用于在请求处理的不同阶段插入自定义逻辑。常用于权限校验、日志记录、参数预处理等场景
1.创建拦截器类并实现handlerinterceptor接口,该接口提供了三种方法:
- prehandle:在controller方法执行前调用
- posthandle:controller方法执行后、视图渲染前调用
- aftercompletion:请求完成、视图渲染完毕后调用
import jakarta.servlet.http.httpservletrequest;
import jakarta.servlet.http.httpservletresponse;
import lombok.extern.slf4j.slf4j;
import org.springframework.stereotype.component;
import org.springframework.web.servlet.handlerinterceptor;
import org.springframework.web.servlet.modelandview;

@slf4j
@component
public class interceptor implements handlerinterceptor {

    @override
    public boolean prehandle(httpservletrequest request, httpservletresponse response, object handler) {
        //1.获取token
        string cookie = request.getheader("cookie");
        if (cookie == null) {
            response.setstatus(401);
            return false;
        }
        log.info("接收到cookie:{}",cookie);
        //2.校验token
        return true;
    }

    @override
    public void posthandle(httpservletrequest request, httpservletresponse response, object handler, modelandview modelandview) {
        log.info("posthandle");
    }

    @override
    public void aftercompletion(httpservletrequest request, httpservletresponse response, object handler, exception ex) {
        log.info("aftercompletion");
    }
}
2.注册拦截器
import org.example.springlogin.intercepter.interceptor;
import org.springframework.beans.factory.annotation.autowired;
import org.springframework.context.annotation.configuration;
import org.springframework.web.servlet.config.annotation.interceptorregistry;
import org.springframework.web.servlet.config.annotation.webmvcconfigurer;
import java.util.arrays;
import java.util.list;

@configuration
public class config implements webmvcconfigurer {
    private final interceptor interceptor;

    @autowired
    public config(interceptor interceptor) {
        interceptor = interceptor;
    }
    //排除不需要拦截的路径
    private static final list<string> excludes = arrays.aslist(
            "/**/login.html",
            "/user/login",
            "/captcha/get"
    );

    @override
    public void addinterceptors(interceptorregistry registry) {
        //注册拦截器
        registry.addinterceptor(interceptor)
                //拦截所有路径
                .addpathpatterns("/**")
                .excludepathpatterns(excludes);
    }
}
3.创建home.html文件,并且在登录成功后跳转到该页面(在login.html中添加location.href="/home.html")
<!doctype html>
<html lang="en">
<head>
    <meta charset="utf-8">
    <title>home</title>
</head>
<body>
    <h1>hello world</h1>
</body>
</html>
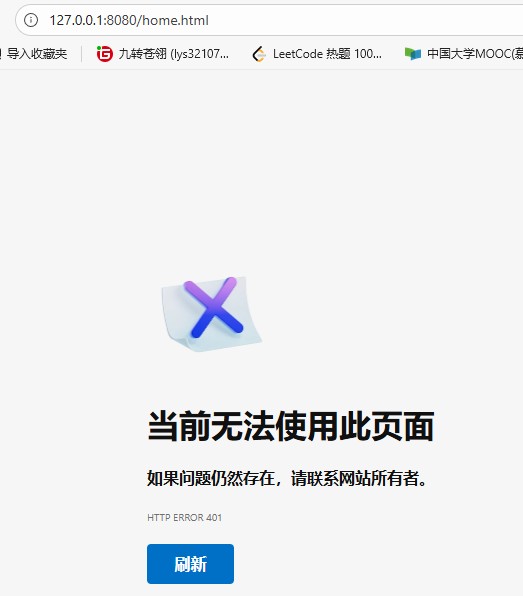
实现效果:
- 成功登陆时


- 未登录直接访问home.html页面时
到此这篇关于springboot登录企业级认证系统实现方案:session、统一封装、md5加密与拦截器的文章就介绍到这了,更多相关springboot登录认证方案内容请搜索代码网以前的文章或继续浏览下面的相关文章希望大家以后多多支持代码网!
赞 (0)
您想发表意见!!点此发布评论


发表评论