nginx+rtmp实现直播完整流程
31人参与 • 2026-01-11 • Redis
一,环境准备
1.下载nginx-rtmp-module:
cd /www/server/
git clone https://github.com/arut/nginx-rtmp-module.git
2.nginx安装:
这是用了宝塔哈。
软件商店 > 应用搜索:nginx > 安装 > 编译安装 > 添加自定义模块
模块名称:nginx_rtmp_module
描述: nginx rtmp
参数:–add-module=/www/server/nginx-rtmp-module
3. 编辑conf配置:
新建目录:
/www/server/nginx/conf/rtmp, 在目录下新建两个文件:nginx-rtmp.conf和nginx-rtmp-play.conf新建目录:
/www/tmp/hls用于存放hls视频文件# nginx-rtmp.conf rtmp { server { listen 1935; ping 30s; chunk_size 4000; notify_method get; application live { # 推流地址rtmp://ip:1935/live/密钥,同拉流播放地址 live on; record off; # 是否开启记录 off, all,用于录制直播视频以便回放重播 #record_unique on; # 记录值唯一 #record_max_size 200m; # 记录文件大小 #record_path "/www/tmp/video"; # 记录文件位置 #record_suffix -%y-%m-%d-%h_%m_%s.flv; # 记录文件命名 #on_publish http://127.0.0.1:8686/auth; # 开始推流的回调地址 #on_done 'http://when live stop call this url'; # 结束推流的回调地址 #on_play http://127.0.0.1:8686/auth; # 开始播放的回调地址 } application hls { # 推流地址rtmp://ip:1935/hls/密钥,开启hls协议进行m3u8直播 live on; hls on; # 开启hls, hls的推流会产生一个m3u8的ts视频文件索引,同时保存一个个视频片段缓存,可以拿到再次播放。 hls_path /www/tmp/hls; # 视频切片ts文件存放的位置 hls_sync 100ms; hls_fragment 5s; # 视频切片的大小,ts文件大小 hls_cleanup on; #对多余的切片进行删除 hls_playlist_length 60s; #保存m3u8列表长度时间,默认是30秒 } #application vod { # 用于视频点播flv/mp4 # play /www/tmp/videos; # 本地视频mp4文件存放地址,作为流播放视频: rtmp://ip:1935/vod/视频名称.mp4 #} #application vod_http { # 播放远程http链接的视频,rtmp://ip:1935/vod_http/视频名称.mp4 # play http://localhost:8080/vod/; #} } }# nginx-rtmp-play.conf server { listen 1000; location /stat { # http://ip:1000/stat, 监控流的地址 rtmp_stat all; rtmp_stat_stylesheet stat.xsl; } location /stat.xsl { root /www/server/nginx-rtmp-module/; } location /hls { # http拉流的地址,http://ip:1000/hls/密钥.m3u8 # serve hls fragments types { application/vnd.apple.mpegurl m3u8; video/mp2t ts; } root /www/tmp; expires -1; add_header cache-control no-cache; add_header access-control-allow-origin *; } }
编辑nginx.conf引入配置: include /www/server/nginx/conf/rtmp/nginx-rtmp.conf;
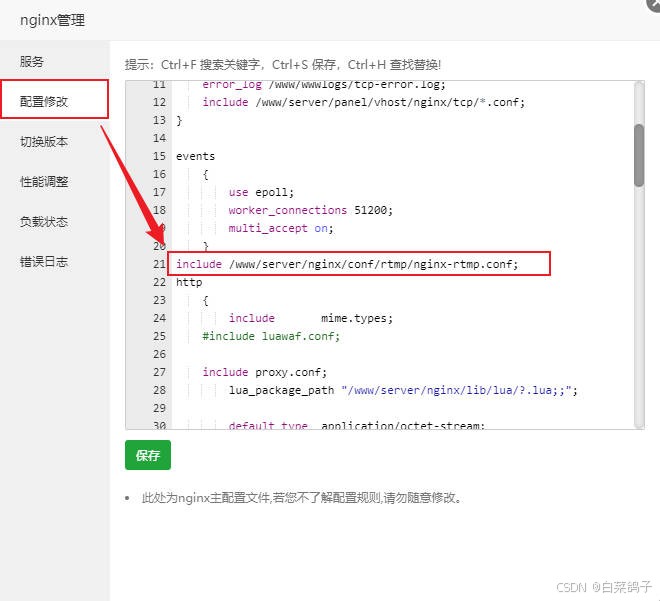
引入配置:include /www/server/nginx/conf/rtmp/nginx-rtmp-play.conf;
4. 重启nginx:
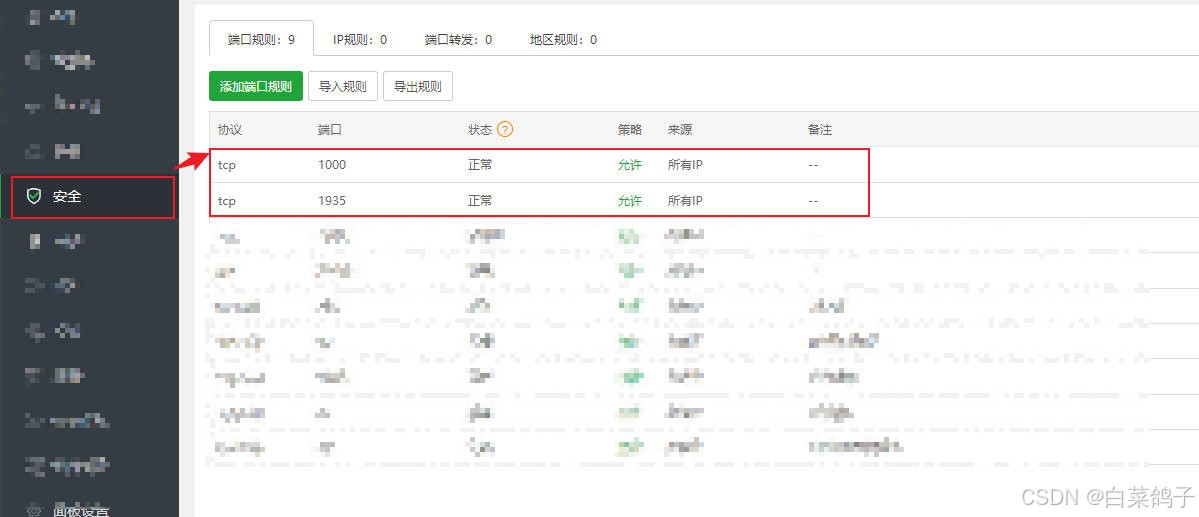
注意放行端口:1935和1000:
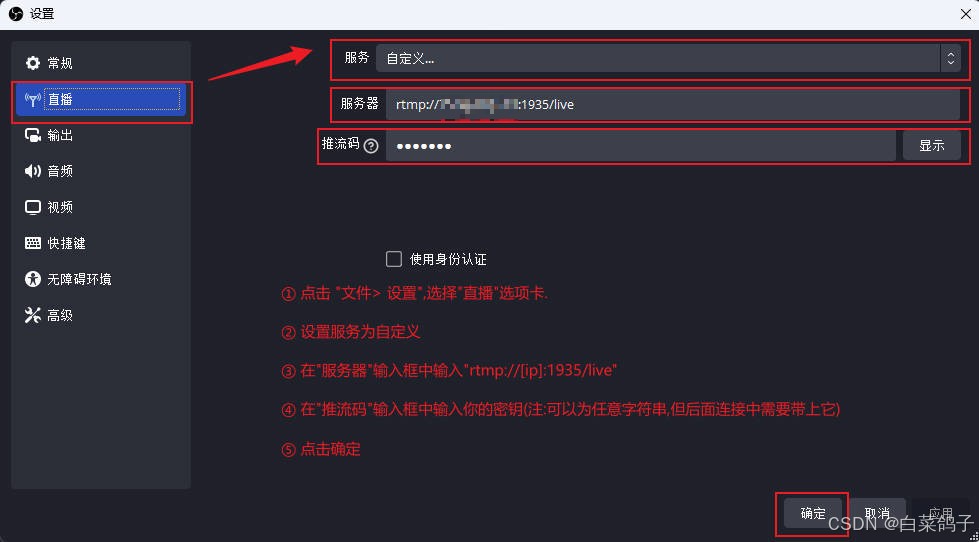
5. 使用obs推流:
live推流:
推流地址:rtmp://ip:1935/live,串流密钥:test123
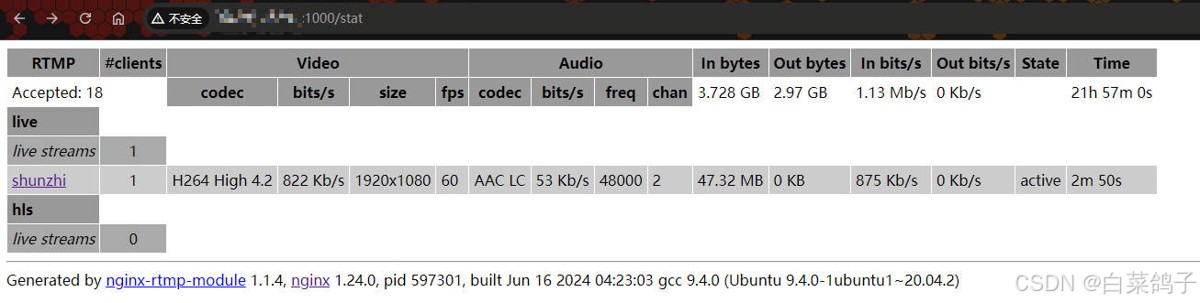
浏览器访问:http://ip:1000/stat可以看到推流的情况:
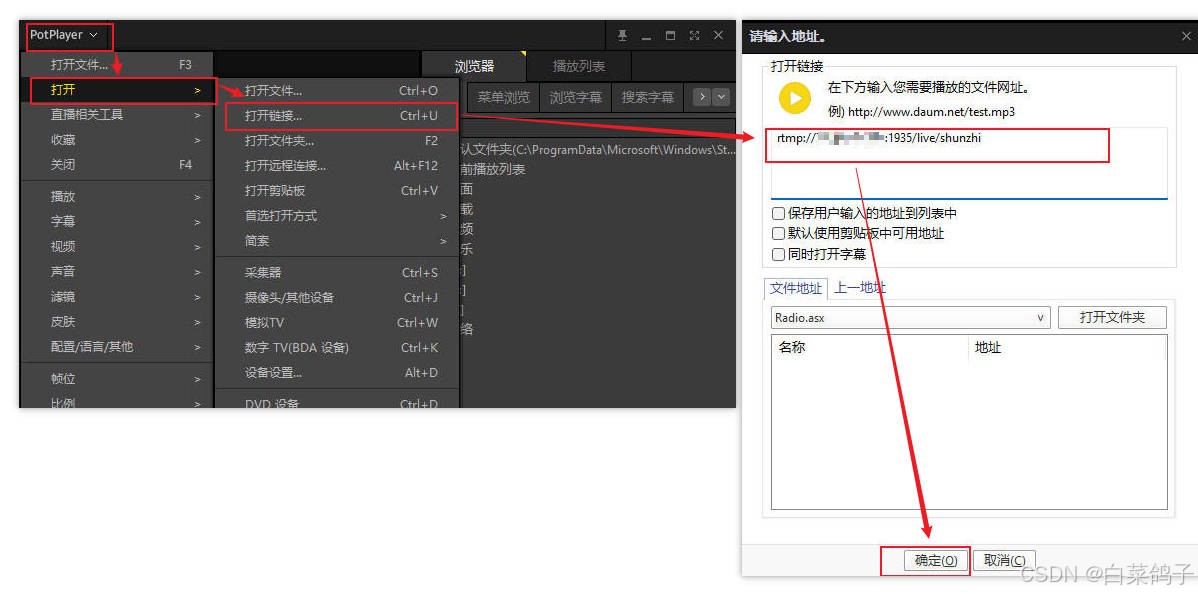
使用potplayer拉流播放:
点击右上角的potplayer,选择“打开>打开链接”,输入rtmp://ip:1935/live/test123后,点击”确定“。
hls推流:
推流地址:rtmp://ip:1935/hls,串流密钥:test123
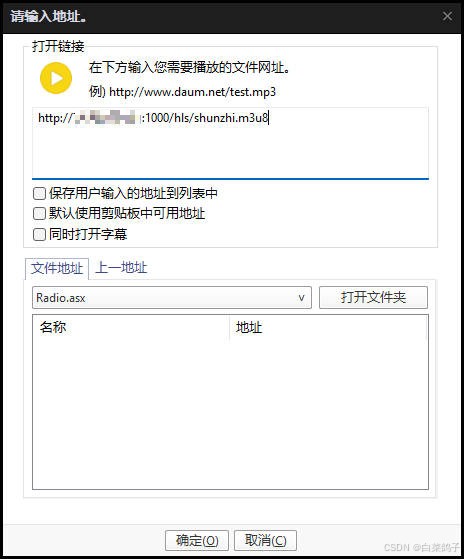
使用potplayer拉流播放:
点击右上角的potplayer,选择“打开>打开链接”,输入http://ip:1000/hls/test123.m3u8后,点击”确定“。
6. 扩展:浏览器拉流播放:
- html播放器代码index.html(使用video.js):
<!doctype html>
<html lang="zh-cn">

<head>
  <meta charset="utf-8">
  <title>html5 直播</title>
  <link href="https://vjs.zencdn.net/7.0.3/video-js.css" rel="external nofollow"  rel="stylesheet">
  <script src="https://vjs.zencdn.net/7.0.3/video.js"></script>
  <script src="https://cdn.jsdelivr.net/npm/videojs-flash@2/dist/videojs-flash.min.js"></script>
</head>

<body style="margin: auto; width: 1080px;">
  <!-- rtmp直播拉流地址 -->
  <video id="rtmp-live" class="video-js vjs-default-skin vjs-big-play-centered" controls preload="auto" width="1080" height="608" data-setup='{}'>
    <source src="rtmp://【ip】/live/test123" type="rtmp/flv">
  </video>
  <hr />
  <!-- http直播hls拉流地址 -->
  <video id="hls-live" class="video-js vjs-default-skin vjs-big-play-centered" controls preload="auto" width="1080"height="608" data-setup='{}'>
    <source src="http://【ip】:1000/hls/test123.m3u8" type="application/x-mpegurl">
  </video>
</body>

</html>
- 因为本例的html需要在服务中打开,本例采用node, 所以在同一目录下建立server.js:
(提示:不使用node启动服务可以在idea中直接将index.html以服务run运行)
var http = require('http');
// 导入文件读写的js
var fs = require('fs');
var server = http.createserver(function (request, response) {
    console.log('someone has visited my first node server !');
    //根据访问的路径来选择响应的文件
    let filepath;
    if (request.url === '/') {
        filepath='index.html';
    } else {
        filepath='notfound.html';
    }
    //读取文件并写入响应内容中去
    fs.readfile(filepath,function(err,data ){
        response.write(''+data);
        //不能直接写data 是16进制的数,需要转成字符串
        //我写data.tostring() 会报错
        response.end();
    })
})
server.listen(8000, function () {
    console.log('server started at http://localhost:8000/  ......')
});
提示:使用chrome播放rtmp流的时候需要允许flash执行,而使用hls播放m3u8则不用
命令安装rtmp模块
下载并解压 rtmp 模块
cd /www/server/nginx/src/
git clone https://github.com/arut/nginx-rtmp-module.git
安装 pcre 库
sudo apt update
sudo apt install libpcre3 libpcre3-dev
cd /www/server/nginx/src/
wget https://ftp.pcre.org/pub/pcre/pcre-8.43.tar.gz
tar -xzvf pcre-8.43.tar.gz
cd pcre-8.43
./configure
make
sudo make install
确保 nginx 配置正确
cd ~/nginx-1.24.0/
./configure --user=www --group=www --prefix=/www/server/nginx \
--add-module=/www/server/nginx/src/ngx_devel_kit \
--add-module=/www/server/nginx/src/lua_nginx_module \
--add-module=/www/server/nginx/src/ngx_cache_purge \
--with-openssl=/www/server/nginx/src/openssl \
--with-pcre=/www/server/nginx/src/pcre-8.43 \
--with-http_v2_module \
--with-stream \
--with-stream_ssl_module \
--with-stream_ssl_preread_module \
--with-http_stub_status_module \
--with-http_ssl_module \
--with-http_image_filter_module \
--with-http_gzip_static_module \
--with-http_gunzip_module \
--with-ipv6 \
--with-http_sub_module \
--with-http_flv_module \
--with-http_addition_module \
--with-http_realip_module \
--with-http_mp4_module \
--add-module=/www/server/nginx/src/ngx_http_substitutions_filter_module-master \
--with-ld-opt=-wl,-e \
--with-cc-opt=-wno-error \
--with-http_dav_module \
--add-module=/www/server/nginx/src/nginx-dav-ext-module \
--add-module=/www/server/nginx/src/nginx-rtmp-module \
--with-ld-opt="-wl,-rpath,/usr/local/lib/"
安装
make
make install
检查是否成功,在输入下方命令后查找是否安装完成trmp模块
nginx -v
如果提示没有找到luajit查看是否安装
luajit -v
如果已经安装查找安装目录
whereis luajit
根据目录设置环境变量
export luajit_lib=/usr/local/lib
export luajit_inc=/usr/local/include/luajit-2.1
到此这篇关于nginx+rtmp实现直播完整流程的文章就介绍到这了,更多相关nginx rtmp 直播内容请搜索代码网以前的文章或继续浏览下面的相关文章希望大家以后多多支持代码网!
赞 (0)
您想发表意见!!点此发布评论


发表评论