SpringBoot中读取配置文件的6种方式总结
1人参与 • 2026-03-19 • Java
概述:本文从读取默认配置文件即自定义配置文件入手,去整理了解几种加载方案的区别
springboot读取配置文件的几种方式
- 测试方式1:通过environment读取配置信息
- 测试方式2:通过@value注解读取配置信息(推荐使用)
- 测试方式3:通过@configurationproperties注解读取配置信息
- 测试方式4:通过@propertysource+@value注解读取配置信息
- 测试方式5:通过@propertysource+@configurationproperties注解读取配置信息
- 测试方式6:通过properties读取配置信息
结论:无论什么场景都推荐使用@value注解准备错;其他了解即可。
准备工作
配置文件目录
application.properties
server.port=8080
spring.profiles.active=dev
application-dev.properties
spring.redis.host=localhost
logging.level.root = info
application-prod.properties
spring.redis.port=6379
logging.level.root = warn
my.properties
demo.name=cat
案例说明
测试方式1:通过environment读取配置信息
注意点说明:
注意点1:environment是用来读取应用程序运行时的环境变量的类,可以通过key-value的方式读取application.properties和系统环境变量,命令行输入参数,系统属性等.
controller
import com.example.demo.config.readproperties;
import com.example.demo.config.readproperties2;
import com.example.demo.config.readproperties3;
import org.springframework.beans.factory.annotation.autowired;
import org.springframework.beans.factory.annotation.value;
import org.springframework.core.env.environment;
import org.springframework.core.io.classpathresource;
import org.springframework.core.io.resource;
import org.springframework.core.io.support.propertiesloaderutils;
import org.springframework.web.bind.annotation.getmapping;
import org.springframework.web.bind.annotation.restcontroller;

import java.io.ioexception;
import java.util.hashmap;
import java.util.map;
import java.util.properties;

/**
 * 测试读取配置文件的几种方式:
 * @author 211145187
 * @date 2022/7/20 14:02
 **/
@restcontroller
public class readapplicationproperties {
    @autowired
    private environment environment;

	//测试方式1:通过environment读取配置信息
    @getmapping("/readapplicationproperties1")
    public map<string,object> readapplicationproperties1(){
        map<string,object> map = new hashmap<>();
        map.put("port",environment.getproperty("server.port"));
        system.out.println("通过environment读取配置信息:" + environment.getproperty("server.port"));
        return  map;
    }
}
结果打印:
![]()
测试方式2:通过@value注解读取配置信息(推荐使用)
controller
import com.example.demo.config.readproperties;
import com.example.demo.config.readproperties2;
import com.example.demo.config.readproperties3;
import org.springframework.beans.factory.annotation.autowired;
import org.springframework.beans.factory.annotation.value;
import org.springframework.core.env.environment;
import org.springframework.core.io.classpathresource;
import org.springframework.core.io.resource;
import org.springframework.core.io.support.propertiesloaderutils;
import org.springframework.web.bind.annotation.getmapping;
import org.springframework.web.bind.annotation.restcontroller;

import java.io.ioexception;
import java.util.hashmap;
import java.util.map;
import java.util.properties;

/**
 * 测试读取配置文件的几种方式:
 * @author 211145187
 * @date 2022/7/20 14:02
 **/
@restcontroller
public class readapplicationproperties {
    @value("${server.port}")
    private integer serverport;

	//测试方式2:通过@value注解读取配置信息
    @getmapping("/readapplicationproperties2")
    public void readapplicationproperties2(){
        system.out.println("通过@value注解读取配置信息:" + serverport);
    }
}
结果打印
![]()
测试方式3:通过@configurationproperties注解读取配置信息
注意点说明:
注意点1:@configurationproperties注解用于指定前缀,下方的属性名称必须和要获取的配置信息名称一致,比如必须叫port,否则获取值为null
使用@configurationproperties首先建立配置文件与对象的映射关系,然后在控制器方法中使用@autowired注解将对象注入.
注意点2:配置生效的两种方式:
- 方式1:配置@component
- 方式2:启动类添加@enableconfigurationproperties(readproperties.class)
总结:注解@component和注解@enableconfigurationproperties(readproperties.class)是等价的,写一个就行。
注意点3:@configurationproperties也可以和@value和@bean一起使用,只不过我没写案例。
注意点4:@configurationproperties只能加载以application为前缀开头的配置文件,比如application-dev.properties,加载自定义名称配置文件内容无效。
注意点5:
问题:从上面的示例中,我们可以看到在属性绑定中@enableconfigurationproperties和@component的效果一样,那么为啥springboot还要使用这个注解呢?
答案:当我们引用第三方jar包时,@component标注的类是无法注入到spring容器中的,这时我们可以用@enableconfigurationproperties来代替@component
readproperties
import lombok.data;
import org.springframework.boot.context.properties.configurationproperties;
import org.springframework.stereotype.component;

/**
 * 1)注解@configurationproperties中的prefix用于设置前缀
 * 2)下方的属性名称必须和要获取的配置信息名称一致,比如必须叫port,否则获取值为null
 */
@configurationproperties(prefix = "server")//这个注解是用找到类
@component  //生效的两种方式:方式1:配置@component,方式2:启动类添加@enableconfigurationproperties(readproperties.class)
@data
public class readproperties {
    private integer port;
}
controller
import com.example.demo.config.readproperties;
import com.example.demo.config.readproperties2;
import com.example.demo.config.readproperties3;
import org.springframework.beans.factory.annotation.autowired;
import org.springframework.beans.factory.annotation.value;
import org.springframework.core.env.environment;
import org.springframework.core.io.classpathresource;
import org.springframework.core.io.resource;
import org.springframework.core.io.support.propertiesloaderutils;
import org.springframework.web.bind.annotation.getmapping;
import org.springframework.web.bind.annotation.restcontroller;

import java.io.ioexception;
import java.util.hashmap;
import java.util.map;
import java.util.properties;

/**
 * 测试读取配置文件的几种方式:
 * @author 211145187
 * @date 2022/7/20 14:02
 **/
@restcontroller
public class readapplicationproperties {
    @autowired
    private readproperties readproperties;

	//测试方式3:通过@configurationproperties注解读取配置信息
    @getmapping("/readapplicationproperties3")
    public void readapplicationproperties3(){
        system.out.println("通过@configurationproperties注解读取配置信息:" + readproperties.getport());
    }
}
结果打印
![]()
测试方式4:通过@propertysource+@value注解读取配置信息
注意点说明:
注意点1:@propertysource注解加载指定的属性文件(*.properties)到 spring 的 environment 中。可以配合 @value 和@configurationproperties 和@bean使用。
注意点2:@propertysource注解可以配合 @value 和@configurationproperties 和@bean一起使用,只不过我没写案例。
注意点3:使用@propertysource注解推荐只加载自定义名称的配置文件,不要加载以application为前缀开头的配置文件,比如application-dev.properties,因为重名的key值会被覆盖,这点会在注意点4中着重说明。
注意点4:(最容易出错)
讲解一个大坑
补充说明:application-dev.properties中设置logging.level.root = info,而application-prod.properties中设置logging.level.root = warn
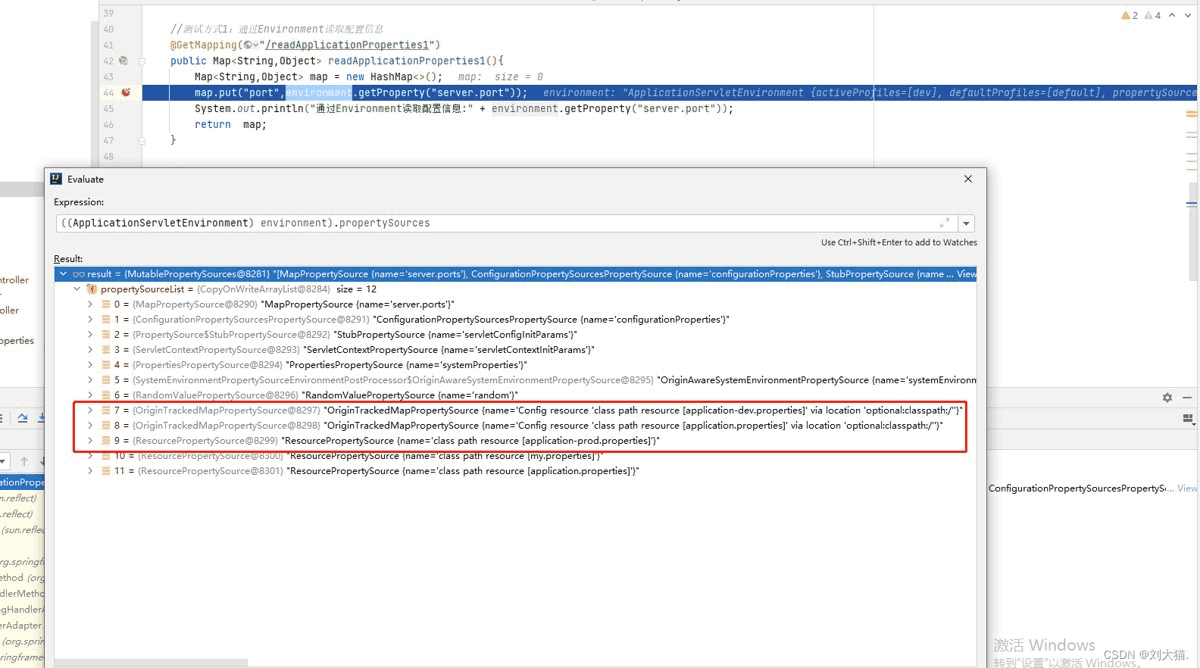
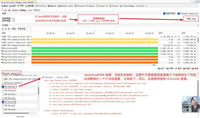
案例说明:application.properties配置文件设置内置spring.profiles.active=dev,用于关联application-dev.properties配置文件,正常代码运行会把application.properties和application-dev.properties配置文件都加载到内存中,但是现在我想创建一个config或者bean,通过@propertysource注解去注入并打印application-prod.properties中的这个内容:logging.level.root = warn,正确打印logging.level.root的结果应该是warn,因为它是最后加载的,但实际打印结果logging.level.root的值是info,
问题:为什么?为什么打印info,而我想打印的是prod中的值warn
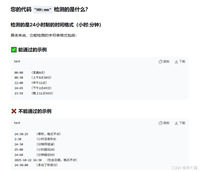
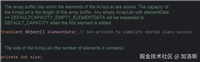
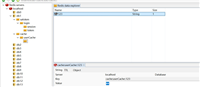
答案:如图1,你看红色框中你感觉prod在info下载加载,你会觉得prod相同的key会覆盖dev中的值,实际答案真不是这样,详情请看如图2这个人的回答。正常来说生产项目中application-dev.properties和application-prod.properties只会允许使用一个,才不会混用。
实际真实项目解决方案是:
- 第1种方案:启动类中配置环境变量也会通过指定dev还是prod生效,所以该案例只是自己的一个想法,实际没太大作用且实际项目也不会允许同时加载dev和prod配置文件。
- 第2种方案:为了避免重名key被覆盖,我们会让application.properties和application-dev.properties不会存放相同的key内容,即application.properties有一个key,那么application-dev.properties和application-prod.properties中绝不会有这个相同的key内容。
- 第3种方案:如果非要使用@propertysource注解注入一个配置文件,那么一定指向自定义名称配置文件,千万不要指向以application-为前缀的配置文件。
如图1

如图2
注意点5:配置文件加载的优先级 > @propertysource注解注入
readproperties2
import lombok.data;
import org.springframework.beans.factory.annotation.value;
import org.springframework.context.annotation.propertysource;
import org.springframework.stereotype.component;

/**
 * @author 211145187
 * @date 2022/7/20 15:47
 **/
@propertysource(value = {"application.properties"})
@component
@data
public class readproperties2 {
    @value("${server.port}")
    private integer port;
}
readproperties4
import lombok.data;
import org.springframework.boot.context.properties.configurationproperties;
import org.springframework.context.annotation.propertysource;
import org.springframework.stereotype.component;

/**
 * @author 211145187
 * @date 2022/7/20 15:51
 **/
@configurationproperties(prefix = "spring.redis")//这个注解是用找到类    注意:@configurationproperties无法加载自定义配置问价内容,必须和@propertysource配合使用才能获取
@component  //生效的两种方式:方式1:配置@component,方式2:启动类添加@enableconfigurationproperties(readproperties.class)
@propertysource(value = {"classpath:application-prod.properties"})
@data
public class readproperties4 {
    private string port;
}
controller
import com.example.demo.config.readproperties;
import com.example.demo.config.readproperties2;
import com.example.demo.config.readproperties3;
import org.springframework.beans.factory.annotation.autowired;
import org.springframework.beans.factory.annotation.value;
import org.springframework.core.env.environment;
import org.springframework.core.io.classpathresource;
import org.springframework.core.io.resource;
import org.springframework.core.io.support.propertiesloaderutils;
import org.springframework.web.bind.annotation.getmapping;
import org.springframework.web.bind.annotation.restcontroller;

import java.io.ioexception;
import java.util.hashmap;
import java.util.map;
import java.util.properties;

/**
 * 测试读取配置文件的几种方式:
 * @author 211145187
 * @date 2022/7/20 14:02
 **/
@restcontroller
public class readapplicationproperties {
    @autowired
    private readproperties2 readproperties2;

	//测试方式4:通过@propertysource+@value注解读取配置信息
    @getmapping("/readapplicationproperties4")
    public void readapplicationproperties4(){
        system.out.println("通过@propertysource注解读取配置信息:" + readproperties2.getport());
    }
}
结果打印
![]()
测试方式5:通过@propertysource+@configurationproperties注解读取配置信息
readproperties3
import lombok.data;
import org.springframework.boot.context.properties.configurationproperties;
import org.springframework.context.annotation.propertysource;
import org.springframework.stereotype.component;

/**
 * @author 211145187
 * @date 2022/7/20 15:51
 **/
@configurationproperties(prefix = "demo")//这个注解是用找到类    注意:@configurationproperties无法加载自定义配置问价内容,必须和@propertysource配合使用才能获取
@component  //生效的两种方式:方式1:配置@component,方式2:启动类添加@enableconfigurationproperties(readproperties.class)
@propertysource(value = {"classpath:my.properties"})
@data
public class readproperties3 {
    private string name;
}
controller
import com.example.demo.config.readproperties;
import com.example.demo.config.readproperties2;
import com.example.demo.config.readproperties3;
import org.springframework.beans.factory.annotation.autowired;
import org.springframework.beans.factory.annotation.value;
import org.springframework.core.env.environment;
import org.springframework.core.io.classpathresource;
import org.springframework.core.io.resource;
import org.springframework.core.io.support.propertiesloaderutils;
import org.springframework.web.bind.annotation.getmapping;
import org.springframework.web.bind.annotation.restcontroller;

import java.io.ioexception;
import java.util.hashmap;
import java.util.map;
import java.util.properties;

/**
 * 测试读取配置文件的几种方式:
 * @author 211145187
 * @date 2022/7/20 14:02
 **/
@restcontroller
public class readapplicationproperties {
    @autowired
    private readproperties3 readproperties3;

	//测试方式5:通过@propertysource+@configurationproperties注解读取配置信息
    @getmapping("/readapplicationproperties5")
    public void readapplicationproperties5(){
        system.out.println("通过@propertysource+@configurationproperties注解读取配置信息:" + readproperties3);
    }
}
结果打印
![]()
测试方式6:通过properties读取配置信息
controller
import com.example.demo.config.readproperties;
import com.example.demo.config.readproperties2;
import com.example.demo.config.readproperties3;
import org.springframework.beans.factory.annotation.autowired;
import org.springframework.beans.factory.annotation.value;
import org.springframework.core.env.environment;
import org.springframework.core.io.classpathresource;
import org.springframework.core.io.resource;
import org.springframework.core.io.support.propertiesloaderutils;
import org.springframework.web.bind.annotation.getmapping;
import org.springframework.web.bind.annotation.restcontroller;

import java.io.ioexception;
import java.util.hashmap;
import java.util.map;
import java.util.properties;

/**
 * 测试读取配置文件的几种方式:
 * @author 211145187
 * @date 2022/7/20 14:02
 **/
@restcontroller
public class readapplicationproperties {
    //测试方式6:通过properties读取配置信息
    @getmapping("/readapplicationproperties6")
    public void readapplicationproperties6() throws ioexception {
        resource resource = new classpathresource("application-prod.properties");
        properties properties = propertiesloaderutils.loadproperties(resource);
        string root = properties.getproperty("logging.level.root");
        system.out.println("通过xproperties读取配置信息:" + root);
    }
}
结果打印
![]()
以上就是springboot中读取配置文件的6种方式总结的详细内容,更多关于springboot读取配置文件的资料请关注代码网其它相关文章!
赞 (0)
您想发表意见!!点此发布评论


发表评论