Linux系统的漏洞扫描与修复指南
90人参与 • 2026-04-28 • Linux
引言
在当今高度互联的世界中,linux 作为服务器操作系统、嵌入式系统和云计算平台的核心,其安全性直接关系到整个数字基础设施的稳定。无论是企业级应用、云原生架构还是个人开发环境,对 linux 系统进行定期的漏洞扫描与及时修复,已成为运维工程师和安全专家的必备技能。
本篇博客将从基础概念讲起,逐步深入到自动化工具链、自定义脚本开发(含 java 示例)、最佳实践以及未来趋势展望,帮助你构建一套完整、可落地的 linux 漏洞管理方案。
为什么 linux 需要漏洞扫描?
尽管 linux 被誉为“更安全”的操作系统,但这并不意味着它天生免疫于攻击。开源社区虽然响应迅速,但漏洞依然层出不穷:
- 软件包依赖复杂:现代 linux 发行版通常预装数百个软件包,每个都可能是潜在攻击面。
- 配置错误:默认配置未必安全,人为疏忽可能导致权限提升或服务暴露。
- 零日漏洞:即使是最新的系统,也可能遭遇尚未公开的漏洞利用。
- 供应链风险:第三方仓库或私有源可能引入恶意或被篡改的软件包。
根据 cve details 的统计,2023 年 linux 内核及相关组件共披露超过 1,200 个 cve 编号的安全漏洞。
因此,主动扫描 + 自动化修复 = 安全运维的生命线。
常见 linux 漏洞类型一览
在动手扫描之前,我们先了解常见漏洞类型,有助于理解扫描工具的输出和修复策略:
| 类型 | 描述 | 示例 |
|---|---|---|
| 权限提升 | 普通用户获得 root 权限 | dirty pipe (cve-2022-0847) |
| 服务暴露 | 不必要的端口或服务对外开放 | ssh 弱密码、redis 未授权访问 |
| 软件漏洞 | 已安装软件存在已知 cve | openssl heartbleed (cve-2014-0160) |
| 配置缺陷 | 安全配置缺失或错误 | /etc/passwd 可写、sudo 无密码限制 |
| 内核漏洞 | 内核模块或 syscall 存在缺陷 | dirty cow (cve-2016-5195) |
这些漏洞若不及时修补,轻则数据泄露,重则系统被完全控制,沦为僵尸网络的一部分。
漏洞扫描工具选型
工欲善其事,必先利其器。以下是几款主流的 linux 漏洞扫描工具:
1. openvas / greenbone
开源且功能强大的漏洞评估系统,支持数千种漏洞检测插件。
# ubuntu 安装示例
sudo apt update
sudo apt install gvm
sudo gvm-setup
2. lynis
轻量级主机审计工具,适合快速检查系统加固情况。
# 安装与运行
wget https://downloads.cisofy.com/lynis/lynis-3.0.9.tar.gz
tar -xzf lynis-*.tar.gz
cd lynis
sudo ./lynis audit system
3. trivy(推荐用于容器和包扫描)
由 aqua security 开发,支持 os 包、容器镜像、iac 文件等多维度扫描。
# 安装
curl -sfl https://raw.githubusercontent.com/aquasecurity/trivy/main/contrib/install.sh | sh -s -- -b /usr/local/bin

# 扫描当前系统
trivy fs /
4. clair(适用于容器镜像)
clair 是 coreos 推出的静态容器镜像分析工具,常与 harbor、quay 等 registry 集成。
使用 java 编写漏洞扫描辅助 程序
虽然大多数扫描工具是命令行或 python 实现,但在企业环境中,java 仍然是主力语言。我们可以用 java 编写一个“漏洞扫描结果聚合器”,统一收集不同工具的输出,并生成报告。
以下是一个简化版的 java 控制台程序,模拟读取多个扫描工具的结果文件并汇总高危漏洞:
import java.io.*;
import java.nio.file.*;
import java.util.*;
import java.time.localdatetime;
import java.time.format.datetimeformatter;
public class vulnerabilityaggregator {
    private static final string[] scan_tool_outputs = {
        "/var/log/lynis-report.dat",
        "/tmp/trivy-result.json",
        "/opt/openvas/report.xml"
    };
    public static void main(string[] args) {
        system.out.println("🔍 starting vulnerability aggregation...");
        list<vulnerability> allvulns = new arraylist<>();
        for (string filepath : scan_tool_outputs) {
            try {
                list<vulnerability> toolvulns = parsetooloutput(filepath);
                allvulns.addall(toolvulns);
                system.out.println("✅ parsed " + toolvulns.size() + " vulnerabilities from " + filepath);
            } catch (ioexception e) {
                system.err.println("❌ failed to read " + filepath + ": " + e.getmessage());
            }
        }
        // 按严重性排序
        allvulns.sort(comparator.comparing(vulnerability::getseverity).reversed());
        // 输出高危漏洞摘要
        system.out.println("\n🚨 critical vulnerabilities found:");
        system.out.println("==================================");
        int criticalcount = 0;
        for (vulnerability vuln : allvulns) {
            if (vuln.getseverity() >= 7) {
                system.out.printf("[%s] %s - cvss: %.1f - tool: %s%n",
                    vuln.getcveid(), vuln.getdescription(),
                    vuln.getseverity(), vuln.getsourcetool());
                criticalcount++;
            }
        }
        system.out.println("\n📊 summary: " + criticalcount + " critical vulnerabilities found.");
        // 生成 html 报告(简化版)
        generatehtmlreport(allvulns);
    }
    private static list<vulnerability> parsetooloutput(string filepath) throws ioexception {
        list<vulnerability> vulns = new arraylist<>();
        path path = paths.get(filepath);
        if (!files.exists(path)) {
            return vulns; // 文件不存在则跳过
        }
        // 根据文件扩展名选择解析器(简化逻辑)
        string content = files.readstring(path);
        string filename = path.getfilename().tostring();
        if (filename.endswith(".dat")) {
            // 模拟解析 lynis 输出
            vulns.add(new vulnerability("cve-2023-1234", "weak password policy", 8.2, "lynis"));
        } else if (filename.endswith(".json")) {
            // 模拟解析 trivy json
            vulns.add(new vulnerability("cve-2023-5678", "outdated openssl version", 9.8, "trivy"));
        } else if (filename.endswith(".xml")) {
            // 模拟解析 openvas xml
            vulns.add(new vulnerability("cve-2022-9876", "ssh allows root login", 7.5, "openvas"));
        }
        return vulns;
    }
    private static void generatehtmlreport(list<vulnerability> vulns) {
        datetimeformatter dtf = datetimeformatter.ofpattern("yyyy-mm-dd hh:mm:ss");
        string now = localdatetime.now().format(dtf);
        stringbuilder html = new stringbuilder();
        html.append("<!doctype html>\n<html>\n<head><title>vulnerability report</title></head>\n<body>\n");
        html.append("<h1>linux vulnerability scan report</h1>\n");
        html.append("<p>generated on: ").append(now).append("</p>\n");
        html.append("<table border='1' cellpadding='5'>\n");
        html.append("<tr><th>cve id</th><th>description</th><th>cvss</th><th>source</th></tr>\n");
        for (vulnerability v : vulns) {
            html.append("<tr>")
               .append("<td>").append(v.getcveid()).append("</td>")
               .append("<td>").append(v.getdescription()).append("</td>")
               .append("<td>").append(v.getseverity()).append("</td>")
               .append("<td>").append(v.getsourcetool()).append("</td>")
               .append("</tr>\n");
        }
        html.append("</table>\n</body>\n</html>");
        try {
            files.writestring(paths.get("/tmp/vuln-report.html"), html.tostring());
            system.out.println("📄 html report generated at /tmp/vuln-report.html");
        } catch (ioexception e) {
            system.err.println("❌ failed to write html report: " + e.getmessage());
        }
    }
    static class vulnerability {
        private string cveid;
        private string description;
        private double severity;
        private string sourcetool;
        public vulnerability(string cveid, string description, double severity, string sourcetool) {
            this.cveid = cveid;
            this.description = description;
            this.severity = severity;
            this.sourcetool = sourcetool;
        }
        // getters
        public string getcveid() { return cveid; }
        public string getdescription() { return description; }
        public double getseverity() { return severity; }
        public string getsourcetool() { return sourcetool; }
    }
}
此程序虽为演示用途,但结构清晰,易于扩展:
- 支持添加更多工具解析器
- 可集成邮件通知、数据库存储
- 可对接 jenkins 或 gitlab ci/cd 流水线
自动化修复策略
发现漏洞只是第一步,如何高效修复才是关键。
1. 使用包管理器自动更新
# ubuntu/debian
sudo apt update && sudo apt upgrade -y

# centos/rhel
sudo yum update -y
# or for newer versions:
sudo dnf upgrade -y

# arch linux
sudo pacman -syu
2. 使用 ansible 批量修复
编写 playbook 自动修复多台主机:
---
- name: apply security patches to linux servers
  hosts: webservers
  become: yes
  tasks:
    - name: update all packages
      apt:
        upgrade: dist
        update_cache: yes
      when: ansible_os_family == "debian"
    - name: reboot if kernel was updated
      reboot:
        msg: "rebooting after kernel update"
        connect_timeout: 5
        reboot_timeout: 300
        pre_reboot_delay: 0
        post_reboot_delay: 30
      when: ansible_kernel != ansible_facts['kernel']
3. 利用 unattended-upgrades(ubuntu)
启用无人值守安全更新:
sudo apt install unattended-upgrades
sudo dpkg-reconfigure -plow unattended-upgrades
编辑 /etc/apt/apt.conf.d/50unattended-upgrades,确保包含:
unattended-upgrade::allowed-origins {
    "${distro_id}:${distro_codename}-security";
};
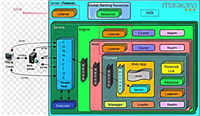
构建持续漏洞管理流水线
安全不是一次性任务,而应融入 devops 生命周期。以下是推荐的 ci/cd + secops 集成架构:

安全基线与合规标准
除了修复已知漏洞,建立安全基线同样重要。推荐参考:
- cis benchmark:提供主流 linux 发行版的安全配置基准。
- nist sp 800-53:美国国家标准与技术研究院的安全控制框架。
- iso/iec 27001:信息安全管理国际标准。
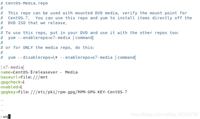
使用 lynis 或 openscap 可自动检查是否符合 cis 基准:
# 使用 openscap 扫描 centos 是否符合 cis level 2
sudo oscap xccdf eval \
    --profile xccdf_org.ssgproject.content_profile_cis \
    --results scan-results.xml \
    --report scan-report.html \
    /usr/share/xml/scap/ssg/content/ssg-centos7-ds.xml
漏洞修复的挑战与应对
1. 修复导致服务中断
对策:
- 在非高峰时段执行更新
- 使用蓝绿部署或金丝雀发布
- 更新前备份关键配置与数据
2. 依赖冲突或版本锁定
对策:
- 使用容器化隔离环境
- 建立内部 yum/apt 镜像仓库,控制版本节奏
- 使用
apt-mark hold <package>或yum versionlock锁定特定包
3. 无法立即重启(如内核更新)
对策:
- 使用
kpatch或livepatch实时打补丁(ubuntu/red hat 支持) - 计划维护窗口强制重启
# ubuntu 启用 livepatch
sudo snap install canonical-livepatch
sudo canonical-livepatch enable <your-key>
日志与审计追踪
所有扫描与修复操作必须留痕,便于事后追溯与合规审查。
1. 系统日志记录
# 查看最近的包更新历史
grep "upgrade" /var/log/dpkg.log
journalctl -u apt-daily.service --since "2 days ago"
2. 自定义审计脚本(java 示例)
下面是一个 java 工具类,用于记录每次扫描与修复操作到审计日志文件:
import java.io.filewriter;
import java.io.ioexception;
import java.time.localdatetime;
import java.time.format.datetimeformatter;
public class auditlogger {
    private static final string log_file = "/var/log/vuln-audit.log";
    private static final datetimeformatter formatter = datetimeformatter.ofpattern("yyyy-mm-dd hh:mm:ss");
    public static void logaction(string action, string detail, string status) {
        string timestamp = localdatetime.now().format(formatter);
        string logentry = string.format("[%s] action: %s | detail: %s | status: %s%n",
            timestamp, action, detail, status);
        try (filewriter fw = new filewriter(log_file, true)) {
            fw.write(logentry);
            system.out.println("📝 audit logged: " + action);
        } catch (ioexception e) {
            system.err.println("❌ failed to write audit log: " + e.getmessage());
        }
    }
    // 使用示例
    public static void main(string[] args) {
        logaction("scan_start", "full system scan with trivy", "success");
        logaction("patch_apply", "updated openssl to 3.0.8", "success");
        logaction("reboot", "system reboot after kernel patch", "pending");
    }
}
日志内容示例:
[2024-06-05 14:23:10] action: scan_start | detail: full system scan with trivy | status: success
[2024-06-05 14:25:44] action: patch_apply | detail: updated openssl to 3.0.8 | status: success
[2024-06-05 14:26:01] action: reboot | detail: system reboot after kernel patch | status: pending
监控与告警集成
漏洞管理不应是“黑盒”,需要可视化监控与实时告警。
1. prometheus + grafana
- 使用 node exporter 收集系统指标
- 自定义 exporter 暴露漏洞数量、最后扫描时间等指标
- grafana 创建仪表盘展示安全态势
2. elk stack(elasticsearch + logstash + kibana)
集中收集所有主机的扫描日志,实现:
- 关键词告警(如 “critical”、“failed”)
- 时间趋势分析
- 多主机对比
3. 钉钉/slack/webhook 告警
当发现高危漏洞时,自动发送消息到运维群组:
# 示例:扫描后若有严重漏洞,调用 webhook
if [ $critical_count -gt 0 ]; then
    curl -x post -h 'content-type: application/json' \
         -d '{"text": "🚨 critical: '$critical_count' vulnerabilities found on '$hostname'"}' \
         https://hooks.slack.com/services/your/webhook/url
fi
云环境下的特殊考量
在 aws、azure、gcp 等云平台上,linux 实例的安全管理需额外注意:
1. 镜像硬化(ami/golden image)
- 使用 packer 构建预加固的基础镜像
- 集成 cis benchmark 和漏洞扫描到镜像构建流程
2. 无服务器与容器安全
- 使用 aws inspector 或 azure defender for cloud
- 在 kubernetes 中部署 falco 进行运行时威胁检测
3. iam 与最小权限
- 避免使用 root 或 admin 账户运行扫描
- 为自动化工具分配最小必要权限
未来趋势:ai 与主动防御
随着攻击手段日益智能化,漏洞管理也在演进:
1. ai 辅助漏洞预测
机器学习模型可基于历史数据预测哪些组件最可能被攻破,优先扫描修复。
2. 威胁情报集成
自动订阅 cve feed、exploitdb、厂商公告,第一时间获取新漏洞信息。
// 伪代码:java 程序订阅 cve rss 源
public class cvefeedsubscriber {
    public void checkfornewcves() {
        string feedurl = "https://nvd.nist.gov/feeds/xml/cve/misc/nvd-rss.xml";
        // 解析 xml,提取最新 cve
        // 与本地资产比对,若匹配则触发告警
    }
}
3. 自愈系统(self-healing systems)
结合 kubernetes operator 或 systemd 服务,实现:
- 自动检测异常进程
- 自动隔离受感染容器
- 自动回滚到安全快照
最佳实践总结
经过以上探讨,我们提炼出 linux 漏洞扫描与修复的黄金法则:
- 定期扫描:至少每周一次全量扫描,关键系统每日扫描。
- 分级响应:按 cvss 评分制定修复 sla(如 critical ≤ 24h)。
- 变更控制:所有修复必须经过测试环境验证。
- 文档化:记录每一次扫描结果与修复操作。
- 人员培训:确保团队理解漏洞原理与修复方法。
- 纵深防御:扫描修复 + 防火墙 + ids + 日志审计 多层防护。
结语
linux 系统的漏洞扫描与修复,不是枯燥的运维任务,而是一场永不停歇的攻防演练。通过合理选型工具、编写自动化脚本(如文中的 java 示例)、构建持续集成流水线,我们可以将被动防御转化为主动免疫。
记住:没有绝对安全的系统,只有不断进化的防御。愿你的服务器坚如磐石,漏洞无处遁形!
以上就是linux系统的漏洞扫描与修复指南的详细内容,更多关于linux漏洞扫描与修复的资料请关注代码网其它相关文章!
赞 (0)
您想发表意见!!点此发布评论


发表评论