Nginx 1.28.0 源码编译安装与自定义网页部署详细指南
2人参与 • 2026-05-11 • 阿里
一、前置说明
- 安装包:
nginx-1.28.0.tar.gz,已上传至/root目录 - 系统:centos 7.x(适配你当前的环境)
- 安装方式:源码编译安装,默认安装到
/usr/local/nginx - 前置依赖:gcc、pcre、zlib、openssl(脚本自动安装)
二、一键安装脚本(推荐直接使用)
vim /root/nginx_install.sh
- 脚本如下:
#!/bin/bash
# nginx 1.28.0 源码编译安装脚本(centos 7.x,root执行)
# ==================== 配置参数 ====================
nginx_version="1.28.0"
nginx_package="/root/nginx-${nginx_version}.tar.gz"
install_path="/usr/local/nginx"
# =================================================
# 1. 检查root权限
if [ $uid -ne 0 ]; then
    echo "请使用root用户执行此脚本!"
    exit 1
fi
# 2. 检查安装包是否存在
if [ ! -f "${nginx_package}" ]; then
    echo "错误:/root目录下未找到nginx-${nginx_version}.tar.gz安装包!"
    exit 1
fi
# 3. 安装编译依赖
echo "===== 安装编译依赖 ====="
yum install -y gcc gcc-c++ make pcre pcre-devel zlib zlib-devel openssl openssl-devel
# 4. 解压源码包
echo "===== 解压nginx源码包 ====="
cd /root
tar -zxf nginx-${nginx_version}.tar.gz
cd nginx-${nginx_version}
# 5. 配置编译参数(含ssl、gzip、rewrite等核心模块)
echo "===== 配置编译参数 ====="
./configure \
--prefix=${install_path} \
--with-http_ssl_module \
--with-http_gzip_static_module \
--with-http_stub_status_module \
--with-http_realip_module \
--with-pcre
# 6. 编译并安装
echo "===== 编译并安装nginx ====="
make && make install
# 7. 配置环境变量(方便直接调用nginx命令)
echo "===== 配置环境变量 ====="
if ! grep -q "nginx" /etc/profile; then
    echo "export path=\$path:${install_path}/sbin" >> /etc/profile
fi
source /etc/profile
# 8. 创建系统服务(systemd管理,开机自启)
echo "===== 创建nginx系统服务 ====="
cat > /usr/lib/systemd/system/nginx.service << eof
[unit]
description=nginx web server
after=network.target
[service]
type=forking
execstart=${install_path}/sbin/nginx
execreload=${install_path}/sbin/nginx -s reload
execstop=${install_path}/sbin/nginx -s stop
privatetmp=true
[install]
wantedby=multi-user.target
eof
# 重载systemd配置并设置开机自启
systemctl daemon-reload
systemctl enable nginx
# 9. 开放防火墙端口(80/443)
echo "===== 开放防火墙端口 ====="
firewall-cmd --add-service=http --permanent
firewall-cmd --add-service=https --permanent
firewall-cmd --reload
# 10. 启动nginx并验证
echo "===== 启动nginx并验证 ====="
systemctl start nginx
sleep 2
if ps aux | grep nginx | grep -v grep > /dev/null; then
    echo "====================================="
    echo "✅ nginx ${nginx_version} 安装成功!"
    echo "安装路径:${install_path}"
    echo "配置文件:${install_path}/conf/nginx.conf"
    echo "网页目录:${install_path}/html"
    echo "启动命令:systemctl start nginx"
    echo "访问地址:http://你的服务器ip"
    echo "====================================="
else
    echo "❌ nginx 启动失败,请检查安装日志!"
    exit 1
fi
赋权执行脚本+重新加载环境变量
chmod +x nginx_install.sh
sh /root/nginx_install.sh
source /etc/profile
三、手动分步安装流程(可选)
步骤1:安装编译依赖
yum install -y gcc gcc-c++ make pcre pcre-devel zlib zlib-devel openssl openssl-devel
步骤2:解压源码包
cd /root
tar -zxf nginx-1.28.0.tar.gz
cd nginx-1.28.0
步骤3:配置编译参数
./configure \
--prefix=/usr/local/nginx \
--with-http_ssl_module \
--with-http_gzip_static_module \
--with-http_stub_status_module \
--with-http_realip_module \
--with-pcre
步骤4:编译并安装
make && make install
步骤5:配置环境变量
echo "export path=\$path:/usr/local/nginx/sbin" >> /etc/profile
source /etc/profile
步骤6:创建systemd服务
cat > /usr/lib/systemd/system/nginx.service << eof
[unit]
description=nginx web server
after=network.target
[service]
type=forking
execstart=/usr/local/nginx/sbin/nginx
execreload=/usr/local/nginx/sbin/nginx -s reload
execstop=/usr/local/nginx/sbin/nginx -s stop
privatetmp=true
[install]
wantedby=multi-user.target
eof
# 重载配置并设置开机自启
systemctl daemon-reload
systemctl enable nginx
步骤7:开放防火墙端口
firewall-cmd --add-service=http --permanent
firewall-cmd --add-service=https --permanent
firewall-cmd --reload
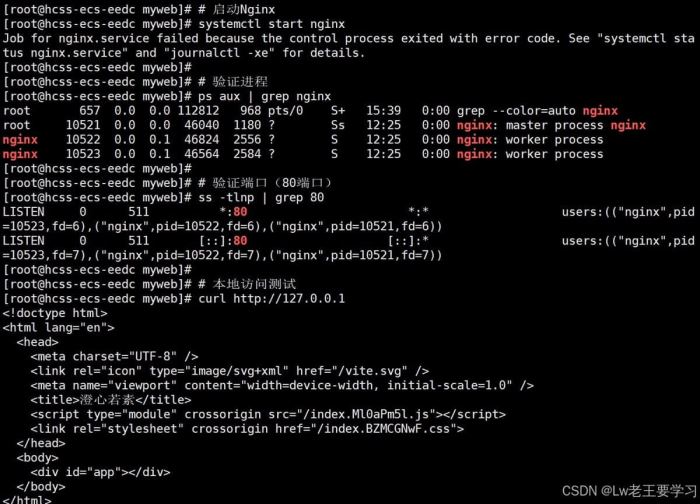
步骤8:启动并验证
# 启动nginx
systemctl start nginx
# 验证进程
ps aux | grep nginx
# 验证端口(80端口)
ss -tlnp | grep 80
# 本地访问测试
curl http://127.0.0.1
步骤9、自定义html文件部署步骤
替换默认首页(快速测试)
如果仅需替换nginx默认的欢迎页,直接将自定义的index.html覆盖默认文件即可:
# 备份默认首页(可选)
cp /usr/local/nginx/html/index.html /usr/local/nginx/html/index.html.bak
# 将本地自定义的index.html上传到服务器(示例用scp,也可通过rz、ftp等方式)
scp /本地路径/index.html root@你的服务器ip:/usr/local/nginx/html/
# 刷新页面即可访问(无需重启nginx)
----#####我这里用的xftp¥¥¥¥¥----

四、安装后核心目录说明
| 目录/文件 | 作用说明 |
|---|---|
/usr/local/nginx/conf/nginx.conf | 主配置文件,所有反向代理、站点配置都在这里 |
/usr/local/nginx/conf/conf.d/ | 自定义站点配置目录(可手动创建,在nginx.conf中include) |
/usr/local/nginx/html/ | 默认网页根目录,部署前端项目时将文件放在这里 |
/usr/local/nginx/logs/ | 日志目录,包含access.log(访问日志)和error.log(错误日志) |
/usr/local/nginx/sbin/nginx | nginx主程序,可直接执行命令(如nginx -s reload重载配置) |
五、常用管理命令
# 启动nginx
systemctl start nginx
# 停止nginx
systemctl stop nginx
# 重启nginx
systemctl restart nginx
# 重载配置(修改配置文件后用,不中断服务)
systemctl reload nginx
# 或直接用主程序
nginx -s reload
# 检查配置文件语法
nginx -t
# 查看nginx状态
systemctl status nginx
# 查看nginx进程
ps aux | grep nginx
# 查看端口占用
ss -tlnp | grep nginx
六、部署前端项目示例
- 将前端打包文件上传至
/usr/local/nginx/html/你的项目目录(如/usr/local/nginx/html/frontend) - 编辑配置文件
/usr/local/nginx/conf/nginx.conf,添加站点配置:
server {
    listen 80;
    server_name 你的服务器ip;
    location / {
        root /usr/local/nginx/html/frontend;
        index index.html index.htm;
        try_files $uri $uri/ /index.html; # 解决spa路由刷新404问题
    }
    # 反向代理后端接口示例
    location /api {
        proxy_pass http://127.0.0.1:8080;
        proxy_set_header host $host;
        proxy_set_header x-real-ip $remote_addr;
    }
}- 检查配置并重载:
nginx -t && nginx -s reload
七、常见问题排查
- 端口被占用:执行
ss -tlnp | grep 80查看占用进程,停止占用进程或修改nginx监听端口 - 配置文件语法错误:
nginx -t会明确提示错误位置,根据提示修改配置文件 - 访问403 forbidden:检查网页目录权限,确保nginx进程用户(默认nobody)有读取权限
- 无法访问:检查防火墙是否开放80/443端口,服务器安全组是否放行
到此这篇关于nginx 1.28.0 源码编译安装与自定义网页部署简明指南的文章就介绍到这了,更多相关nginx 1.28.0 源码编译安装内容请搜索代码网以前的文章或继续浏览下面的相关文章希望大家以后多多支持代码网!
赞 (0)
您想发表意见!!点此发布评论


发表评论