React 的 KeepAlive 实战指南:深度解析组件缓存机制
246人参与 • 2024-08-04 • 大数据
vue 的 keep-alive 组件是用于缓存组件的高阶组件,可以有效地提高应用性能。它能够使组件在切换时仍能保留原有的状态信息,并且有专门的生命周期方便去做额外的处理。该组件在很多场景非常有用,比如:
· tabs 缓存页面
· 分步表单
· 路由缓存
在 vue 中,通过 keepalive 包裹内的组件会自动缓存下来, 其中只能有一个直接子组件。
<keepalive>
  // <component 语法相当于 react的{showa ? <a /> : <b />}
   <component :is="showa ? 'a' : 'b'">
</keepalive>
可惜的是 react 官方目前并没有对外正式提供的 keepalive 组件,但是我们可以参考 vue 的使用方式与 api 设计,实现一套 react 版本的 keepalive。
下文将为大家详细介绍三种不同的实现方式。
style 隐藏法
style 隐藏法是最简单方便的方式,直接使用 display: none 来代替组件的销毁。
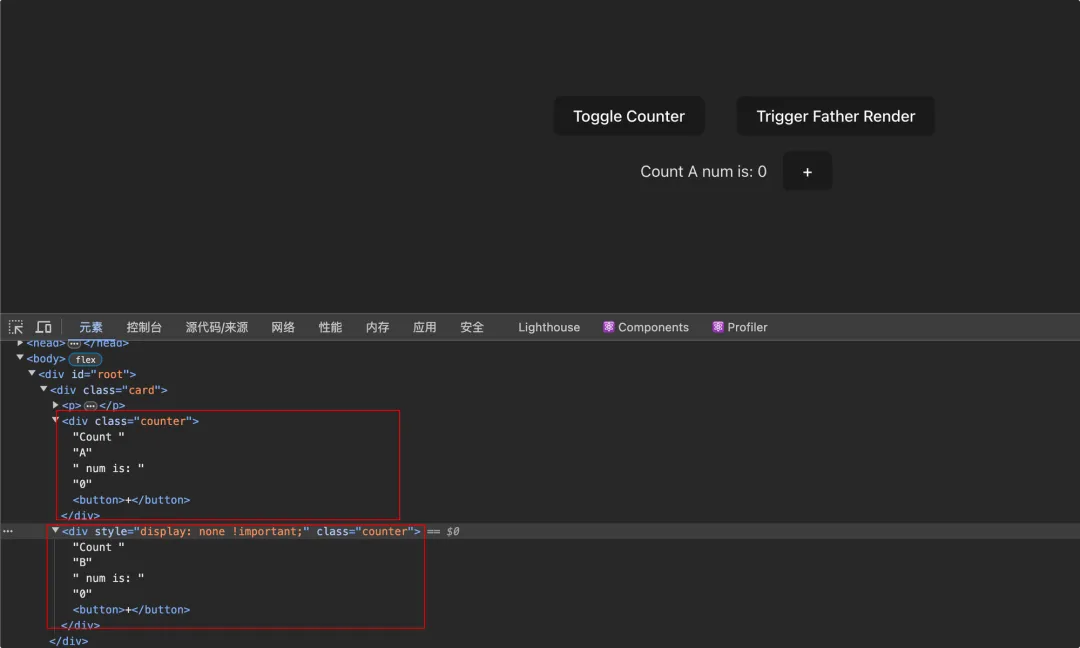
封装一个 stylekeepalive 组件,传入的 showcomponentname 属性表示当前要展示的组件名,同时 children 组件都需要定义下组件名 name。
const stylekeepalive: react.fc<any> = ({children, showcomponentname}) => {
    return (
        <>
            {react.children.map(children, (child) => (
                <div
                    style={{
                        display: child.props.name === showcomponentname ? "block" : "none",
                    }}
                >
                    {child}
                </div>
            ))}
        </>
    );
}

// 使用
<stylekeepalive showcomponentname={countername}>
      <counter name="a" />
      <counter name="b" />
</stylekeepalive>
假如就这样写,勉强能实现要求,但会带来以下问题:
· 第一次挂载时每个子组件都会渲染一遍
· 父组件 render ,会导致子组件 render ,即使该组件目前是隐藏状态
· 对实际 dom 结构具有侵入式,如会为每个子组件包一层 div 用来控制 display 样式
我们研究下antd的tabs 组件,其 tabpane 也是通过 display 来控制显隐的, 动态设置.ant-tabs-tabpane-hidden 类来切换。
可是它并没有一次性就把所有 tabpane 渲染出来,active 过一次后再通过类名来做控制显隐,且切换 tab后,除了第一次挂载会 render ,后续切换 tab 都不会 rerender 。
为了实现与 tabs 一样的效果,我们稍加改造 stylekeepalive 组件, 对传入的 children 包裹一层 shouldrender 组件,该组件实现初次挂载时只渲染当前激活的子组件, 且只有在组件激活时才会进行 rerender 。
const shouldrender = ({ children, visible }: any) => {
    // 是否已经挂载
    const renderedref = useref(false);
    // 缓存子组件,避免不必要的渲染
    const childref = useref();

    if (visible) {
        renderedref.current = true;
        childref.current = children();
    }

    if (!renderedref.current) return null;

    return (
        <div
            style={{
                display: visible ? "block" : "none",
            }}
        >
            {childref.current}
        </div>
    );
};

const stylekeepalive: react.fc<any> = ({children, showcomponentname}) => {
    return (
        <>
            {react.children.map(children, (child) => {
                const visible = child.props.name === showcomponentname;
                return (
                    <shouldrender visible={visible}>
                       {() => child}
                    </shouldrender>
                );
            })}
        </>
    );
}
再来看看效果,我们实现了懒加载,但与antd 的 tabs 不同的是, 父组件 render 时,我们对隐藏的子组件不会再进行 render , 这样能很大程度的减少性能影响。
这种方式虽然通过很简易的代码就实现了我们需要的 keepalive 功能,但其仍需要保留 dom 元素,在某些大数据场景下可能存在性能问题,并且以下面这种使用方法,会使开发者感觉到它是一次性渲染所有子组件。
<stylekeepalive showcomponentname={componentname}>
      <counter name="a" />
      <counter name="b" />
</stylekeepalive>

// api可改写成这种形式更加直观, 且name也不再需要传
<stylekeepalive active={isactive}>
      <counter />
</stylekeepalive>
<stylekeepalive active={isactive}>
      <counter />
</stylekeepalive>
suspense 法
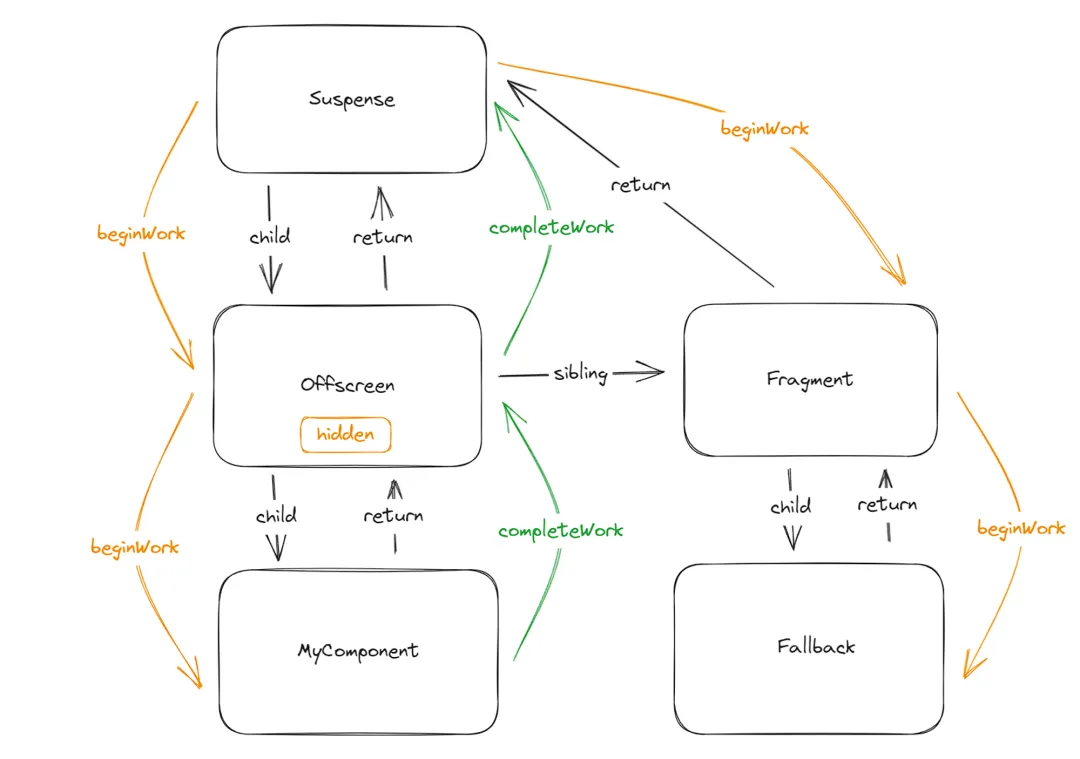
suspense 内部使用了 offscreen 组件,这是一个类似于 keepalive 的组件,如下图所示,suspense 的 children 会通过 offscreen 包裹一层,因为 fallback 组件和 children 组件可能会多次进行切换。
既然 offscreen 可以看成 react 内部的 keepalive 组件,那我们下面深入研究下它的特性。
由于offscreen 目前还是unstable状态,我们安装试验性版本的 react 和 react-dom 可以去尝试这个组件。
pnpm add react@experimental react-dom@experimental
在组件中导入,注意:offscreen 在今年某个版本后统一更名为了 activity 。更名后其实更能体现出 keepalive 激活与失活的状态特性。
import { unstable_activity as offscreen } from "react";
offscreen组件的使用方式也很简单,只有一个参数 mode: "visible" | "hidden"。
<offscreen mode={countername === "a" ? "visible" : "hidden"}>
    <counter name="a" />
</offscreen>
<offscreen mode={countername === "b" ? "visible" : "hidden"}>
    <counter name="b" />
</offscreen>
我们再看看实际的页面效果:
第一次组件挂载时,竟然把应该隐藏的组件也渲染出来了,而且也是通过样式来控制显式隐藏的。
这乍看上去是不合理的,我们期望初次挂载时不要渲染失活的组件,否则类似于 tabs 搭配数据请求的场景就不太适合了,我们不应该一次性请求所有 tabs 中的数据。
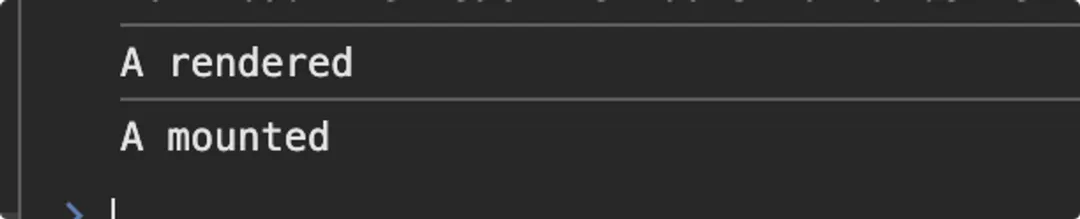
但先别急,我们看看useeffect的执行情况,子组件中加入以下代码debug:
console.log(`${name} rendered`)

useeffect(() => {
    console.log(`${name} mounted`)
    return () => {
        console.log(`${name} unmounted`)
    }
}, [])
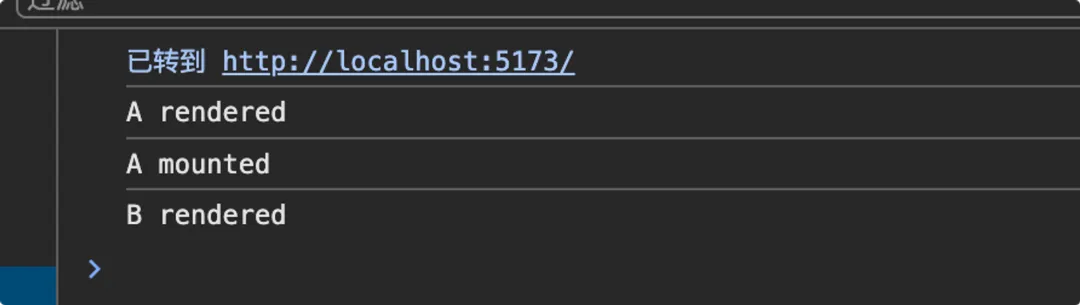
我们可以观察到,只有激活的组件a执行了 useeffect ,失活的组件b只是进行了一次pre-render 。
切换一次组件后,a组件卸载了,但是它最后又render了一次, 这是因为父组件中的 countername更新了,导致子组件更新 。

我们得出结论:
通过 offscreen 包裹的组件, useeffect 在每次激活时都会执行一次,且每次父组件更新都会导致其进行render。
虽然激活才会调用 useeffect 的机制解决了副作用会全部执行的问题,但对失活组件的pre-render 是否会造成性能影响?
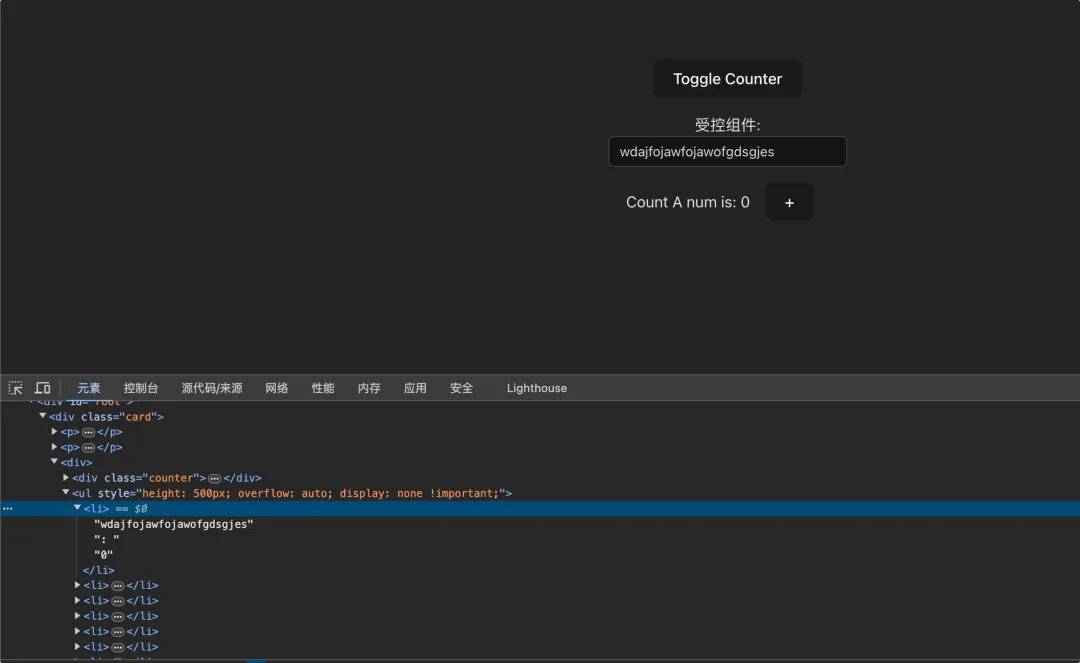
进行下性能测试,对比使用常规 display 去实现的方法, 其中longlist 渲染20000条数据,且每条数据渲染依赖于参数 value, value 为受控组件控制,那么当我们在父组件进行输入时,是否会有卡顿呢?
const stylekeepalivenoperf: react.fc<any> = ({children, showcomponentname}) => {
return (
<>
{react.children.map(children, (child) => (
<div
style={{
display: child.props.name === showcomponentname ? "block" : "none",
}}
>
{child}
</div>
))}
</>
);
}
const longlist = ({value}: any) => {
const [list] = usestate(new array(20000).fill(0))
return (
<ul style={{ height: 500, overflow: "auto" }}>
{list.map((_, index) => (
<li key={index}>{value}: {index}</li>
))}
</ul>
);
}
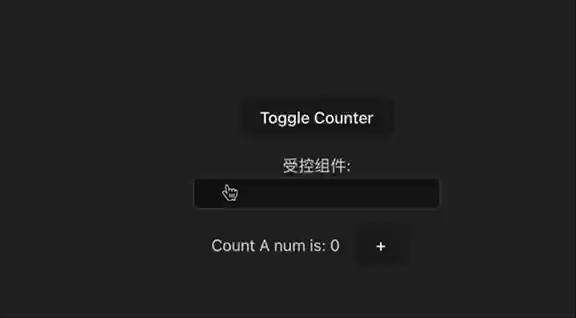
const performancetest = () => {
const [activecomponent, setactivecomponent] = usestate('a');
const [value, setvalue] = usestate('');
return (
<div classname="card">
<p>
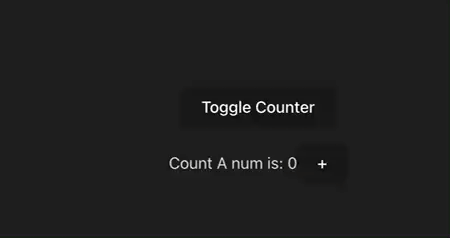
<button
onclick={() =>
setactivecomponent((val) => (val === "a" ? "b" : "a"))
}
>
toggle counter
</button>
</p>
<p>
受控组件:
<input
value={value}
onchange={(e) => setvalue(e.target.value)}
/>
</p>
<div>
{/* 1. 直接使用display进行keep-alive */}
<stylekeepalivenoperf showcomponentname={activecomponent}>
<counter name="a" />
<longlist value={value} name="b" />
</stylekeepalivenoperf>
{/* 2. 使用offscreen */}
<offscreen mode={activecomponent === 'a' ? 'visible' : 'hidden'}>
<counter name="a" />
</offscreen>
<offscreen mode={activecomponent === 'b' ? 'visible' : 'hidden'}>
<longlist value={value}/>
</offscreen>
</div>
</div>
);
}
● 使用 stylekeepalivenoperf
● 使用 offscreen
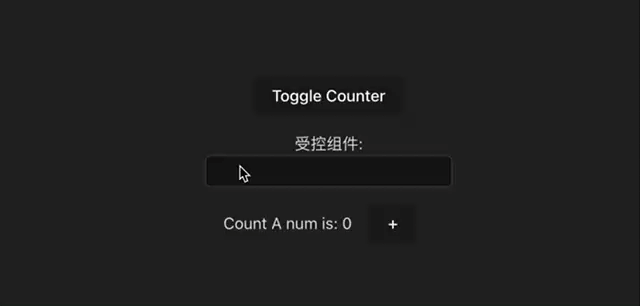
我们可以看到,使用offscreen 下几乎没有任何性能影响,且查看dom树,即使失活的longlist组件也照样被渲染出来了。
这样看来,使用 offscreen 不但不会有性能影响,还有 pre-render 带来的某种意义上的性能提升。
这得益于react的 concurrent 模式,高优先级的组件会打断低优先级的组件的更新,用户输入事件拥有着最高的优先级,而 offscreen 组件在失活时拥有着最低的优先级。如下为 lane 模型中的优先级:

我们再与优化过的 stylekeepalive 组件比较,该组件对失活的组件不会进行 render,所以在进行输入时也非常流畅,但当我们切换组件渲染 longlist 时,出现了明细的卡顿掉帧,毕竟需要重新 render 一个长列表。而 offscreen 在进行组件切换时就显得非常流畅了,只有 dispaly 改变时产生的重排导致的短暂卡顿感。
因此我们得出结论,使用offscreen优于第一种style方案。
由于该组件还是 unstable 的,我们无法直接在项目中使用,所以我们需要利用已经正式发布的 suspense 去实现 offscreen 版的 keepalive 。
suspense 需要让子组件内部 throw 一个 promise 错误来进行 children 与 fallback 间切换,那么我们只需要在激活时渲染 children , 失活时 throw promise ,就能快速的实现 keepalive 。
const wrapper = ({children, active}: any) => {
    const resolveref = useref();

    if (active) {
        resolveref.current && resolveref.current();
        resolveref.current = null;
    } else {
        throw new promise((resolve) => {
           resolveref.current = resolve;
        })
    }

    return children;
}

const offscreenkeepalive = ({children, active}: any) => {
    return <suspense>
        <wrapper active={active}>
            {children}
        </wrapper>
    </suspense>
}
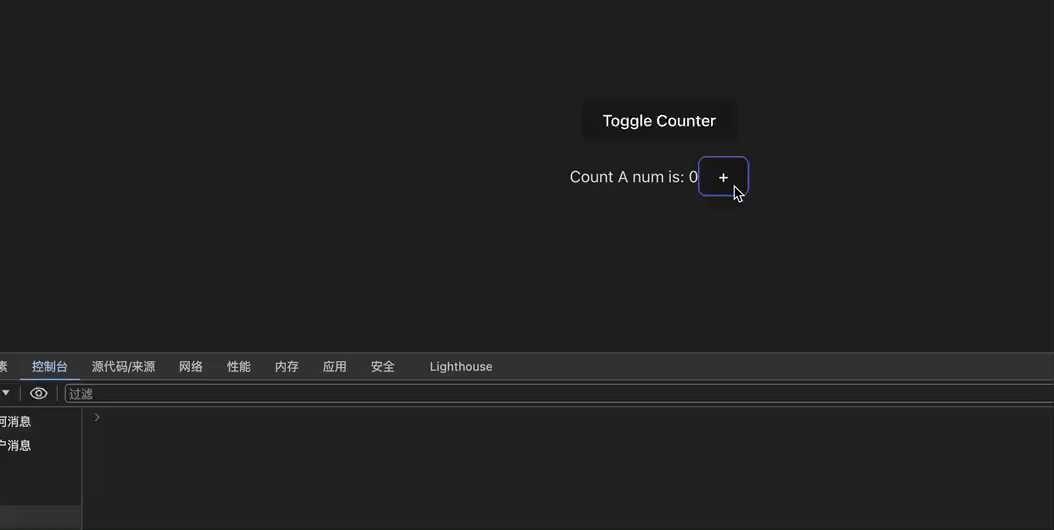
我们来看看实际效果。
初次渲染情况:
切换组件后渲染情况:

这与直接使用 offscreen 的效果并不一致。
· 初次渲染只会渲染当前激活的组件,这是因为 suspense 会在 render 时就抛出错误,那么当然不能把未激活的组件也 render 了
· 切换组件后,a组件的 useeffect 没有触发unmount , 也就是说,进行激活状态切换不会再去重新执行 useeffect
· 切换组件后,a组件失活,但没有进行render ,也就是说不会对失活的组件再进行渲染,也就是说没有了 pre-render 的特性
这样一来,虽然实现了 keepalive 功能,能够实现与我们的 stylekeepalive 完全一致的效果,但丢失了 offscreen 激活/失活的生命周期,pre-render 预渲染等优点。
接下来,我们为其添加生命周期,由于失活的组件会直接被 throw 出去,子组件中的 useeffect 卸载函数不会被执行,我们需要把两个生命周期函数 useactiveeffect、usedeactiveeffect 中的回调注册给上层组件才能实现, 通过 context 传递注册函数。
const keepalivecontext = react.createcontext<{
    registeractiveeffect: (effectcallback) => void;
    registerdeactiveeffect: (effectcallback) => void;
}>({
    registeractiveeffect: () => void 0,
    registerdeactiveeffect: () => void 0,
});

export const useactiveeffect = (callback) => {
  const { registeractiveeffect } = usecontext(keepalivecontext);

  useeffect(() => {
    registeractiveeffect?.(callback);
  }, []);
};

export const usedeactiveeffect = (callback) => {
  const { registerdeactiveeffect } = usecontext(keepalivecontext);

  useeffect(() => {
    registerdeactiveeffect?.(callback);
  }, []);
};
我们在上层组件 keepalive 中对 effects 进行保存,并监听 active 状态的变化,以执行对应的生命周期函数。
const keepalive: react.fc<keepaliveprops> = ({ active, children }) => {
  const activeeffects = useref([]);
  const deactiveeffects = useref([]);

  const registeractiveeffect = (callback) => {
    activeeffects.current.push(() => {
      callback();
    });
  };

  const registerdeactiveeffect = (callback) => {
    deactiveeffects.current.push(() => {
      callback();
    });
  };

  useeffect(() => {
    if (active) {
      activeeffects.current.foreach((effect) => {
        effect();
      });
    } else {
      deactiveeffects.current.foreach((effect) => {
        effect();
      });
    }
  }, [active]);

  return (
    <keepalivecontext.provider value={{ registeractiveeffect, registerdeactiveeffect }}>
      <suspense fallback={null}>
        <wrapper active={active}>{children}</wrapper>
      </suspense>
    </keepalivecontext.provider>
  );
};
至此,我们实现了一个相对比较完美的基于 suspense 的 keepalive 组件。
dom 移动法
由于组件的状态保存的一个前提是该组件必须存在于 react组件树 中,也就是说必须把这个组件 render 出来,但 render 并不是意味着这个组件会存在于dom树中,如 createportal 能把某个组件渲染到任意一个dom节点上,甚至是内存中的dom节点。
那么要实现 keepalive ,我们可以让这个组件一直存在于 react组件树 中,但不让其存在于 dom树中。
社区中两个 keepalive 实现使用最多的库都使用了该方法,react-keep-alive, react-activation ,下面以 react-activation 最简单实现为例。完整实现见 react-activation:https://github.com/cjy0208/react-activation/
具体实现如下:
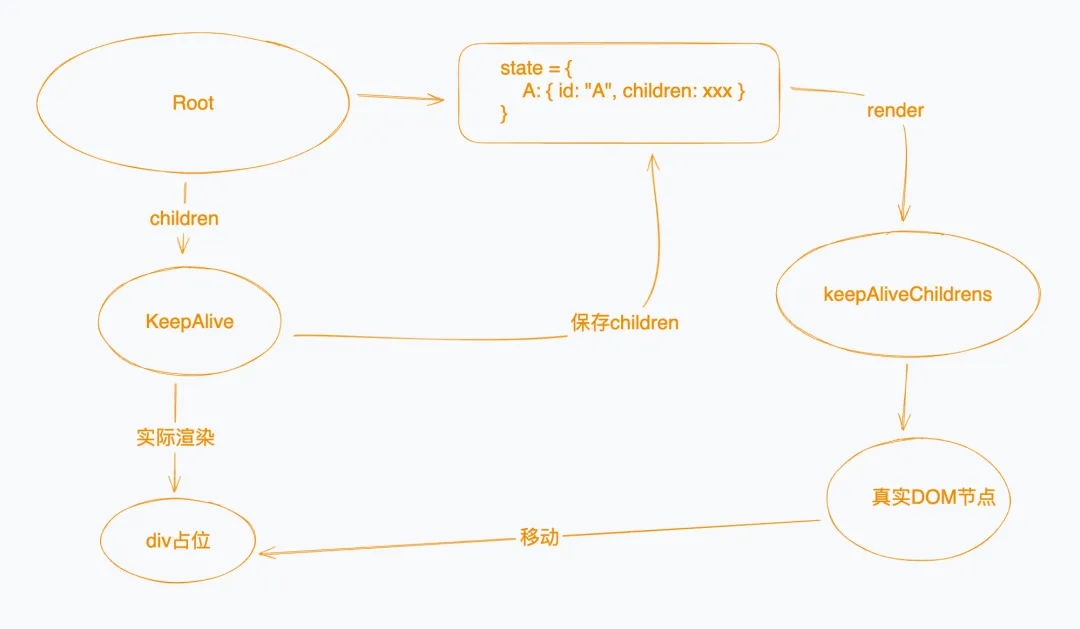
· 在某个不会被销毁的父组件(比如根组件)上创建一个 state 用来保存所有需要 keepalive 的 children ,并通过 id 标识
· keepalive 组件会在首次挂载时将 children 传递给父组件
· 父组件接收到 children,保存至 state 触发重新渲染,在父组件渲染所有keepalive children,得到真实dom节点,将dom节点移动至实际需要渲染的位置
· keepalive 组件失活时,组件销毁,dom节点也销毁,但 children 是保存在父组件渲染的,所以状态得以保存
· keepalive 再次激活时,父组件拿到缓存的 children,重新渲染一编,完成状态切换
import { component, createcontext } from 'react'

const keepalivecontext = createcontext({});

const withscope = wrappedcomponent => props => (
  <keepalivecontext.consumer>{keep => <wrappedcomponent {...props} keep={keep} />}</keepalivecontext.consumer>
)

export class alivescope extends component<any> {
  nodes = {};
  state = {};

  keep = (id, children) => {
    return new promise((resolve) =>
      this.setstate(
        {
          [id]: { id, children },
        },
        () => resolve(this.nodes[id])
      )
    );
  };

  render() {
    return (
      <keepalivecontext.provider value={this.keep}>
        {this.props.children}
        <div classname='keepers-store'>
          {object.values(this.state).map(({ id, children }: any) => (
        <div
          key={id}
          ref={(node) => {
            this.nodes[id] = node;
          }}
          >
          {children}
        </div>
      ))}
        </div>

      </keepalivecontext.provider>
    );
  }
}

class activationkeepalive extends component {
  constructor(props) {
    super(props)
  }

  placeholder: htmlelement | null = null;

  componentdidmount(): void {
    this.init(this.props)
  }

  init = async ({ id, children, keep }) => {
    // keep用于向父组件传递最新的children,并返回该children对应的dom节点
    const realcontent = await keep(id, children)
    // appendchild为剪切操作
    this.placeholder?.appendchild(realcontent)
  }

  // 只渲染占位元素,不渲染children
  render() {
    return (
      <div
        classname='keep-placeholder'
        ref={node => {
          this.placeholder = node
        }}
        />
    )
  }
}

export default withscope(activationkeepalive)

  // 使用
<alivescope>
  {countername === "a" && (
    <activationkeepalive id="a">
      <counter name="a" />
    </activationkeepalive>
  )}
  {countername === "b" && (
  <activationkeepalive id="b">
    <counter name="b" />
  </activationkeepalive>
  )}
</alivescope>
组件树如下,渲染在了 alivescope 下,而非 activationkeepalive 下。
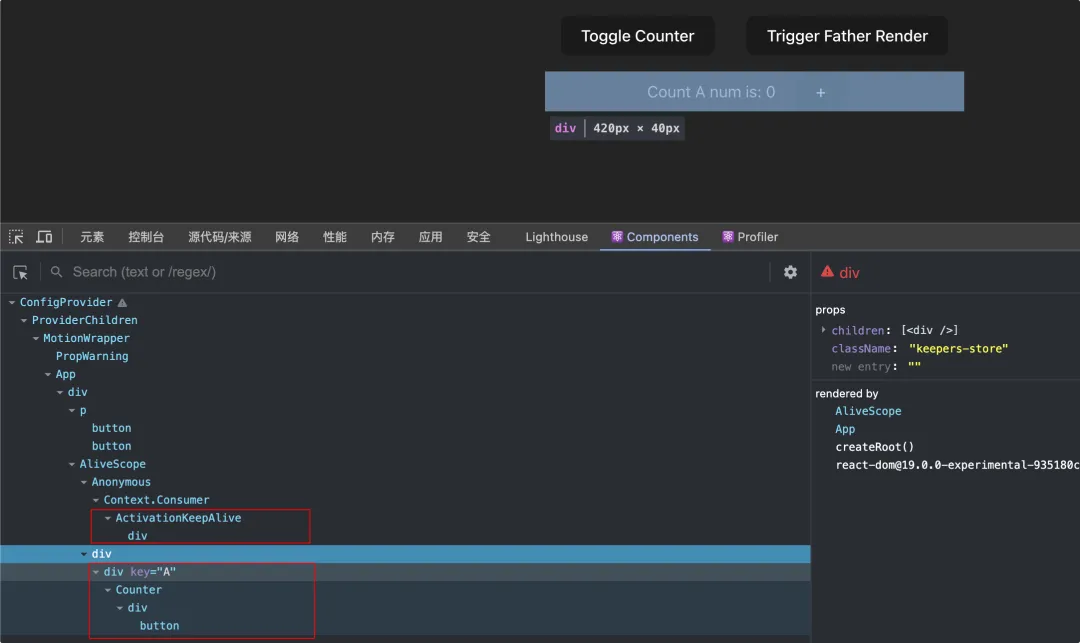
虽然这种方法理论性可行,但实际上会有很多事情要处理,比如事件流会乱掉,父组件更新渲染也会有问题,因为children 实际渲染在 alivescope 上, 要让 alivescope 重新渲染才会使 children 重新渲染。
在 react-activation 中,也还有部分问题有待解决,如果使用 createportal 方案,也只是 alivescope 中免去了移动 dom 的操作(隐藏时渲染在空标签下,显示时渲染在占位节点下)。
《行业指标体系白皮书》下载地址:https://www.dtstack.com/resources/1057?src=szsm
《数栈产品白皮书》下载地址:https://www.dtstack.com/resources/1004?src=szsm
《数据治理行业实践白皮书》下载地址:https://www.dtstack.com/resources/1001?src=szsm
想了解或咨询更多有关大数据产品、行业解决方案、客户案例的朋友,浏览袋鼠云官网:https://www.dtstack.com/?src=szkyzg
赞 (0)
您想发表意见!!点此发布评论


发表评论