万字长文教你实现华为云IoT+OpenHarmony智能家居开发
474人参与 • 2024-08-06 • 动态
本文分享自华为云社区《华为云iot+openharmony的智能家居开发》,作者:袁睿。
一、选题说明
1. 选题为基于openharmony的智能家居,应用场景为户用,受益人群为住户。
2. 开发的软件设备为智能门锁,储物精灵,软硬件开发都有的是光伏逆变器。
3. 解决的问题:
传统的智能家居:智能单品,需要手动加入场景,无网不能智能控制
创新的智能家居:空间智能,自发现后融入场景,分布式软总线控制
4. 关键功能点:
智能门锁:密码解锁,nfc解锁,数字管家控制,服务卡片控制
储物精灵:密码解锁,nfc解锁,防火帘控制,分布式软总线控制
逆变器:单相逆变,隔离拓扑,组件小型化,高转换率与低总谐波失真
二、竞赛开发平台
1. 操作系统:openharmony 3.0
2. 开发软件:vs code(deveco studio tool),deveco studio
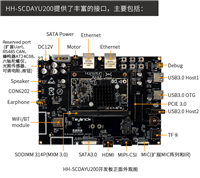
3. 开发板:深开鸿khdvk-3861b,润和dayu200,润和hispark ai camera
3. 关于环境:
操作系统:ubuntu 编译构建:python
包管理工具:hpm npm 环境:node.js
烧录软件:hiburn usb串口驱动:ch341ser.exe
本地ssh:finalshell ssh文件对比:beyond conpare
4. 虚拟机
(1) 虚拟机环境
ubuntu(华为的硬件开发一般都在此linux环境下进行)
虚拟机vmware:下载之后使用上述提到的华为云中国镜像。
下载vs code的linux版与openharmony3.0源码。
(2)虚拟机环境:
将ubuntu shell环境修改为bash:ls -l /bin/sh
在下载vs code后下载华为硬件编制插件(device tool)
(3) hb编译插件:
安装:python3 -m pip install --user ohos-build
变量:vim ~/.bashrc
复制粘贴到.bashrc的最后一行:export path=~/.local/bin:$path
更新变量:source ~/.bashrc
检查:pip install ohos-build
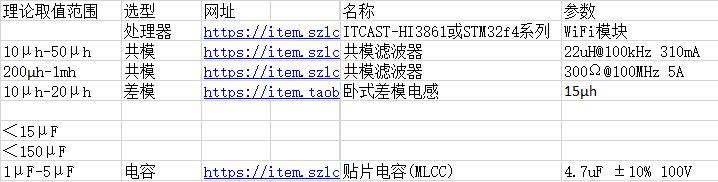
5. 逆变器的主要硬件选材:
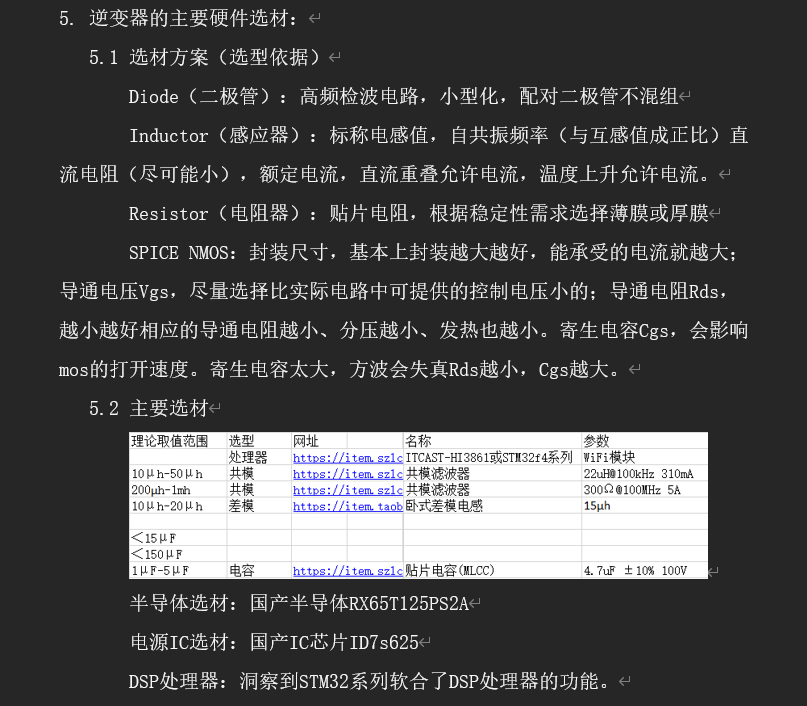
(1)选材方案(选型依据)
diode(二极管):高频检波电路,小型化,配对二极管不混组
inductor(感应器):标称电感值,自共振频率(与互感值成正比)直流电阻(尽可能小),额定电流,直流重叠允许电流,温度上升允许电流。
resistor(电阻器):贴片电阻,根据稳定性需求选择薄膜或厚膜
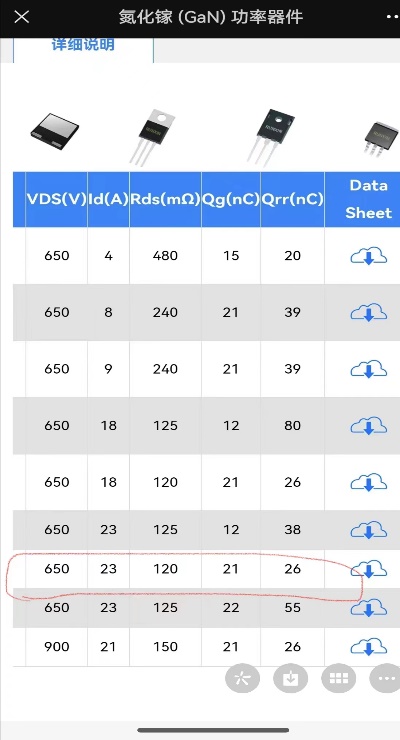
spice nmos:封装尺寸,基本上封装越大越好,能承受的电流就越大;导通电压vgs,尽量选择比实际电路中可提供的控制电压小的;导通电阻rds,越小越好相应的导通电阻越小、分压越小、发热也越小。寄生电容cgs,会影响mos的打开速度。寄生电容太大,方波会失真rds越小,cgs越大。
(2)主要选材
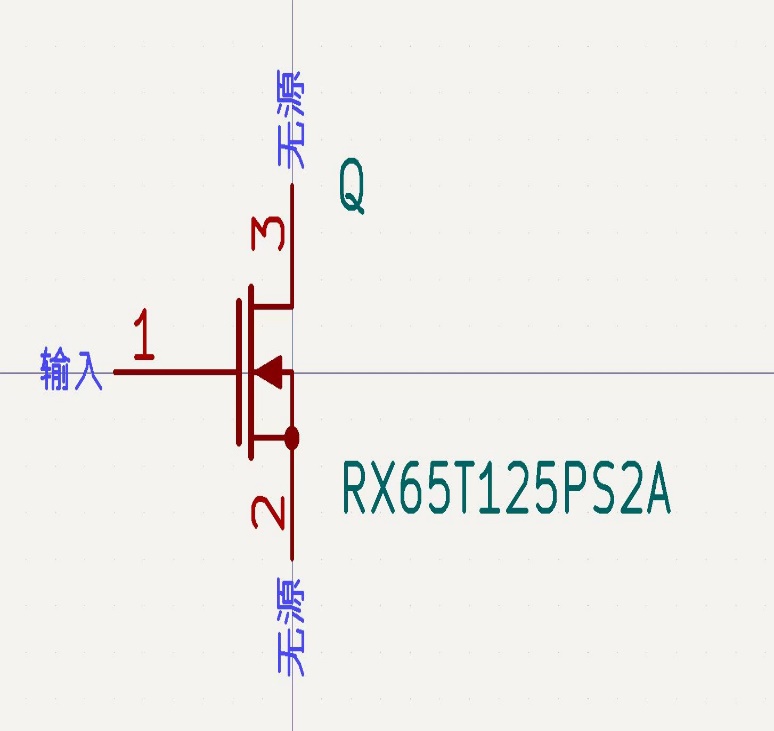
半导体选材:国产半导体rx65t125ps2a
电源ic选材:国产ic芯片id7s625
dsp处理器:洞察到stm32系列软合了dsp处理器的功能。
三、方案详述
(一)储物精灵
(1)用户角度:先从用户角度考虑需求与如何使用,再从技术层面解析
(具体用户使用方法这里不多赘述,详细内容直接看下午开发内容)
(2)实现原理:(下文的步骤会详细介绍,在这里先介绍初期设想)
① 关于mqtt协议在华为云的打通(设备在线激活):使用mqttx或mqttfx。
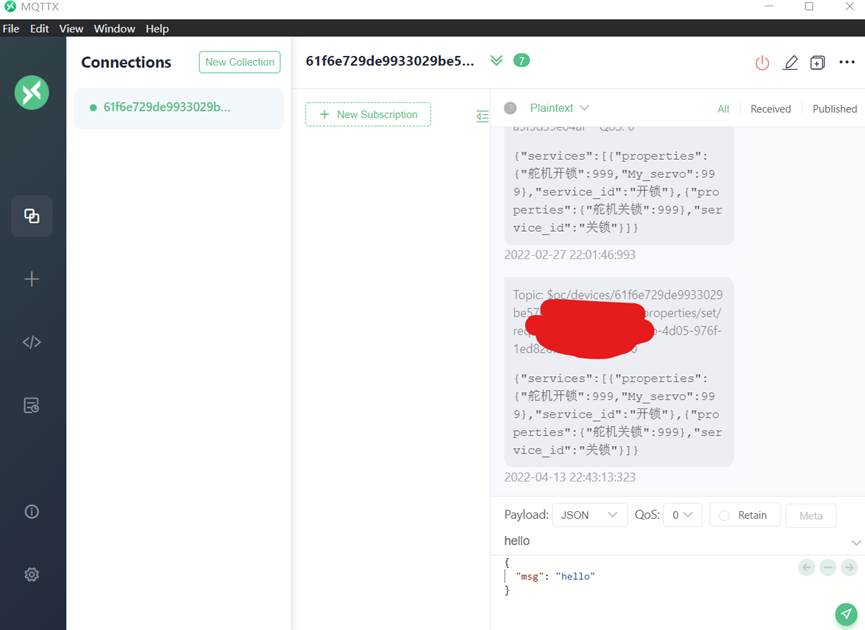
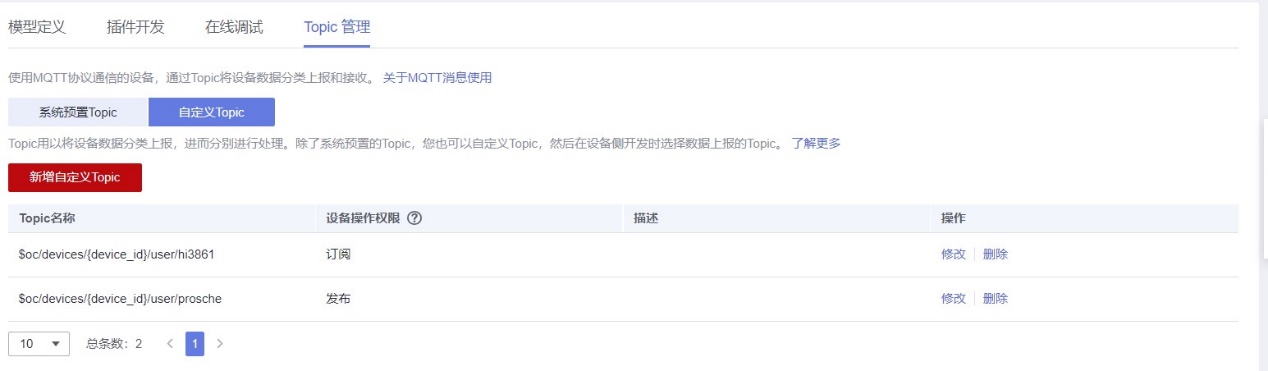
② 华为云:根据提示创建并获取密钥等信息,获取clientid等身份识别信息,然后在云端的topic(事件主题)中自定义订阅与发布,对产品进行定义。
③ appgallery connect网站:创建并注册harmonyos产品,根据提示流程。
④ 设备开发具体解析:每个设备都是一个子节点,实现了基于openharmony设备的l0、l1、l2设备之间的互联互通。主控程序基于 openharmony js应用程序框架设计实现,并使用mqtt物联网通信协议接入华为云iot平台,同时可将控制指令发送至华为云iot平台,供云端处理。dayu开发板(软件+硬件)具体实现为中控mqtt通信过程处于内核态驱动程序,js应用通过发起接口调用后,进入用户态调用内核态接口的流程,并且js应用会将所需要向云端发送的mqtt协议主题内容直接传入内核态,内核态不作数据处理和解析,直接将数据发布至云端,这样设计的目的是为了在添加设备的时候,仅需改变js应用的数据结构,并不需要修改设备的代码,完成了解耦合。
nfc录入与记录:使用nfc扩展板录入,详细请见下方软总线设备通讯链接。
⑤ 智能识别对比:识别对象的数据库,这里的识别作为单一的照片识别。vuforia 的服务器制作该 target 的识别数据库,该数据库要下载并绑定工程到target。图片由摄像头获取视频逐帧比对。
(3)设备侧
第一步:网络连接 使设备接电后自动联网
我们会在代码中预置热点名称与密码
在创建包后新建mqtt_entry.c用于存放热点自连代码的地址:
/home/open/downloads/code-v3.0-lts/openharmony/applications/sample/wifi-iot/app/mqtt_demo
{
    int ret;
    errno_t rc;
    hi_wifi_assoc_request assoc_req = {0};
/* 拷贝ssid到assoc的req */
    /* copy ssid to assoc_req */
    rc = memcpy_s(assoc_req.ssid, hi_wifi_max_ssid_len + 1, "rui666", 8); //热点名
    /* wpa-psk. cncomment: 认证类型:wpa2-psk.cnend */
    if (rc != eok) {
    return -1;
    }
//热点加密方式
    assoc_req.auth = hi_wifi_security_wpa2psk;
    memcpy(assoc_req.key, "88888888", 11);   //热点的密码
    ret = hi_wifi_sta_connect(&assoc_req);
    if (ret != hisi_ok) {
    return -1;
    }
    return 0;
}           //预置热点名和密码 在设备通电后会自连
这里把原有的ability等量代换成了自发现热点。

*openharmony_ability的碰一碰自发现与自配网见下述。
第二步:上报订阅与下发,在此包内创建main函数
/home/open/downloads/code-v3.0-lts/openharmony/applications/sample/wifi-iot/app/mqtt_demo
void mqtt_callback(messagedata *msg_data)
    {
        size_t res_len = 0;
        uint8_t *response_buf = null;
        char topicname[45] = { "$crsp/" };

        los_assert(msg_data);

    printf("topic %.*s receive a message\r\n",    msg_data->topicname->lenstring.len, msg_data->topicname->lenstring.data);

    printf("message is %.*s\r\n",
    msg_data->message->payloadlen,
    msg_data->message->payload);

    }

    int mqtt_connect(void)
    {
        int rc = 0;

        networkinit(&n);
        networkconnect(&n, "a161fa3144.iot-mqtts.cn-north-4.myhuaweicloud.com", 1883);
        buf_size  = 4096+1024;
        onenet_mqtt_buf = (unsigned char *) malloc(buf_size);
        onenet_mqtt_readbuf = (unsigned char *) malloc(buf_size);
        if (!(onenet_mqtt_buf && onenet_mqtt_readbuf))
        {
            printf("no memory for mqtt client buffer!");
            return -2;
        }

        mqttclientinit(&mq_client, &n, 1000, onenet_mqtt_buf, buf_size, onenet_mqtt_readbuf, buf_size);

        mqttstarttask(&mq_client);
        data.keepaliveinterval = 30;
        data.cleansession = 1;
        data.clientid.cstring = "61f6e729de9933029be57672_88888888_0_0_2022020905";
        data.username.cstring = "61f6e729de9933029be57672_88888888";
        data.password.cstring = "43872acc0b1e6aa7bf9e6a69f12aa9b1ebc07daffb67e18cf905c847a594f813";
        data.cleansession = 1;

        mq_client.defaultmessagehandler = mqtt_callback;

        //连接服务器
        rc = mqttconnect(&mq_client, &data);

        //订阅消息,设置回调函数
        mqttsubscribe(&mq_client, "porsche", 0, mqtt_callback);

        while(1)
        {
            mqttmessage message;

            message.qos = qos1;
            message.retained = 0;
            message.payload = (void *)"openharmony";
            message.payloadlen = strlen("openharmony");
        //上报
            if (mqttpublish(&mq_client, "hi3861", &message) < 0)
            {
                printf("mqttpublish faild !\r\n");
            }
            iotgpiosetoutputval(9, 0);      //9gpio 0 light on
            usleep(1000000);
        }

        return 0;
       }
第三步:储物精灵保险模式&舵机开门
舵机开锁:
int servoid =0;
void my_servo(uint8_t servoid,int angle)
{
    int j=0;
    int k=2000/200;
    angle = k*angle;
    for (j=0;j<5;j++){
        iotgpiosetoutputval(servoid, 1);
        hi_udelay(angle);
        iotgpiosetoutputval(servoid, 1);
        hi_udelay(20000-angle);
        }
}
保险模式:
static int dealsetpassword(cjson *objcmd)
{
    int ret = -1;
    char *pstr = null;
    cjson *objparas = null;
    cjson *objpara = null;
    commandparamsetpsk setlockpskparam;
    memset(&setlockpskparam, 0x00, sizeof(commandparamsetpsk));
    if ((objparas = cjson_getobjectitem(objcmd, "paras")) == null) {
        raiselog(log_level_err, "paras not exist");
        return ret;
}

    if ((objpara = cjson_getobjectitem(objparas, "pskid")) != null) {
        char *id = cjson_getstringvalue(objpara);  //密码标识(string型)
        if (id == null || strlen(id) > lock_id_length) {
            raiselog(log_level_err, "check lock id failed!");
            return -1;
        }
        strncpy(setlockpskparam.id, id, strlen(id));
    } else {
        return ret;
}

    if ((objpara = cjson_getobjectitem(objparas, "option")) != null) {
        char *option = cjson_getstringvalue(objpara);
        printf("option = %c \n", *option);          //三个命令(string型)
        if (*option == 'a') {
            setlockpskparam.option = option_add;        //新增密码
        } else if (*option == 'u') {
            setlockpskparam.option = option_update;     //更新密码
        } else if (*option == 'd') {
            setlockpskparam.option = option_delete;     //删除密码
        } else {
            raiselog(log_level_err, "no such option(%c)!", *option);
            return -1;
        }
    } else {
        return ret;
    }

    if ((objpara = cjson_getobjectitem(objparas, "lockpsk")) != null) {
        char *psk = cjson_getstringvalue(objpara);
        if (psk == null || strlen(psk) > lock_psk_length) {
            raiselog(log_level_err, "check psk failed!");
            return -1;
        }
        strncpy(setlockpskparam.password, psk, strlen(psk));
    } else {
        return ret;
}
 ret = iotprofile_commandcallback(cloud_command_setpsk, &setlockpskparam);
    return ret;
}
第四步:标注gpio口
识别gpio口与接入(这里要注意一个接的是正极一个是接地还有一个为信号传输口)
void mqtt_test(void)
{

    iotgpioinit(9);
    iotgpiosetdir(9, iot_gpio_dir_out);
    mqtt_connect();
}
第五步:吊起mqtt协议(build.gn版)
与主函数平行的build.gn,吊起函数与第三方库的内容:
sources = [
        "mqtt_test.c",
        "mqtt_entry.c"
    ]
include_dirs = [
        "//utils/native/lite/include",
        "//kernel/liteos_m/components/cmsis/2.0",
        "//base/iot_hardware/interfaces/kits/wifiiot_lite",
        "//vendor/hisi/hi3861/hi3861/third_party/lwip_sack/include",
        "//foundation/communication/interfaces/kits/wifi_lite/wifiservice",
        "//third_party/pahomqtt/mqttpacket/src",
        "//third_party/pahomqtt/mqttclient-c/src",
        "//third_party/pahomqtt/mqttclient-c/src/liteos",
        "//kernel/liteos_m/kal/cmsis",
        "//base/iot_hardware/peripheral/interfaces/kits",
       ]
    deps = [
        "//third_party/pahomqtt:pahomqtt_static",    //吊起mqtt协议
           ]
}
build.gn:与app并列的build.gn用于指出要编译的主函数,可以使用startup后面跟要编译的主包也可以直接features进行选中,在这里可以把不需要参与编译的项目通过#给注释掉。
在start_up里的builld.gn:
import("//build/lite/config/component/lite_component.gni")
lite_component("app") {
       features = [
         "mqtt_demo:mqtt_test",      //标注主函数,指定位置编译
]
储物精灵pro版(识别功能版):(使用第三方平台:vuforia)
我们的原理就是上传画面到云端,然后逐帧分解比对(此功能目前还在完善)
(4)软件侧(偏向软件,但是还是嵌入式开发)
步骤一:接收服务器的存储代码
exports.i***ta2=function(req,res){
    console.log("iot_data:",req)
    const url = new url("get the url provided by huawei cloud"+req.url) //the address configured inside the forwarding destination
    let properties = json.stringify(req.body.notify_data.body.services)
    console.log("store data:",properties)
    let addarr = [properties]
    var addsql = 'insert into sesnor_record(properties) values (?)'
    var callback = function(err,data){
        console.log("error:"+err)
        console.log("property insertion result:"+json.stringify(data))
        res.send(data)
    }
    sqlutil.sqlcontent(addsql,addarr,callback)
}
步骤二:射频贴纸&复旦卡拉取本地方案
写入复旦卡请用第三方的软件,nfc射频贴纸使用应用调试助手(华为应用市场可下载)。
void rc522_config ( void )
{
    uint8_t ucstatusreturn;         //returns the status
    uint8_t flag_station = 1;       //leave the flag bit of the function

  while ( flag_station )
  {
        /* seek cards (method: all in the range), the first search fails again, and when the search is successful, the card sequence is passed into the array ucarray_id*/
        if ( ( ucstatusreturn = pcdrequest ( picc_reqall, ucarray_id ) ) != mi_ok )
            ucstatusreturn = pcdrequest ( picc_reqall, ucarray_id );
        if ( ucstatusreturn == mi_ok  )
        {
            /* an anti-collision operation in which the selected sequence of cards is passed into an array ucarray_id */
            if ( pcdanticoll ( ucarray_id ) == mi_ok )
            {
                if ( pcdselect ( ucarray_id ) == mi_ok )
                    {
                        printf ("\nrc522 is ready!\n");
                        flag_station = 0;
                    }
            }
        }

  }
}
步骤三:智能窗帘轨解决方案
因为马达可以无限前后方向的对窗帘轨进行拉动所以选择马达来进行拉动。另外要注意马达的功率来判断是否加入继电器,详情请移步源码仓(购买马达时要向供应商索要相关数据,同时向开发板供应商索要已公开的脚位置图)
static void rtctimeupdate(void)
{
    extern int sntpgetrtctime(int localtimezone, struct tm *rtctime);
    struct tm rtctime;
    sntpgetrtctime(config_local_timezone,&rtctime);

    raiselog(log_level_info, "year:%d month:%d mday:%d wday:%d hour:%d min:%d sec:%d", \
            rtctime.tm_year + base_year_of_time_calc, rtctime.tm_mon + 1, rtctime.tm_mday,\
            rtctime.tm_wday, rtctime.tm_hour, rtctime.tm_min, rtctime.tm_sec);

    if (rtctime.tm_wday > 0) {
        g_appcontroller.curday = rtctime.tm_wday - 1;
    } else {
        g_appcontroller.curday = en_sunday;
    }

    g_appcontroller.cursecondsinday = rtctime.tm_hour * cn_seconds_in_hour + \
            rtctime.tm_min * cn_seconds_in_minute + rtctime.tm_sec + 8; // add 8 ms offset
}

static uint32_t time2tick(uint32_t ms)
{
    uint64_t ret;
    ret = ((uint64_t)ms * oskernelgettickfreq()) / cn_miniseconds_in_second;
    return (uint32_t)ret;
}

#define cn_reaction_time_seconds   1
static void boardledbuttoncallbackf1(char *arg)
{
    static uint32_t lastsec = 0;
    uint32_t cursec = 0;
    raiselog(log_level_info, "button pressed");

    cursec = g_appcontroller.cursecondsinday;
    if((cursec) < (lastsec + cn_reaction_time_seconds)) {
        raiselog(log_level_warn, "frequecy pressed button");
        return;
    }
    lastsec = cursec;

    g_appcontroller.curtainstatus = cn_board_switch_on;
    g_appcontroller.pwmleddutycycle = \
        g_appcontroller.pwmleddutycycle > 0 ? g_appcontroller.pwmleddutycycle:config_led_dutycycledefault;

    oseventflagsset(g_appcontroller.curtainevent, cn_lamp_event_setstatus);

    return;
}

static void boardledbuttoncallbackf2(char *arg)
{
      uint32_t lastsec = 0;
    uint32_t cursec = 0;
    raiselog(log_level_info, "button pressed");

    cursec = g_appcontroller.cursecondsinday;
    if ((cursec) < (lastsec + cn_reaction_time_seconds)) {
        raiselog(log_level_warn, "frequecy pressed button");
        return;
    }
    lastsec = cursec;

    g_appcontroller.curtainstatus = cn_board_switch_off;
    oseventflagsset(g_appcontroller.curtainevent, cn_lamp_event_setstatus);

    return;
}

#define curtain_motor_gpio_idx 8
#define wifi_iot_io_func_gpio_8_gpio 0
#define wifi_iot_io_func_gpio_14_gpio 4
#define motor_work_second 6

static void e53sc1_motorinit(void)
{
    iotgpioinit(curtain_motor_gpio_idx);
    iotgpiosetfunc(curtain_motor_gpio_idx, wifi_iot_io_func_gpio_8_gpio);
    iotgpiosetdir(curtain_motor_gpio_idx, iot_gpio_dir_out); //设置gpio_8为输出模式
    return;
}

static void e53sc1_setcurtainstatus(int curtainstatus)
{
   if ((curtainstatus == cn_board_curtain_open) || (curtainstatus == cn_board_curtain_close)) {
        iotgpiosetoutputval(curtain_motor_gpio_idx, 1); //设置gpio_8输出高电平打开电机
        sleep(motor_work_second);
        iotgpiosetoutputval(curtain_motor_gpio_idx, 0); //设置gpio_8输出低电平关闭电机
    }
    return;
}

static void datacollectandreport(const void *arg)
{
    (void)arg;
    uint32_t curtainevent;
    uint32_t waitticks;

    waitticks = time2tick(config_sensor_sample_cycle);
    while (1) {

        curtainevent = oseventflagswait(g_appcontroller.curtainevent, cn_curtain_event_setstatus, \
            osflagswaitany, waitticks);
        if (curtainevent & cn_curtain_event_setstatus) {
            raiselog(log_level_info, "getevent:%08x", curtainevent);
            e53sc1_setcurtainstatus(g_appcontroller.curtainstatus);
        }

        (void) iotprofile_report(g_appcontroller.curtainstatus);

    }
    return;
}

static int updateshedule(commandparamsetshedule *shedule)
{
    if (shedule->num == 1 && shedule->day[0] == 0) {        // set the one time schedule to current weekday
        shedule->day[0] = (g_appcontroller.curday + 1);
    }

    switch (shedule->option) {
        case 'a':
            iot_scheduleadd(shedule->scheduleid, shedule->day, shedule->num, shedule->starthour * cn_seconds_in_hour +\
                shedule->startminute * cn_seconds_in_minute, shedule->duration, shedule->shedulecmd.cmd, 0);
            break;
        case 'u':
            iot_scheduleupdate(shedule->scheduleid, shedule->day, shedule->num, shedule->starthour * cn_seconds_in_hour +\
                shedule->startminute * cn_seconds_in_minute, shedule->duration, shedule->shedulecmd.cmd, 0);
            break;
        case 'd':
            iot_scheduledelete(shedule->scheduleid, shedule->day, shedule->num, shedule->starthour * cn_seconds_in_hour +\
                shedule->startminute * cn_seconds_in_minute, shedule->duration, shedule->shedulecmd.cmd, 0);
            break;
        default:
            raiselog(log_level_err, "the schedule has no such option!\n");
            break;
    }
    return 0;
}

void currenttimecalctimerhander(){
   g_appcontroller.cursecondsinday ++;
}

#define timecalcticks_number 100
#define cn_miniseconds_in_1000ms 1000

static void curtainshedule(void)
{
    int startsecondinday = 0;
    int endsecondinday = 0;
    int settingcmd = 0;
    int executetasktime = 0;  // indicate the do something busy
    ostimerid_t currenttimecalc_id;
    currenttimecalc_id = ostimernew(currenttimecalctimerhander, ostimerperiodic, null, null);
    ostimerstart(currenttimecalc_id, timecalcticks_number);

    while (1) {
        osdelay(time2tick(cn_miniseconds_in_1000ms));

        if (g_appcontroller.cursecondsinday >= cn_secons_in_day) {
            g_appcontroller.cursecondsinday = 0;
            g_appcontroller.curday++;
            if (g_appcontroller.curday >= en_dayall) {
                g_appcontroller.curday = en_monday;
            }
            iot_schedulesetupdate(1);
        }
        // check if we need do some task here
        if (iot_scheduleisupdate(g_appcontroller.curday, g_appcontroller.cursecondsinday)) {
            if (executetasktime > 0) {
                executetasktime = 0;
                if (g_appcontroller.curtainstatus == cn_board_curtain_open) {
                    g_appcontroller.curtainstatus = cn_board_curtain_close;
                    oseventflagsset(g_appcontroller.curtainevent, cn_curtain_event_setstatus);
                }
            }
            startsecondinday = iot_schedulegetstarttime();
            endsecondinday = startsecondinday + iot_schedulegetdurationtime();

            iot_schedulegetcommand(&settingcmd, null);
        }

        raiselog(log_level_info, "start:%d end:%d cur:%d",startsecondinday, endsecondinday, g_appcontroller.cursecondsinday);
        if ((endsecondinday == startsecondinday) && (g_appcontroller.cursecondsinday == endsecondinday)) {
            if (g_appcontroller.curtainstatus != settingcmd) {
                raiselog(log_level_info, "triggering");
                g_appcontroller.curtainstatus = settingcmd;
                oseventflagsset(g_appcontroller.curtainevent, cn_curtain_event_setstatus);
            }
            iot_schedulesetupdate(1);
        }
    }
    return;
}

int iotprofile_commandcallback(int command, void *buf)
{
    commandparamsetshedule setsheduleparam;
    commandparamsetcurtain setcurtainparam;
    //commandparamsetdutycycle setdutycycleparam;
    cloud_commandtype cmd = (cloud_commandtype)command;

    if (cmd == cloud_command_setcurtain_status) {
        setcurtainparam = *(commandparamsetcurtain *)buf;
        g_appcontroller.curtainstatus = setcurtainparam.status;
        raiselog(log_level_info, "setcurtainparam.status:%d\r\n", setcurtainparam.status);
        oseventflagsset(g_appcontroller.curtainevent, cn_lamp_event_setstatus);
        return 0;

    } else if (cmd == cloud_command_setshedule) {
        setsheduleparam = *(commandparamsetshedule *)buf;
        raiselog(log_level_info, "setshedule:day:%d hour:%d minute:%d duration:%d \r\n", \
            setsheduleparam.day,setsheduleparam.starthour,setsheduleparam.startminute, setsheduleparam.duration);
        return updateshedule(&setsheduleparam);
    }

    return -1;
}

static int iotwifiinfo_get(char *ssid, int id_size, char *pwd, int pd_size)
{
    int retval = utilsgetvalue(sid_key, ssid, id_size);
    if (retval <= 0) {
        raiselog(log_level_err, "no such ssid stored! \n");
        return 0;
    }

    if ( utilsgetvalue(pwd_key, pwd, pd_size) < 0) {
        raiselog(log_level_info, "ssid(%s) no password stored! \n", ssid);
    } else {
        raiselog(log_level_info, "ssid : %s, pwd : %s! \n", ssid, pwd);
    }

    return 1;
}

static void iotwifiinfo_set(char *ssid, char *pwd)
{
    if (utilssetvalue(sid_key, ssid) != 0) {
        raiselog(log_level_err, "store ssid failed! \n");
        return;
    }
    if (utilssetvalue(pwd_key, pwd) != 0) {
        raiselog(log_level_err, "store password failed! \n");
        utilsdeletevalue(sid_key);
        return;
    }
    raiselog(log_level_info, "store password success! \n");
}

static void iotmaintaskentry(const void *arg)
{
    osthreadattr_t attr;
    nfcinfo nfcinfo;
    (void)arg;
    char ssid[buff_size] = {0};
    char pwd[buff_size] = {0};
    int ret = 0;

    g_appcontroller.pwmleddutycycle = config_led_dutycycledefault;
    board_initpwmled();
    board_initwifi();
    e53sc1_motorinit();

    iot_scheduleinit();
    ret = board_isbuttonpressedf2();
    osdelay(main_task_delay_ticks);

    ledflashfrequencyset(config_flashled_frenetconfig);

    nfcinfo.deviceid = "6136ceba0ad1ed02866fa3b2_curtain01";
    nfcinfo.devicepwd = "12345678";

    if (ret) {
        raiselog(log_level_info, "netconfig button has pressed! \n");
        if (board_nan_netcfgstartconfig(softap_name, ssid, sizeof(ssid), pwd, sizeof(pwd)) < 0) {
            raiselog(log_level_err, "board_netcfgstartconfig failed! \n");
            return;
        } else {
            ret = after_netcfg_action;
        }
    } else {
        ret = iotwifiinfo_get(ssid, sizeof(ssid), pwd, sizeof(pwd));
        if (ret == 0) {
            if (board_nan_netcfgstartconfig(softap_name, ssid, sizeof(ssid), pwd, sizeof(pwd)) < 0) {
                raiselog(log_level_err, "board_netcfgstartconfig failed! \n");
                return;
            } else {
                ret = after_netcfg_action;
            }
        }
    }

    ledflashfrequencyset(config_flashled_frewifi);
    if (board_connectwifi(ssid, pwd) != 0) {
        raiselog(log_level_err, "board_connectwifi failed! \n");
        if (ret == after_netcfg_action) {
            notifynetcfgresult(netcfg_dev_info_invalid);
        }
        hi_hard_reboot(hi_sys_reboot_cause_cmd);
        return;
    }

    if (ret == after_netcfg_action) {
        raiselog(log_level_debug, "connect wifi success ! \n");
        notifynetcfgresult(netcfg_ok);
        osdelay(main_task_delay_ticks);
        raiselog(log_level_debug, "stopnetcfg wifi success ! \n");
        stopnetcfg();
        iotwifiinfo_set(ssid, pwd);
    }

    ledflashfrequencyset(config_flashled_frecloud);
    rtctimeupdate();
    if (cloud_init() != 0) {
        return;
    }

    if (cloud_connect(nfcinfo.deviceid, nfcinfo.devicepwd, \
        config_cloud_default_serverip, config_cloud_default_serverport) != 0) {
        return;
    }

    ledflashfrequencyset(config_flashled_workswell);
    attr.attr_bits = 0u;
    attr.cb_mem = null;
    attr.cb_size = 0u;
    attr.stack_mem = null;
    attr.stack_size = config_task_default_stacksize;
    attr.priority = config_task_default_prior;
    attr.name = "datacollectandreport";
    if (osthreadnew((osthreadfunc_t)datacollectandreport, null, (const osthreadattr_t *)&attr) == null) {
        return;
    }

    attr.name = "curtainshedule";
    if (osthreadnew((osthreadfunc_t)curtainshedule, null, (const osthreadattr_t *)&attr) == null) {
        return;
    }
    return;
}

static void iotmainentry(void)
{
    osthreadattr_t attr;
    raiselog(log_level_info, "data:%s time:%s \r\n",__function__, __date__, __time__);
    g_appcontroller.curtainevent = oseventflagsnew(null);
    if ( g_appcontroller.curtainevent == null) {
        return;
    }
    // create the iot main task
    attr.attr_bits = 0u;
    attr.cb_mem = null;
    attr.cb_size = 0u;
    attr.stack_mem = null;
    attr.stack_size = config_task_main_stacksize;
    attr.priority = config_task_main_prior;
    attr.name = "iotmain";
    (void) osthreadnew((osthreadfunc_t)iotmaintaskentry, null, (const osthreadattr_t *)&attr);

    return;
}
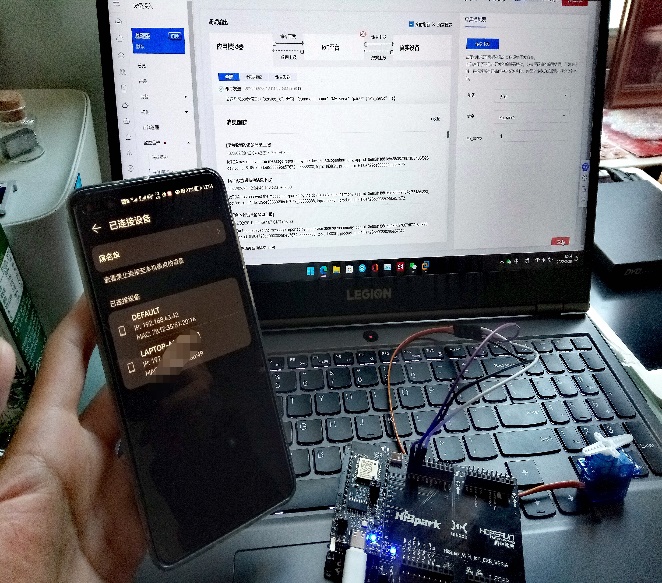
步骤四:无感配网解决方案(重要ability)
openharmony设备之间的信息传递利用特有的nan协议实现。利用手机和智能设备之间的wifi 感知订阅、发布能力,实现了数字管家与设备之间的互联。在完成设备间的认证和响应后,即可发送相关配网数据。同时还支持与常规softap配网方式共存。
相关代码:
teamx/common/iot_wifi/libs/libhilinkadapter_3861.a // 无感配网相关库文件
teamx/common/iot_wifi/libs/libnetcfgdevicesdk.a    // 无感配网相关库文件
teamx/common/inc/iot_netcfg_nan.h
teamx/common/inc/network_config_service.h // 无感配网相关头文件
teamx/common/iot_wifi/iot_wifi.c  // 相关联网接口
teamx/common/iot_wifi/iot_netcfg_nan.c // 无感配网相关实现
数字管家可以在gitee下载源码,在下载的team_x中查看详细介绍
步骤五:第三方平台接入
储物精灵pro版(识别功能版):(使用第三方平台:vuforia)
我们的原理就是上传画面到云端,然后逐帧分解比对(此功能目前还在完善)
第六步:实时摄像功能与智能检测光照值功能(正在实验中)
int getlightaverageval(unsigned char cnt)
{
    unsigned short readval = 0;
    unsigned int totalval = 0, totalcnt = 0;

    for(unsigned char i=0; i<cnt; i++)
    {
        if(lightsensorval(&readval) == iot_success)
        {
            totalval += readval;
            totalcnt++;
        }
        usleep(50000);
    }
    return (totalval/totalcnt);
}
enum env_light_state getenvlightstate(void)
{
    enum env_light_state lightstate = light_day;
    int lightval = getlightaverageval(5);
    if(lightval > env_light_level_lowest)
    {
        lightstate = light_night;
    }
    else if(lightval > env_light_level_low)
    {
        lightstate = light_dusk;
    }
    else
    {
        lightstate = light_day;
    }
    return  lightstate;
}
第七步:分布式检索功能(实验中)
传统的分布式使用的是elasticsearch进行,鉴于openharmony能力所以需要开发出对口的ability。
iscreateifmissing()                    //分布式数据库创建、打开、关闭和删除
setcreateifmissing(boolean iscreateifmissing)      //数据库不存在时是否创建
isencrypt()      //获取数据库是否加密
setencrypt(boolean isencrypt)      //设置数据库是否加密
getstoretype()      //获取分布式数据库的类型
setstoretype(kvstoretype storetype)      //设置分布式数据库的类型
kvstoretype.device_collaboration      //设备协同分布式数据库类型
kvstoretype.single_version      //单版本分布式数据库类型
getkvstore(options options, string storeid)      //根据options配置创建和打开标识符为 storeid 的分布式数据库
closekvstore(kvstore kvstore)      //关闭分布式数据库
getstoreid()      //分布式数据增、删、改、查。
subscribe(subscribetype subscribetype, kvstoreobserver observer)      //订阅
sync(list<string> deviceidlist, syncmode mode)      数据同步
开发说明:(包括oh分布式文件)
1. 构造分布式数据库管理类(创建 kvmanagerconfig 对象)
context context;
...
kvmanagerconfig config = new kvmanagerconfig(context);
kvmanager kvmanager =
kvmanagerfactory.getinstance().createkvmanager(config);
2. 获取/创建单版本分布式数据库(声明需要创建的单版本分布式数据库id说明)
options create = new options();
create.setcreateifmissing(true).setencrypt(false).setkvstoretype(kvstoretype.single_version);
string storeid = "testapp";
singlekvstore singlekvstore = kvmanager.getkvstore(create, storeid);
3. 订阅分布式数据更改(客户端需要实现kvstoreobserver接口&结构并注册kvstoreobserver实例)
class kvstoreobserverclient implements kvstoreobserver() {
    public void onchange(changenotification notification) {
        list<entry> insertentries = notification.getinsertentries();
        list<entry> updateentries = notification.getupdateentries();
        list<entry> deleteentries = notification.getdeleteentries();
    }
 }
kvstoreobserver kvstoreobserverclient = new kvstoreobserverclient();
singlekvstore.subscribe(subscribetype.subscribe_type_all, kvstoreobserverclient);
4. 构造需要写入单版本分布式数据库的key和value(将键值数据写入单版本分布式数据库)
string key = "todayweather";
string value = "sunny";
singlekvstore.putstring(key, value);
5. 构造需要从单版本分布式数据库快照中查询的key(数据取自单版本分布式数据库快照)
string key = "todayweather";string value = singlekvstore.getstring(key);
6. 获取设备列表与同步数据(push_only)
list<deviceinfo> deviceinfolist = kvmanager.getconnecteddevicesinfo(devicefilterstrategy.no_filter);
   list<string> deviceidlist = new arraylist<>();
   for (deviceinfo deviceinfo : deviceinfolist) {
       deviceidlist.add(deviceinfo.getid());
   }
   singlekvstore.sync(deviceidlist, syncmode.push_only);
7. 首先get到设备数据交换权限
ohos.permission.distributed_datasync

requestpermissionsfromuser(new string[]{"ohos.permission.distributed_datasync"}, 0);
//然后在abilityslice中声明数据库并使用即可,这里不多赘述
9. 关于api的开放能力请详见官方文档,这里不再赘述。
10. 怼相关接口(正在实验的内容)
searchability searchability = new searchability(context);
countdownlatch lock = new countdownlatch(1);
searchability.connect(new serviceconnectcallback() {
    @override
    public void onconnect() {
        lock.countdown();
    }
    @override
    public void ondisconnect() {
    }
});
lock.await(3000, timeunit.milliseconds);
11. 设置搜索属性与插入索引和重构查询等将会在下一次提交中进行补充。
(二)智能门锁
(上面的储物精灵源码也包括智能门锁的功能实现,这里补充介绍开发)
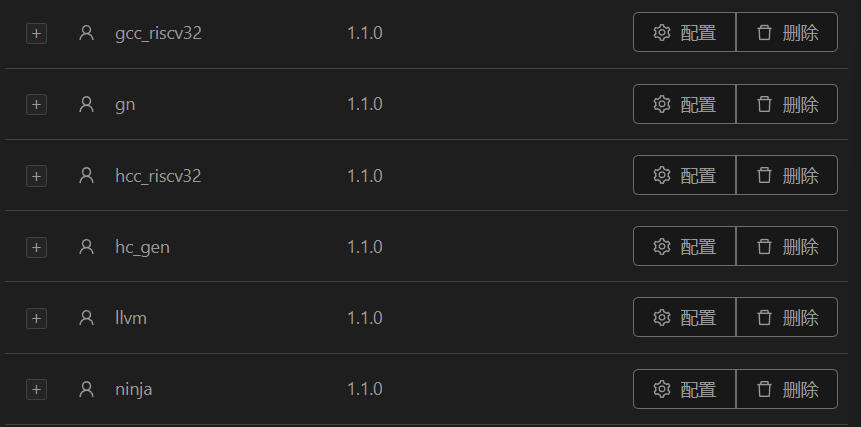
1. 环境搭建:
(1) 需要手动配置在deveco tool里的用户组件
(2) 接舵机的gpio口
这里要注意一个接的是正极一个是接地还有一个为信号传输口
(3) 云端配置
首先在华为云官方获取client id等身份识别信息,然后在云端的topic中自定义订阅与发布。
在初次开发时可以使用mqttx软件进行了命令的订阅与下发实验,显示在线成功接收到上报和订阅的消息。
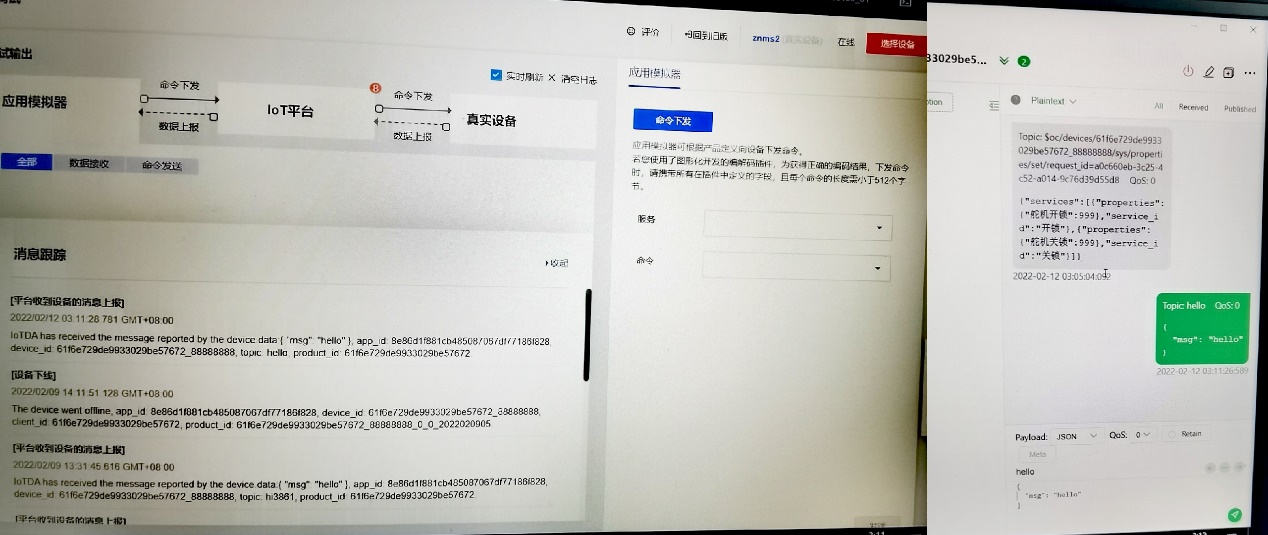
这样华为云的配置就成功了

如有需要还要进行产品定义与多功能的增加与实验
2.关于编译:
(1) 在vs code编译
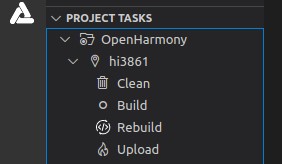
点击build就可以生成json文件啦,编译成功后upload就可以直接烧录进去。(注意:在编译之后如果要再编译必须点击clean以删除build产生的json文件避免报错)
(2)在ubuntu通过命令行编译
hb set //这是用于产生json文件的
hb build //这是用于编译的,编译后则会在源码的out文件夹中产生bin文件
hb clean //在build一次以后如果如果要再build那就必须进行此命令来删除json文件
在build成功后开发者就会发现在源码中的out文件夹中看到allinone.bin,然后发送到windows下使用hiburn进行烧录即可(波特兰最大3000000,否则会烧坏板子)下图为hiburn的配置方法,点击connect即可烧录。

3.碰一碰卡片(原子化服务)
数字管家需要通过在appgallery connect中创建项目后添加应用从而获取json文件,然后放在码云中下在的distschedule\netconfig\src\main\resources中。然后按照文档开发ui界面,点击构建的generate key and csr创建用户名与密钥进行签名。
用户操作界面:在slice目录下新建 xxxslice.java文件,通过addactionroute方法为此abilityslice配置一条路由规则,并且在在应用配置文件(config.json)中注册。在resources/base/layout下新建对应xml布局文件,在上述两个文件中编写相应的ui。
数字管家数据处理:从slice获取deviceid:在onstart中通过调用deviceid等,获取设备的名称等方便数字管家识别设备。从slice页面获取状态:开关锁可以直接调用intent.getbooleanparam来确定是进行开关锁还是对门锁的日程进行编排。
编写设备控制命令的解析:在commandutil中根据具体设备定义profile,来新增获取命令和解析命令的方法,用于设备在本地调用sendcommand来发送命令和解析。
配置设备端信息:在devicedata的initdata中,根据设备productid添加设备图片id、跳转的action参数和解析方法,配置完成后设备列表页、用户页面等都能通过该配置进行图片加载、路由跳转和解析。
最后进行接口对接与nfc写入就可以了(通过应用调试助手写入nfc识别详细用于快速让手机识别到设备从而吊起数字管家实现鸿蒙的ability)
(三)逆变器
1. 拓扑图
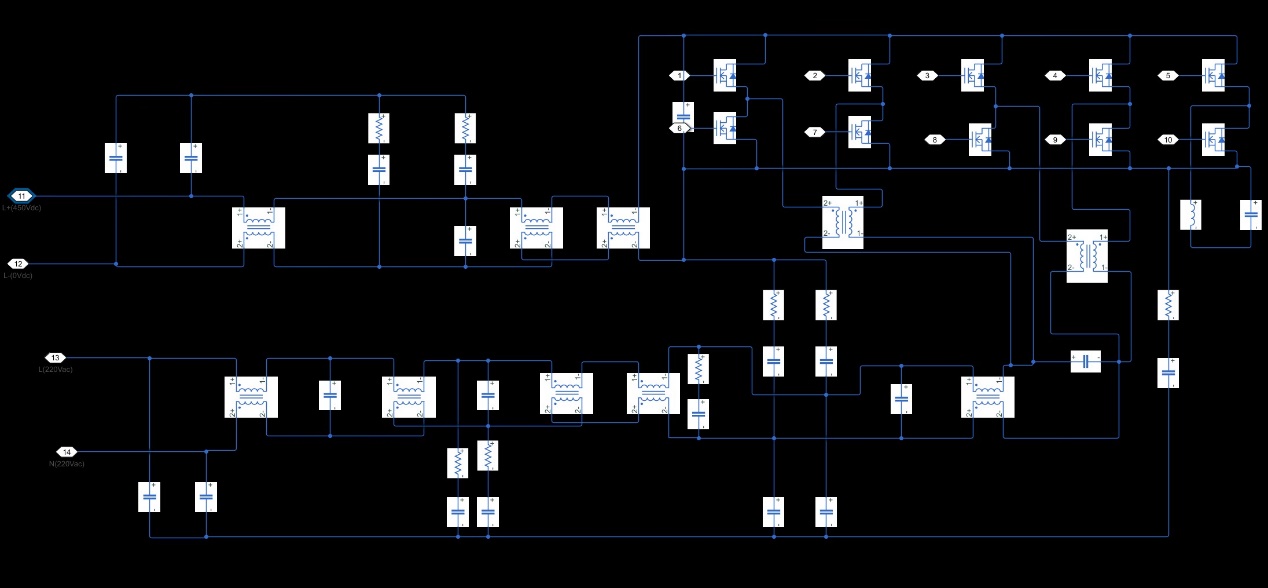
设计的单相逆变器,拥有隔离拓扑,通过控制gan(hemt)的高频开关实现逆变
关于桥臂:两个半桥产生中性点电压,另外两个半桥产生线电压,最后一个半桥作为有源滤波器。
2.现在stm32f407兼容了openharmony 3.2 bata版,因为f4系列软合了dsp处理所以无需另外使用dsp从处理器。考虑到尽量减少直流侧输入电流纹波,输出的正弦波尽可能的平滑与减小总谐波失真,设计了一种并联有源滤波器,它比在输入端使用批量电容更有效地补偿纹波。
3.考虑到大部分eda的元件库原件都不全,我在kicad按照厂家提供的数据手册画了个原件,并按照例出的参数进行了标注。
4. 关于电流与电压的总谐波失真等:有源滤波器工作在更高的电压变化下将相应的能量存储在陶瓷电容器中,陶瓷电容器的电容随着电压的降低而增加。通过算法保持vin稳定同时允许有源滤波器产生大的波纹。输出电流结合电磁屏蔽的开环霍尔传感器形成非常紧凑的测量装置提供电流解耦并降低对共模和寄生感应噪声的敏感性。特定的gan控制调制降低了滤波器电感中的电流可以在不达到饱和水平的情况下降低其核心尺寸。
5. 关于硬件选材:在上文的 二.竞赛开发平台 的逆变器中有介绍
6.通讯部分
(1)分布式软总线
基于udp的coap协议,openharmony特有分布式软总线。
编程步骤: 1.创建socket;
2.设置socket属性,用函数setsockopt();
3.绑定ip地址、端口等信息到socket上,用函数bind();
4.循环接收/发送数据,用函数recvfrom&sendto;
5.关闭网络连接。
创建一个socket,无论是客户端还是服务器端都需要创建一个socket。该函数返回socket文件描述符,类似于文件描述符。socket是一个结构体,被创建在内核中。
class udpclient {
    private datagramsocket client;

    public string sendandreceive(string ip, int port, string msg) {
        string responsemsg = "";

        try {
            //create a client-side datagramsocket object without having to pass in addresses and objects
            client = new datagramsocket();
            byte[] sendbytes = msg.getbytes();
            //encapsulates the address of the destination to be sent
            inetaddress address = inetaddress.getbyname(ip);
            //encapsulates the object to send the datagrampacket
            datagrampacket sendpacket = new datagrampacket(sendbytes,sendbytes.length,address,port);
            try {
                //sent data
                client.send(sendpacket);
            }catch (exception e){
                // e.printstacktrace();
            }
            byte[] responsebytes = new byte[2048];
            //create a datagrampacket object for the response information
            datagrampacket responsepacket = new datagrampacket(responsebytes,responsebytes.length);
            try {
                //waiting for the response information, as on the server side, the client blocks at this step until it receives a packet
                client.receive(responsepacket);
            }catch (exception e){
                // e.printstacktrace();
            }
            //parse the packet contents
            responsemsg = new string(responsepacket.getdata(),0,responsepacket.getlength());
        }catch (exception e){
            // e.printstacktrace();
        }finally {
            //close the client
            if(client != null){
                client.close();
                client = null;
            }
        }
        return responsemsg;
    }
}
datagramsocket类代表一个发送和接收数据包的插座该类是遵循 udp协议 实现的一个socket类
#define _prot_ 8800     //udp server port number
#define _server_ip_ "666.66.66.666"
#define tcp_backlog 5
#define ip_len 16

#define wifi_ssid "rui666"     //wifi name
#define wifi_password "1145141919810"  //wifi oassword
开发板的ip与端口号
public void performclassification() {
        int res = classifier.getresult(accelmeasurements, gyromeasurements);
        taskdispatcher uitaskdispatcher = this.getcontext().getuitaskdispatcher();
        string lab = classes[res];
        result = lab;
        taskdispatcher globaltaskdispatcher = getcontext().getglobaltaskdispatcher(taskpriority.default);
        globaltaskdispatcher.asyncdispatch(new runnable() {
            public void run() {
                hilog.warn(label, udpclient.sendandreceive("666.66.66.666", 8800, result));
            }
        });
相关参数意义(注意要手搓的定义内容):
sin_family  //refers to protocol families, which can only be af_inet in socket programming
sin_port    //storage port number (using network byte order)
sin_addr    //store the ip address and use the in_addr this data structure
sin_zero    //empty bytes are reserved in order to keep sockaddr and sockaddr_in two data structures the same size
fd         //socket
buf        //udp datagram buffer (contains data to be sent)
len        //the length of the udp datagram
flags      //invocation operation mode (typically set to 0)
addr       //a struct that points to the host address information that receives the data (type conversion required sockaddr_in)
alen       //the length of the structure referred to by addr
nfds       //represents the range of all file descriptors in a collection
readfds    //select monitors a collection of readable file handles、
writefds   //a collection of writable file handles that select monitors
exceptfds  //a collection of exception file handles that select monitors
timeout    //the timeout end time of select() this time, null means permanent wait
测试客户端的成功方法:通过udp软件进行相关的发送与接收,并查看打印信息。因为与下文介绍的mqttx软件使用原理差不多所以这里不多赘述。
(2) mqtt
mqtt是用于设备与服务器通讯的一种协议,使设备可以上报订阅下发信息。需要下载此协议并存放在thirdparty(第三方库),并在头文件中吊起。
从开发板厂商官网下载实验demo进行实验。因为目前大多数厂商使用的都是openharmony 1.0代码作为演示,不同的源码版本在编译规则和文件名上都会不同,所以在下载的源码中的头文件吊起等也要修改才能接入mqtt协议。
mqtt最重要要吊起的功能文件在 /home/open/downloads/code_v3.0lts/openharmony/third_party/pahomqtt/mqttclient-c/src里,特别是liteos中。
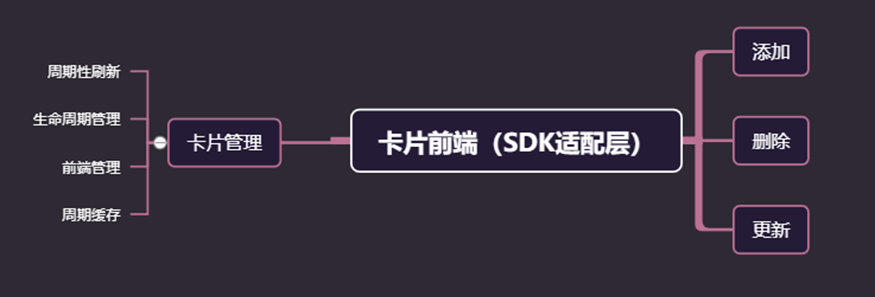
7.服务卡片
(1)服务卡片原理
(2)appgallery connect
①数字管家:
数字管家需要通过在appgallery connect中创建项目后添加应用从而获取json文件,在完成下述的2后把此文件放在码云中下载的fa源码的:
distschedule\netconfig\src\main\resources中。然后按照文档开发ui界面,点击构建的generate key and csr创建用户名与密钥进行签名。
官网在我的项目中创建项目,选择harmonyos平台等完成填写
https://developer.huawei.com/consumer/cn/service/josp/agc/index.html#/
②逻辑处理:
(i)用户操作界面:在slice目录下新建 xxxslice.java文件,通过addactionroute方法为此abilityslice配置一条路由规则,并且在在应用配置文件(config.json)中注册。在resources/base/layout下新建对应xml布局文件,在上述两个文件中编写相应的ui。
(ii)数字管家数据处理:从slice获取deviceid:在onstart中通过调用deviceid等,获取设备的名称等方便数字管家识别设备。从slice页面获取状态:开关锁可以直接调用intent.getbooleanparam来确定是进行开关锁还是对门锁的日程进行编排。
(iii)编写设备控制命令的解析:在commandutil中根据具体设备定义profile,来新增获取命令和解析命令的方法,用于设备在本地调用sendcommand来发送命令和解析。
(iv)配置设备端信息:在devicedata的initdata中,根据设备productid添加设备图片id、跳转的action参数和解析方法,配置完成后设备列表页、用户页面等都能通过该配置进行图片加载、路由跳转和解析。
(v) nfc写入:最后进行接口对接与nfc写入就可以了(通过应用调试助手写入nfc识别详细用于快速让手机识别到设备从而吊起数字管家实现鸿蒙的ability)可以写到开发板的nfc预存区,也可以写在huawei share的碰一碰卡片上。(目前这两种写法都可以写无数次,在下一次写入时会自动清除上一次所写的)
③开发方式:
(i) 用户操作界面:通过桌面可以在卡片中点击相关服务,卡片中可以呈现一个或多个服务。
(ii)工作原理:通过嵌入到ui界面拉起那款应用的服务(可以通过缓存实现快速打开)从而起到交互功能的原子化服务。
(iii)生命周期管理:对设备使用方的 rpc 对象进行管理,请求进行校验以及对更新后的进行回调处理。
(iv)卡片尺寸:目前官方有四种尺寸,可以在new中自己选中喜欢的尺寸。
(v)上手开发:新建一个服务卡片
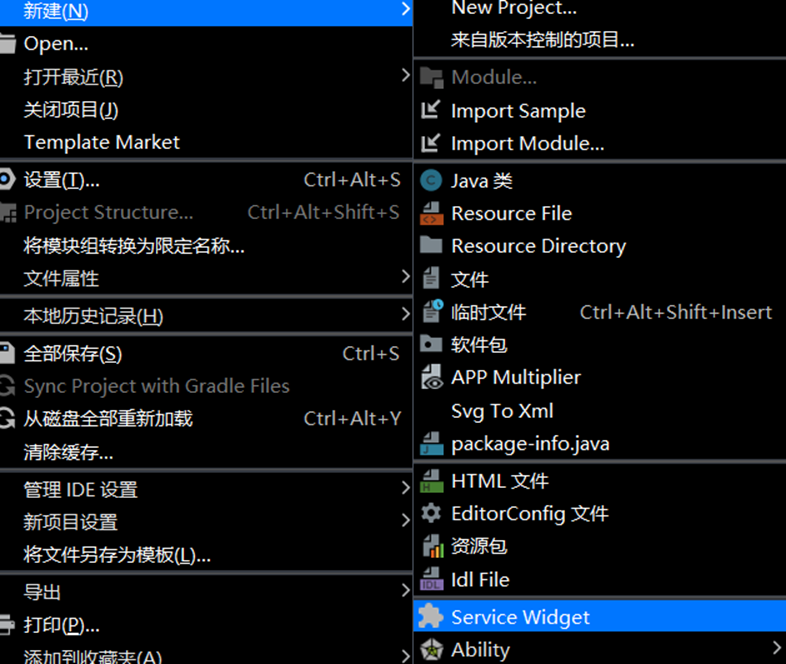
选择自己所需的卡片框架

(vi)开发环节:创建完之后然后就可以看到在原有的subject中生成了config.json文件。js默认配置了卡片大小等信息,froms下的是ability中生命周期管理的核心部分(用于回调),会在主函数中实现调用。
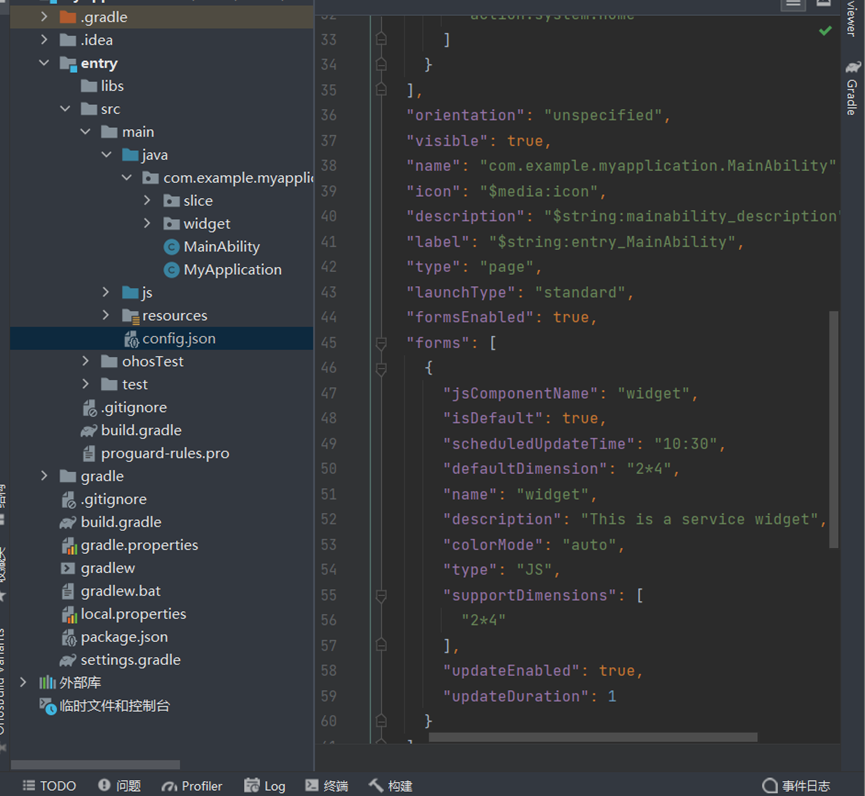
要在这里把false改成true。
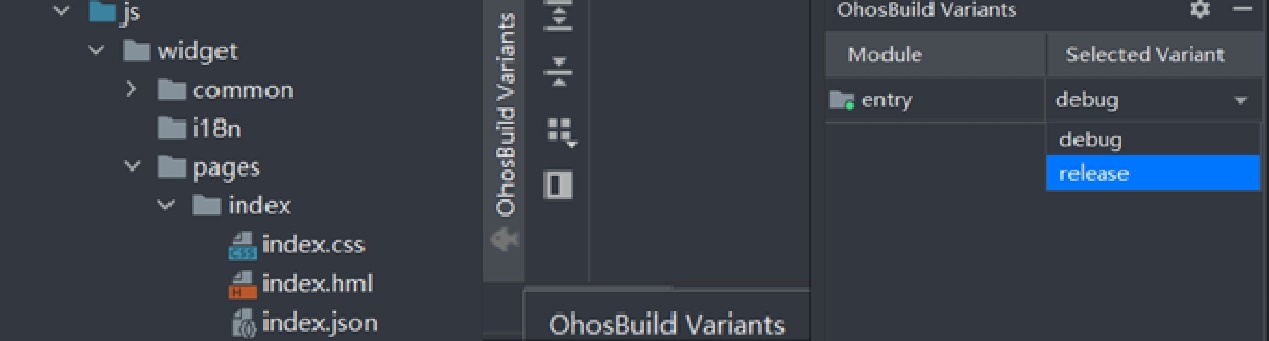
上图的文件包为主要的开发位置,开发者动的是index下的三个包。
完成签名之后在在线调试的实验机器上运行后就会产生一张纯的fa卡片了,此时环境已经搭建完毕。

本地缓存调取:src在main下的resources中建rawfile用于存放缓存,在编译时候打包进hap中怼到鸿蒙设备中即可get到。
下面以开发1*2的mini卡片为例,在本地预置了缓存文件后我们目光转向卡片,继续把播放按钮与卡片解耦开,通过hml塞入显示信息等。iswidget当true时,card_containerdiv就会变为div布局。ispause为true时,按钮呈现播放;为false时,显示暂停按钮。
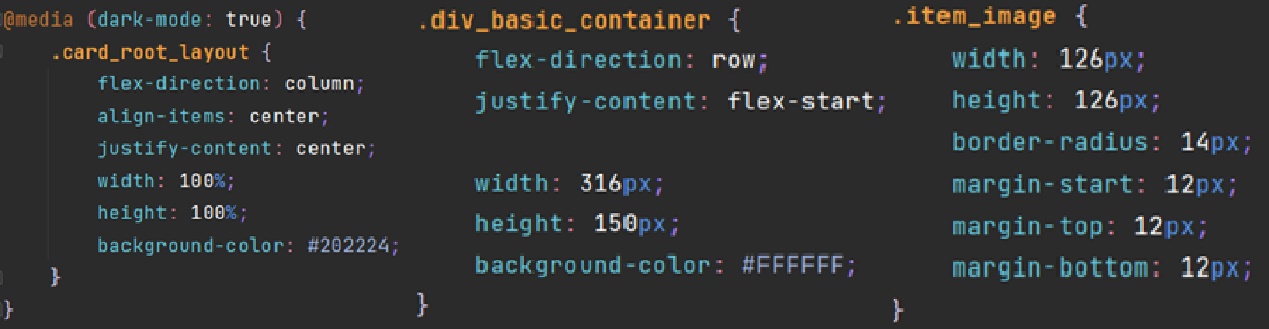
在 css 文件采用原子布局的display-index。display-index 的值越大,则越优先显示。在 main中的oncreateform 里isminiwidget 的data设置为 true。
在.json和main中相对应的地方添加点击事件,到此为止就可以通过点击卡片就可以得到start与stop的互动了。做完显示界面以后,接入界面与预置的本地缓存,然后封装即可。
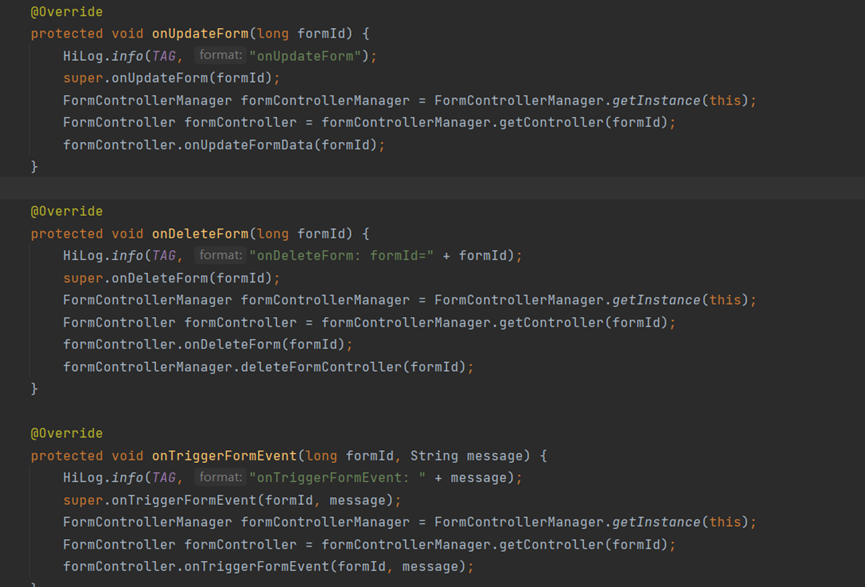
上图上中下分别是更新(onupdateform),删除(ondeleteform),事件消息(message),
更新(onupdateform): 卡片更新与持久化储存卡片,定时更新与请求更新时进行调用。
删除(ondeleteform):用于删除卡片时调用。 图三:formid&massage,接收通知。一张fa卡片创建时需要满足的基本功能:布局加载~请求数据(ohos&intent)~产生卡片(long&生成id用于调用){通过枚举值得到}。
这样一张服务卡片就开发好了。
四、创新点描述
1. 关于智能门锁:
基于openharmony开发,使用原子化服务,拥有密码解锁,nfc解锁,数字管家控制等功能。
2. 关于储物精灵
基于openharmony开发,使用原子化服务,密码解锁,nfc解锁,防火帘控制,分布式软总线控制等。
3. 关于逆变器
基于openharmony开发,拓扑架构大幅度缩小转换器桥臂和emi滤波器的尺寸,在算法使用cec加权效率设计与峰值电压追踪,通过品质因数公式fom算出使用合适的gan半导体选型结合五个桥臂的设计可以最小化逆变器的能量传递。
五、成果展现
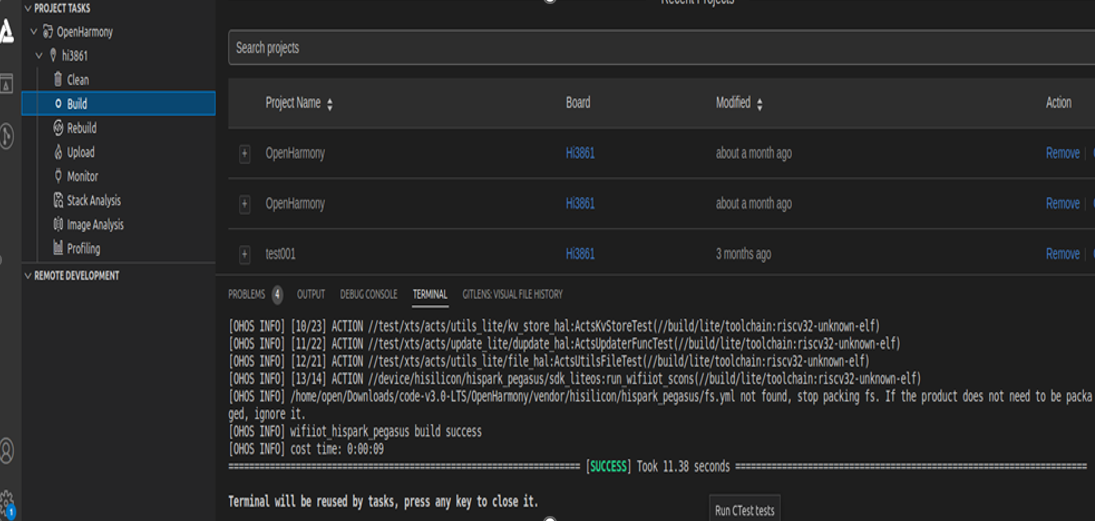
1. 编译成功
2. 动图演示(导入到word中是动图,word可能无法显示出动图效果所以把相关图片动图在上传文件夹中备份了一份)
以下动图分别是门锁的舵机驱动,nfc打卡,智能门轨的演示动图。


赞 (0)
您想发表意见!!点此发布评论


发表评论