PostMan动态设置全局变量
519人参与 • 2024-08-06 • stm32
1. 前言
在开发过程中调试接口,一般都会使用postman。
其中有几个变量可能是好几个接口共用的,就会出现频繁手动复制(ctrl+c)、粘贴(ctrl+v)的情况。
这个过程得非常留意,生怕复制错了,或删减了某些东西,导致接口报错。
总是这样复制就显得非常繁琐和麻烦了。
那有没有办法可以让postman自动设置变量呢 ?
这就是本文要介绍的,postman动态设置变量。
1.1 本文环境
本文内容中,使用的环境如下
postman版本:postman v11.1.14- 系统 :
windows10/windows11

2. 接口
首先来介绍下文本演示的接口 。
这里用到的是阿里的百炼大模型assistant api的接口,这是用来调用阿里大模型的接口。
附上文档链接 : https://help.aliyun.com/document_detail/2741924.html?spm=a2c4g.2741923.0.0.15f64739xkecig
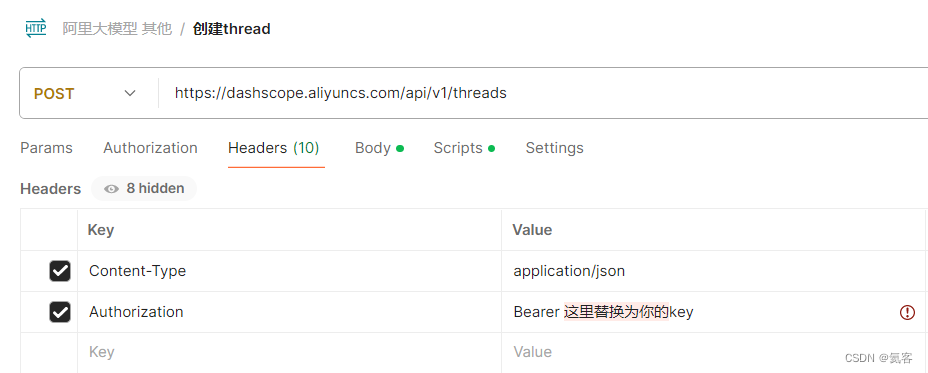
注意这里需要先申请一个dashscope-api-key,才可以调用下面的这些接口。
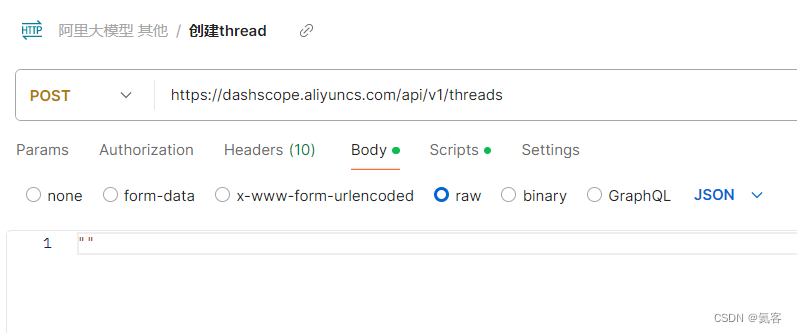
2.1 创建线程
代码示例
curl --location 'https://dashscope.aliyuncs.com/api/v1/threads' \
--header 'content-type: application/json' \
--header 'authorization: bearer <your-dashscope-api-key>' \
--data '""'
返回的结果
{
    "id": "thread_e99a9fe7-0433-426f-98ad-a5139c36579c",
    "object": "thread",
    "created_at": 1711448377850,
    "metadata": {},
    "request_id": "dd9489ec-dbdb-95d4-9ff8-cfe29b61db27"
}
2.2 创建消息
代码示例
curl --location 'https://dashscope.aliyuncs.com/api/v1/threads/thread_e99a9fe7-0433-426f-98ad-a5139c36579c/messages' \
--header 'content-type: application/json' \
--header 'authorization: bearer <your-dashscope-api-key>' \
--data '{
    "role": "user",
    "content": "你是谁",
    "metadata": {}
}'
返回结果
{
    "id": "message_f1933671-19e1-4162-ad25-7326165123e1",
    "object": "thread.message",
    "created_at": 1711508433283,
    "thread_id": "thread_e99a9fe7-0433-426f-98ad-a5139c36579c",
    "assistant_id": "",
    "run_id": "",
    "role": "user",
    "content": [
        {
            "type": "text",
            "text": {
                "value": "你是谁",
                "annotations": []
            }
        }
    ],
    "file_ids": [],
    "metadata": {},
    "from": "",
    "name": "",
    "plugin_call": {},
    "tool_calls": [],
    "status": {},
    "request_id": "b3ad40b9-f052-9665-a064-dab11c34625f"
}
3. 使用postman调试接口
3.1 创建thread
点击send,看下返回的结果
{
    "id": "thread_9e70b593-3e47-4d61-9adb-4253a937d09c",
    "object": "thread",
    "created_at": 1717823196058,
    "metadata": {},
    "request_id": "44cc2792-d063-9578-bd6a-183698123456"
}
注意这里的id,也就是thread_id,在下一个接口中会用到。
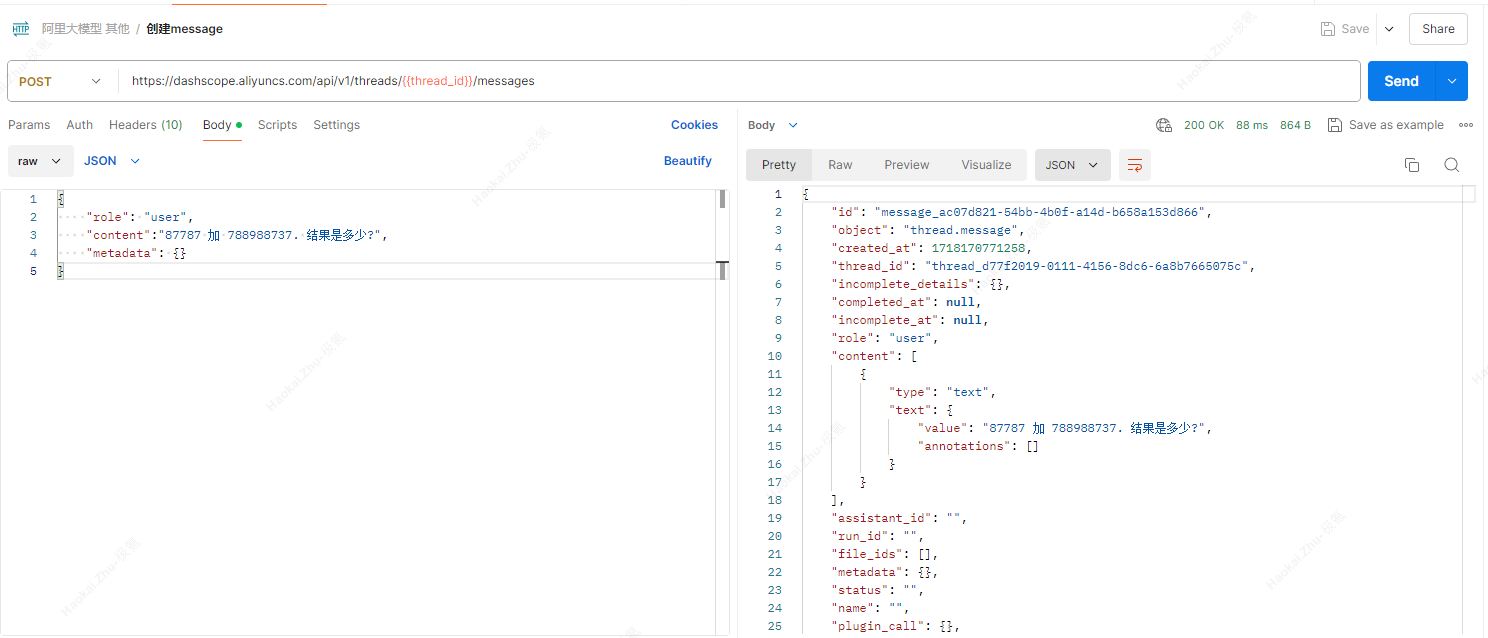
3.2 创建message
这里的url中,有一个thread_9e70b593-3e47-4d61-9adb-4253a937d09c,也就是thread_id,是从上一个接口里取的,这里我们直接将其复制过来。
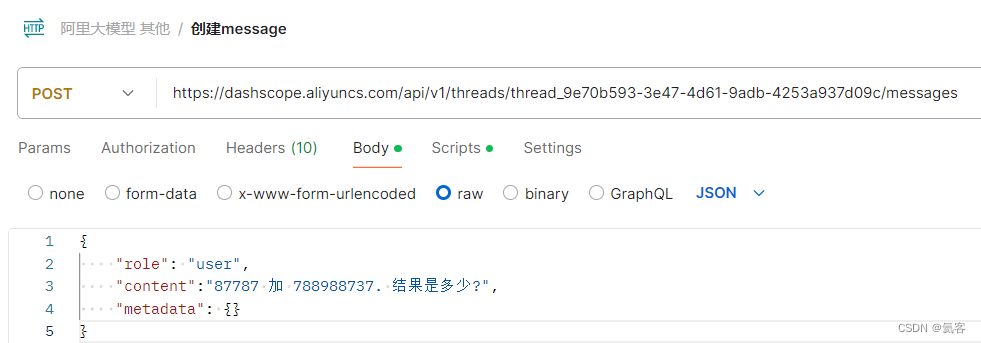
{
    "role": "user",
    "content":"87787 加 788988737. 结果是多少?",
    "metadata": {}
}

点击send,看下返回的结果
{
    "id": "message_9d4e6396-863e-4219-83ff-ab0fe5144b61",
    "object": "thread.message",
    "created_at": 1717823800660,
    "thread_id": "thread_9e70b593-3e47-4d61-9adb-4253a937d09c",
    "incomplete_details": {},
    "completed_at": null,
    "incomplete_at": null,
    "role": "user",
    "content": [
        {
            "type": "text",
            "text": {
                "value": "87787 加 788988737. 结果是多少?",
                "annotations": []
            }
        }
    ],
    "assistant_id": "",
    "run_id": "",
    "file_ids": [],
    "metadata": {},
    "status": "",
    "name": "",
    "plugin_call": {},
    "tool_calls": [],
    "request_id": "2511defb-1ead-9bd7-8080-fed150123456"
}
4. postman动态设置变量
上文中,我们通过ctrl+c和ctrl+v的方式,来赋值thread_id。
那么如何让postman动态设置thread_id,从而不用每次去手动复制了。
4.1 打印日志
首先,我们要知道postman中,有一个scripts,可以写javascript的代码。
pre-request表示在这个http请求执行前,会先调用。
post-response表示在这个http请求执行后,会调用。
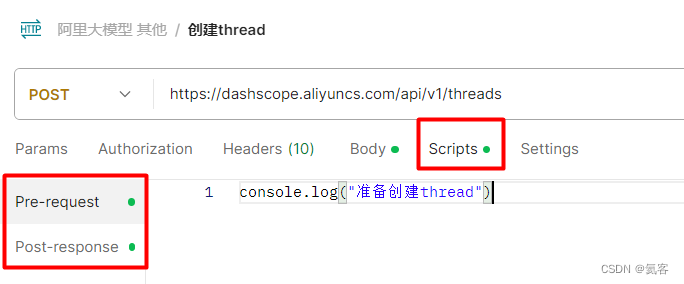
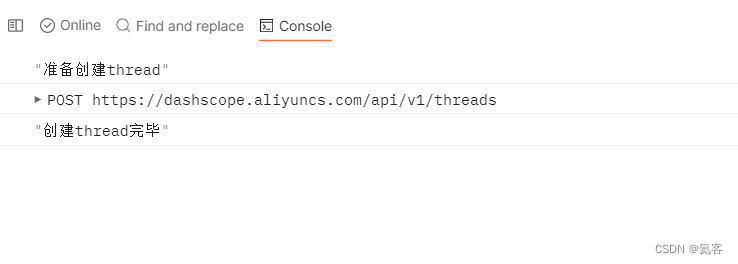
这里,我们在pre-request中,打印准备创建thread
console.log("准备创建thread")
在post-response中,打印创建thread完毕
console.log("创建thread完毕")
具体显示日志的地方在postman左下角的console中

现在我们执行这个http请求,会发现打印如下日志了
4.2 设置全局变量
我们再来看下接口返回的数据
{
    "id": "thread_9e70b593-3e47-4d61-9adb-4253a937d09c",
    "object": "thread",
    "created_at": 1717823196058,
    "metadata": {},
    "request_id": "44cc2792-d063-9578-bd6a-183698123456"
}
这里我们需要取到id,并动态设置成全局变量,那需要怎么做呢 ?
responsebody已被弃用postman中,通过pm.response.text(),我们可以获取到response中的文本内容。
pm.response.text()
然后通过json.parse()可以将json字符串解析为一个json对象
var jsonobj = json.parse(pm.response.text())
然后就可以通过jsonobj.id获取到id字段了
var thread_id = jsonobj.id
console.log("thread_id:"+thread_id)
最后,调用pm.globals.set()将其设置到全局变量里就好
pm.globals.set("thread_id",thread_id)
4.3 使用全局变量
使用{{}}可以获取到对应的全局动态变量
比如,我们这里就可以用{{thread_id}}来替代url中的thread_9e70b593-3e47-4d61-9adb-4253a937d09c了
运行结果如下所示
到此,就完成了postman动态配置变量的操作,不用再每次复制粘贴变量值了。
5. 其他
参考文章
use scripts to add logic and tests to postman requests
2024最新版postman接口测试教程
赞 (0)
您想发表意见!!点此发布评论


发表评论