Nginx配置SSL证书的实现步骤
278人参与 • 2024-09-11 • SSL
成功配置ssl证书后,您将能够通过https加密通道安全访问nginx服务器。
一、准备材料
ssl证书绑定的域名已完成dns解析,即您的域名与主机ip地址相互映射。您可以通过dns验证证书工具,检测域名dns解析是否生效。具体操作:【1】登录数字证书管理服务控制台。
【2】在左侧导航栏,选择证书工具 > dns验证。
【3】在dns页签,选择您域名所在的运营商和地域,并输入您的网站域名,单击立即检测。dns检测结果列表中的解析结果与您在解析配置中的记录值一致时,代表解析正常生效。
已通过数字证书管理服务控制台签发证书。
已在web服务器开放443端口(https通信的标准端口): 如果您使用的是阿里云ecs服务器,请确保已经在安全组规则入方向添加tcp 443端口和tcp 80端口。

二、下载ssl证书
【1】登录数字证书管理服务控制台
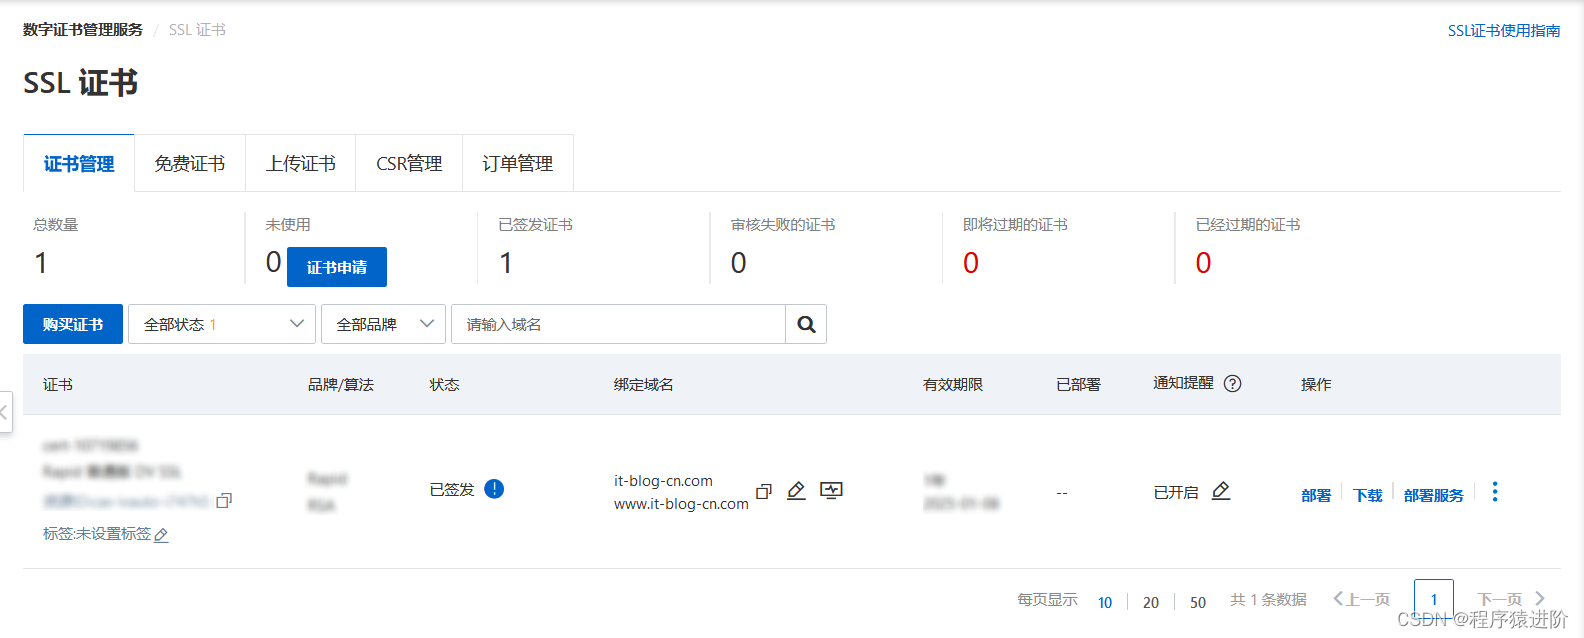
【2】在左侧导航栏,单击ssl证书。
【3】在ssl证书页面,定位到目标证书,在操作列,单击下载。
【4】在服务器类型为nginx的操作列,单击下载。
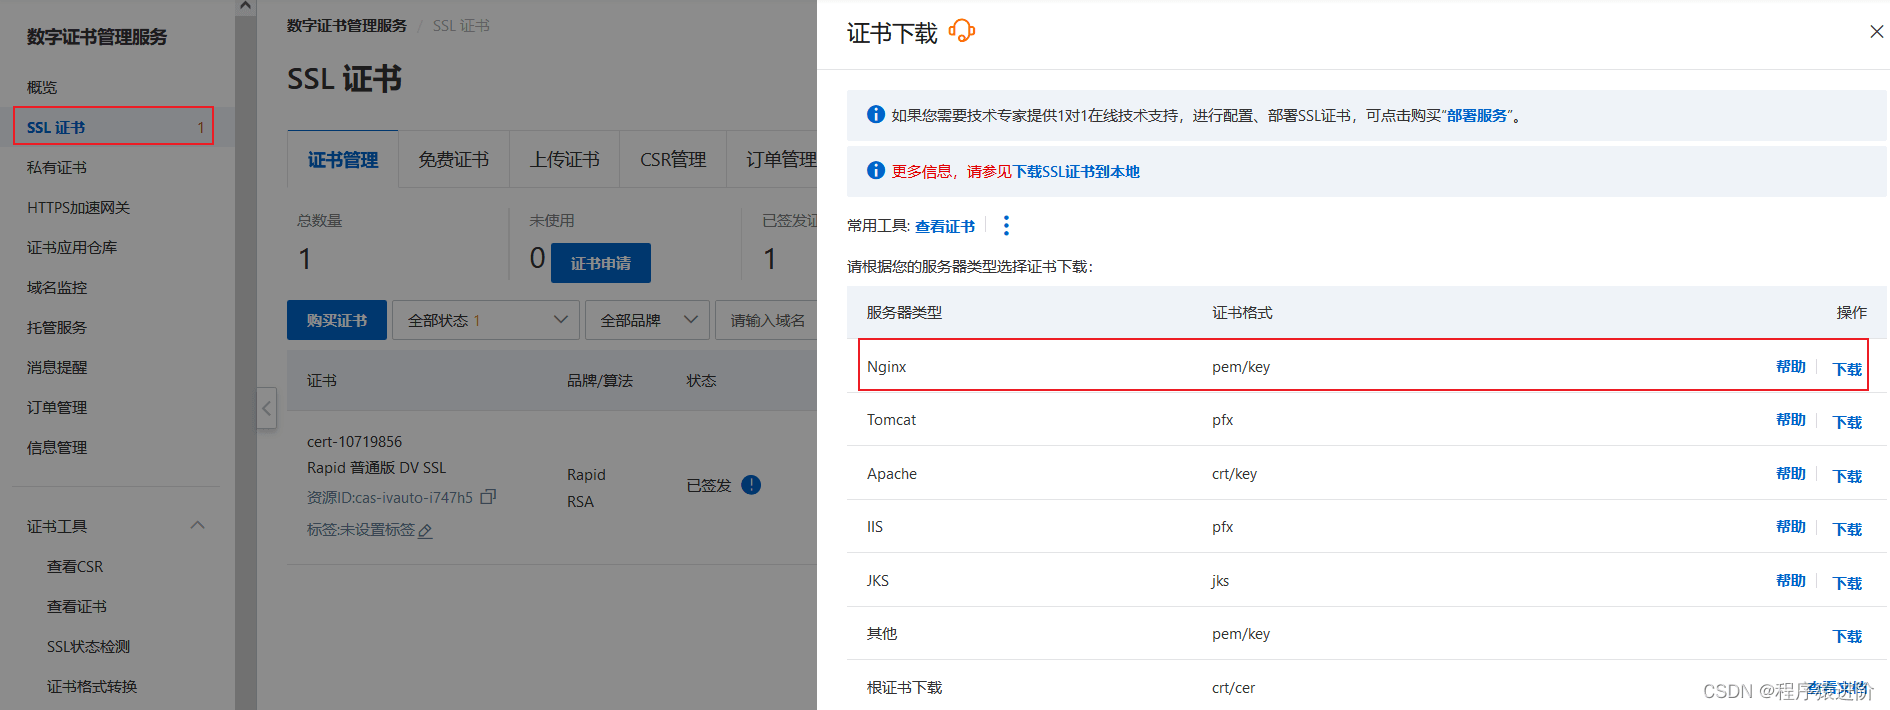
【5】解压缩已下载的ssl证书压缩包:根据您在提交证书申请时选择的csr生成方式,解压缩获得的文件不同。
证书文件(pem格式): nginx支持安装pem格式的文件,pem格式的证书文件是采用base64编码的文本文件,且包含完整证书链。解压后,该文件以证书id_证书绑定域名命名。私钥文件(key格式): 默认以证书绑定域名命名。
三、安装nginx
已安装的可以忽略该步骤
直接在linux服务上使用wget命令把nginx安装包下载到/usr/local/目录中
wget -c http://nginx.org/download/nginx-1.24.0.tar.gz
安装nginx相关依赖
#安装nginx所需要的依赖包
yum install -y gcc-c++	zlib zlib-devel	openssl openssl-devel pcre pcre-devel
安装nginx:解压nginx安装包
#解压安装包
tar -zxvf nginx-1.24.0.tar.gz
进入解压之后的nginx目录下:
#进入nginx目录
cd /usr/local/nginx
执行配置脚本,--prefix是指定安装目录
# 编译,执行配置: 考虑到后续安装ssl证书 添加两个模块
./configure --with-http_stub_status_module --with-http_ssl_module
编译安装
#对nginx编译和安装
make & make install
启动nginx服务:安装好的nginx服务在/usr/local/nginx下:
[root@xxx sbin]# pwd
/usr/local/nginx/sbin

# 启动
./nginx

# 重启
./nginx -s reload

# 关闭
./nginx -s stop

# 或者,指定配置文件启动
./nginx -c /usr/local/nginx/conf/nginx.conf
查看nginx是否启动成功
[root@xxx sbin]# ps -ef | grep nginx
root      1399  1320  0 jan27 ?        00:00:00 nginx: master process nginx -g daemon off;
root      1574  1399  0 jan27 ?        00:00:00 nginx: worker process
root      1575  1399  0 jan27 ?        00:00:00 nginx: worker process
root     20336     1  0 21:21 ?        00:00:00 nginx: master process ./nginx
nobody   20337 20336  0 21:21 ?        00:00:00 nginx: worker process
root     20366 13337  0 21:21 pts/3    00:00:00 grep --color=auto nginx
设置nginx的开机启动
vim /etc/rc.local
文本底部追加
/usr/local/nginx/sbin/nginx
编辑安装目录conf下的nginx.conf文件:
server {
    listen       80;
    server_name  yourdomain.com; # 修改为你自己的域名或ip地址

    location / {
        root   /path/to/your/vuepress/site; # 修改为你的vuepress站点路径,也就是vue npm run build 打包后放置静态文件dist的路径
        index  index.html index.htm;

        try_files $uri $uri/ /index.html;
    }
}
三、在nginx服务器安装证书
【1】执行以下命令,在nginx的conf目录下创建一个cert用于存放证书的目录。
[root@izuf65h6i43ltlzhqolumyz conf]# cd /usr/local/nginx/conf  --进入nginx默认配置文件目录。该目录为手动编译安装nginx时的默认目录,如果您修改过默认安装目录或使用其他方式安装,请根据实际配置调整。
[root@izuf65h6i43ltlzhqolumyz conf]# cd cert/
[root@izuf65h6i43ltlzhqolumyz cert]# ll
total 12
-rw-r--r-- 1 root root 1679 feb  8 18:29 it-blog-cn.com.key
-rw-r--r-- 1 root root 4772 feb  8 18:29 it-blog-cn.com.pem
.pem:证书文件。pem文件的扩展名为crt格式。.key:证书的密钥文件。申请证书时如果未选择自动创建crs,则下载的证书文件压缩包中不会包含.key文件,需要您将自己手动常见的私钥文件拷贝到cert目录下。
【2】更改nginx.conf设置vim nginx.conf找到server块,将https server部分注释去掉【从需要删除的部分开始安装ctrl+v,然后ctrl+d删除】并修改:
    # https server
    # 将 it-blog-cn.com 修改为自己的域名

    server {
        listen       443 ssl;
        server_name  it-blog-cn.com;

        ssl_certificate      /usr/local/nginx/conf/cert/it-blog-cn.com.pem;
        ssl_certificate_key  /usr/local/nginx/conf/cert/it-blog-cn.com.key;

        ssl_session_cache    shared:ssl:1m;
        ssl_session_timeout  5m;

        ssl_ciphers  high:!anull:!md5;
        ssl_prefer_server_ciphers  on;

        location / {
            root   html;
            index  index.html index.htm;
        }
    }
【3】通过nginx -t校验nginx文件语法。如果提示找不到证书文件,说明文件路径配置的不正确。
[root@izuf65h6i43ltlzhqolumyz conf]# ../sbin/nginx -t
nginx: [emerg] cannot load certificate "/usr/local/nginx/conf/it-blog-cn.com.pem": bio_new_file() failed (ssl: error:02001002:system library:fopen:no such file or directory:fopen('/usr/local/nginx/conf/it-blog-cn.com.pem','r') error:2006d080:bio routines:bio_new_file:no such file)
如果提示success,表示校验成功
[root@izuf65h6i43ltlzhqolumyz conf]# ../sbin/nginx -t
nginx: the configuration file /usr/local/nginx/conf/nginx.conf syntax is ok
nginx: configuration file /usr/local/nginx/conf/nginx.conf test is successful
【4】通过nginx -s reload重启nginx【5】检查443端口
[root@izuf65h6i43ltlzhqolumyz conf]# netstat -ntlp lgrep 443
active internet connections (only servers)
proto recv-q send-q local address           foreign address         state       pid/program name
tcp        0      0 0.0.0.0:80              0.0.0.0:*               listen      20336/nginx: master
【5】查询防火墙的状态
[root@izuf65h6i43ltlzhqolumyz conf]# firewall -cmd --state
running
查询防火墙是否放开了443端口,结果显示只有80端口
[root@izuf65h6i43ltlzhqolumyz conf]# firewall -cmd --list-prots
80/tcp
打开443端口,完成后执行reload命令
[root@izuf65h6i43ltlzhqolumyz conf]# firewall -cmd --zone=public --add-prot=443/toc --permanent
success
[root@izuf65h6i43ltlzhqolumyz conf]# firewall -cmd --reload
success
[root@izuf65h6i43ltlzhqolumyz conf]# firewall -cmd --list-ports
80/tcp 443/tcp
【6】执行echo命令在服务器上模拟客户端,将测试命令中的it-blog-cn更换为自己的域名。检查本地443端口加载的https服务以及证书是否正常。如下出现ssl-session表示https服务正常运行,服务器配置的ssl证书是可用的。如果提示connect:errno=111表示没有服务,建议检查nginx是否启动。
[root@izuf65h6i43ltlzhqolumyz conf]# echo | openssl s_client -connect 127.0.0.1:443 -servername it-blog.cn 2>/dev/null
connected(00000003)
---
certificate chain
 0 s:/cn=uat.bestcms.net
   i:/c=us/o=digicert inc/ou=www.digicert.com/cn=encryption everywhere dv tls ca - g1
 1 s:/c=us/o=digicert inc/ou=www.digicert.com/cn=encryption everywhere dv tls ca - g1
   i:/c=us/o=digicert inc/ou=www.digicert.com/cn=digicert global root ca
---
server certificate
-----begin certificate-----
miif8tccbnmgawibagiqbimiuqp6tmpfazzwum5razanbgkqhkig9w0baqsfadbu
mqswcqydvqqgewjvuzevmbmga1uechmmrglnaunlcnqgsw5jmrkwfwydvqqlexb3
d3cuzglnawnlcnquy29tms0wkwydvqqdeyrfbmnyexb0aw9uiev2zxj5d2hlcmug
rfygvextienbic0grzewhhcnmjexmti1mdawmdawwhcnmjixmti1mjm1otu5wjaa
mrgwfgydvqqdew91yxquymvzdgntcy5uzxqwggeima0gcsqgsib3dqebaquaa4ib
dwawggekaoibaqc3iiwmokln7rffy4bflxqp9oyoaah3geibzii9lnuqueqbvtwk
bxfmlx2z7wi4nvmnb6h1+oqsuqrgzhl3nvzaccxppy8mhpa0f2zen3dakqfuvdxf
fgsstjmqs/6izdr1q0ykahy99j5ia6tfygkxm37wwg42+axv4m8i5a2b/bh69llz
kkt5fyvnyvaxmdijyspauch214buhjv6agehgcgv3druy0snrytaimsjdi/vbrky
yeqknmxbbhyxlv51at2ego4rnmz/kmrm6a6lhf3aryop3a+pgjaa8zvuoiko+i1a
whfggicryke94zxqmrd7bu054w9fthojf/wlagmbaagjggldmiic2tafbgnvhsme
gdawgbrvde+yck/1ylpq0dfmuvyaayca1zadbgnvhq4efgqu9to7lciga8p+ohhn
4uqghbmunfmwggydvr0rbbmweyipdwf0lmjlc3rjbxmubmv0ma4ga1uddweb/wqe
awifodadbgnvhsuefjaubggrbgefbqcdaqyikwybbquhawiwpgydvr0gbdcwntaz
bgzngqwbagewktanbggrbgefbqccarybahr0cdovl3d3dy5kawdpy2vydc5jb20v
q1btmigabggrbgefbqcbaqr0mhiwjayikwybbquhmaggggh0dha6ly9vy3nwlmrp
z2ljzxj0lmnvbtbkbggrbgefbqcwaoy+ahr0cdovl2nhy2vydhmuzglnawnlcnqu
y29tl0vuy3j5chrpb25fdmvyexdozxjlrfzutfndqs1hms5jcnqwcqydvr0tbaiw
adccaxwgcisgaqqb1nkcbaieggfsbiibaafmahuarqvv63x6ksawtakjaftzfres
qxs+/um4havy/hd+bucaaaf9vsvu6aaabamarjbeaiac98z9jhfji8wdrv2e0i/c
pc4in9+i5tlauagqm9tovwigkwbyxrocmkgz626gw7iv5kfndegwl1wowlqlg3cf
4niadgbro7d1/qf5nfztudd4jwykeswbj8v3nohcmg3+1isf5qaaax1vk+7taaae
awbhmeucidupbwcgv3m8mnwrihen28df0lvjnv+2hrrqfmvfvmbiaieahtsdnxpi
rrrmxt7djntiunt8frljnm5khdfn0cwkbcqadqbbymqx3yjgshdgotojqodetjgl
gwpr60vhapcqypyg9gaaax1vk+6zaaaeawbgmeqcid3zj7iusdi3+7vwwbqxiwhv
6n8dmr0srfyglu0bi3p5aiao7cvwwf1yjdo8g6q94fr/rcdhwzq61qk95mmiakx5
yzanbgkqhkig9w0baqsfaaocaqeajxlhgk2lc2u9cgl4guu1lhtu/ndnx7ciigwf
cmrobbse0o4iscg10izg57stswagwvlug2ycdld47lwwr2+/xpzks3psrctm45pm
gjuawc9k0c3psigalob+u+c/42fu6squ2h8gxyszin4gr44toyy+i+g3nnntwnsj
vpzz8+19b4+0qahgd1mcj/qf9fwh04am8beibbdzoo7vuc7/b4kjy9f4vvu4i9he
qs6e2poyjvxp7t4k0ebeuovqz2vtya51ikepauuvitcjxqih2qiflkewhza5t+3d
g2ornpodvf6msheifdk/nv79relpyrrlskpesbkx/zfjkl9dng==
-----end certificate-----
subject=/cn=uat.bestcms.net
issuer=/c=us/o=digicert inc/ou=www.digicert.com/cn=encryption everywhere dv tls ca - g1
---
no client certificate ca names sent
peer signing digest: sha256
server temp key: ecdh, p-256, 256 bits
---
ssl handshake has read 3416 bytes and written 434 bytes
---
new, tlsv1/sslv3, cipher is ecdhe-rsa-aes128-gcm-sha256
server public key is 2048 bit
secure renegotiation is supported
compression: none
expansion: none
no alpn negotiated
ssl-session:
    protocol  : tlsv1.2
    cipher    : ecdhe-rsa-aes128-gcm-sha256
    session-id: 79cef4e325845ed2b21c77c85fff4b01b68b72362ee14a05c354e65c074f166d
    session-id-ctx:
    master-key: 48ee5a3e66d294f5f9b7f2a04ee6a58a7d8cf1211c103b86f31231bac30ba63325a1200a7915d7b556f516e215848f65
    key-arg   : none
    krb5 principal: none
    psk identity: none
    psk identity hint: none
    tls session ticket lifetime hint: 300 (seconds)
    tls session ticket:
    0000 - 8b c1 a2 a1 8e cd 5d 7b-f9 1e d0 0a d7 44 2b 89   ......]{.....d+.
    0010 - 09 f3 f4 4d 98 74 37 b7-57 cf ab e2 a5 ed 90 1e   ...m.t7.w.......
    0020 - 9d 4a 9b 2b fa 07 cd 51-d1 bd 4c 8c 41 be 8f 39   .j.+...q..l.a..9
    0030 - b8 4d 25 0e e7 0d 67 6a-0e a2 56 4c ea ad 38 63   .m%...gj..vl..8c
    0040 - 14 ed ed d0 2a 13 11 6a-81 0c e9 ae 10 3e f1 1c   ....*..j.....>..
    0050 - 22 08 9c 1e 7e 11 80 0f-00 61 38 85 6c da 28 b7   "...~....a8.l.(.
    0060 - f8 82 06 ea 80 12 cd a7-27 18 45 c1 84 97 07 13   ........'.e.....
    0070 - 9c 41 82 35 14 80 e4 de-8e ee cb af 55 4e 3e 59   .a.5........un>y
    0080 - 23 ad 6d cb 25 e1 fc 25-7b 3a cb f7 e7 e7 0c 48   #.m.%..%{:.....h
    0090 - 49 bf a8 fb 44 fc de 03-9f a4 f5 40 a7 0a ea 7e   i...d......@...~
    00a0 - 61 ab 50 87 1e 6a 5f 92-45 26 25 73 5c 06 0d b4   a.p..j_.e&%s\...
    00b0 - ed 8c cd 01 e4 86 9c 00-ab 42 22 b1 15 5e c4 ed   .........b"..^..

    start time: 1707407211
    timeout   : 300 (sec)
    verify return code: 10 (certificate has expired)
---
四、更新ecs安全组
放行tcp协议443端口的入方向请求,并在浏览器端通过https访问域名成功。

五、http 强制跳转 https
修改nginx.conf
[root@izuf65h6i43ltlzhqolumyz conf]# vim nginx.conf
在80端口下方添加rewrite ^(.*)$ https://$host$1;,并通过nginx -t校验语法,并通过nginx -s reload重新启动nginx
server {
    listen       80;
    server_name  localhost;

    rewrite ^(.*)$ https://$host$1;
六、nginx 配置文件
nginx.conf配置全文
#user  nobody;

worker_processes  1;

#error_log  logs/error.log;
#error_log  logs/error.log  notice;
#error_log  logs/error.log  info;

pid        logs/nginx.pid;

events {
    worker_connections  1024;
}

http {
    include       mime.types;

    default_type  application/octet-stream;

    #log_format  main  '$remote_addr - $remote_user [$time_local] "$request" '
    #                  '$status $body_bytes_sent "$http_referer" '
    #                  '"$http_user_agent" "$http_x_forwarded_for"';

    #access_log  logs/access.log  main;

    sendfile        on;
    #tcp_nopush     on;

    #keepalive_timeout  0;
    keepalive_timeout  65;

    #gzip  on;
        server {
        listen       80;
        server_name  it-blog-cn.com;

        rewrite ^(.*)$ https://$host$1;
        #charset koi8-r;

        #access_log  logs/host.access.log  main;

        location / {
                proxy_pass http://127.0.0.1:8080/; #代理的地址和端口
                client_max_body_size 100m;

                proxy_set_header host $host;
                proxy_set_header x-real-ip $remote_addr;
                proxy_set_header x-real-port $remote_port;
                proxy_set_header x-forwarded-for $host;
        }

        #error_page  404              /404.html;

        # redirect server error pages to the static page /50x.html
        #
        error_page   500 502 503 504  /50x.html;
        location = /50x.html {
            root   html;
        }

        # proxy the php scripts to apache listening on 127.0.0.1:80
        #
        #location ~ \.php$ {
                   #    proxy_pass   http://127.0.0.1;
        #}

        # pass the php scripts to fastcgi server listening on 127.0.0.1:9000
        #
        #location ~ \.php$ {
        #    root           html;
        #    fastcgi_pass   127.0.0.1:9000;
        #    fastcgi_index  index.php;
        #    fastcgi_param  script_filename  /scripts$fastcgi_script_name;
        #    include        fastcgi_params;
        #}

        # deny access to .htaccess files, if apache's document root
        # concurs with nginx's one
        #
        #location ~ /\.ht {
        #    deny  all;
        #}
    }

    # another virtual host using mix of ip-, name-, and port-based configuration
    #
    #server {
    #    listen       8000;
    #    listen       somename:8080;
    #    server_name  somename  alias  another.alias;

    #    location / {
    #        root   html;
        #        index  index.html index.htm;
    #    }
    #}

    # https server
    #

    server {
        listen       443 ssl;
        server_name  it-blog-cn.com;

        ssl_certificate     /usr/local/nginx/conf/cert/it-blog-cn.com.pem;
        ssl_certificate_key  /usr/local/nginx/conf/cert/it-blog-cn.com.key;

        ssl_session_cache    shared:ssl:1m;
        ssl_session_timeout  5m;

        ssl_ciphers  high:!anull:!md5;
        ssl_prefer_server_ciphers  on;

        location / {

            root   html;

            index  index.html index.htm;

        }
    }
}
到此这篇关于nginx配置ss证书的实现步骤的文章就介绍到这了,更多相关nginx配置ss证书内容请搜索代码网以前的文章或继续浏览下面的相关文章希望大家以后多多支持代码网!
赞 (0)
您想发表意见!!点此发布评论


发表评论