React类组件更新的底层逻辑案例详解
207人参与 • 2025-02-14 • Javascript
创建一个构造函数(类)
- 类组件必须继承自
react.component或react.purecomponent。 - 在类组件中,需要定义 render 方法来返回需要渲染的视图。
- 通常使用es6中的class创建类。
class mycomponent extends react.component {
  constructor(props) {
    super(props); // 调用父类构造函数
    console.log(this.props); // 获取传递的属性
    this.state = { count: 0 }; // 初始化状态
  }
  //返回渲染的视图
  render() {
    return <div>{this.state.count}</div>;
  }
}
类组件初始化
1. 初始化属性 && 规则校验
首先会进行规则校验,校验完毕后,再处理属性的其他操作。处理传进来的属性有两种处理方式:
方案一:
  constructor(props) {
        super(props); //会把传递进来的属性挂载到this实例上
        console.log(this.props); //获取到传递的属性
  }
方案二:
不在constructor中处理「或者constructor都没写」,在constructor处理完毕后,react内部也会把传递的props挂载到实例上。所以在其他的函数中,只要保证this是实例,就可以基于this.props获取传递的属性。同样this.props获取的属性对象也是被冻结的{只读的} object.isfrozen(this.props)->true。
2. 初始化状态
状态:后期修改状态,可以触发视图的更新。需要手动初始化,如果我们没有去做相关的处理,则默认会往实例上挂载一个state,初始值是null => this.state=null, 手动处理则需要写个state对象:
state = {
    ...
  };
如何修改状态,控制视图更新
this.state.xxx=xxx
上面的操作仅仅是修改了状态值,但是无法让视图更新,想让视图更新,我们需要基于react.component.prototype提供的方法操作:
this.setstate(partialstate) 既可以修改状态,也可以让视图更新 「推荐」 ,其中partialstate部分状态
 this.setstate({
       xxx:xxx
  });
this.forceupdate() 强制更新
3、触发 componentwillmount
componentwillmount:组件第一次渲染之前触发。
钩子函数:在程序运行到某个阶段,我们可以基于提供一个处理函数,让开发者在这个阶段做一些自定义的事情
⚠️注意:此周期函数,目前是不安全的「虽然可以用,但是未来可能要被移除了,所以不建议使用」,控制会抛出黄色警告「为了不抛出警告,我们可以暂时用 unsafe_componentwillmount」
⚠️注意:如果开启了react.strictmode「react的严格模式」,则我们使用 unsafe_componentwillmount 这样的周期函数,控制台会直接抛出红色警告错误!!
react.strictmode vs “use strict”
- “use strict”:js的严格模式
- react.strictmode:react的严格模式,它会去检查react中一些不规范的语法、或者是一些不建议使用的api等!!
4、触发 render 进行渲染
5、触发 componentdidmount
componentdidmount:第一次渲染完毕,此时已经把virtualdom变为真实dom了,可以获取真实dom
组件更新的逻辑
第一种:组件内部的状态被修改,组件会更新
1、触发 shouldcomponentupdate
shouldcomponentupdate:是否允许更新,返回值决定视图是否需要更新
   shouldcomponentupdate(nextprops, nextstate) {
     // nextstate:存储要修改的最新状态
     // this.state:存储的还是修改前的状态「此时状态还没有改变」
     console.log(this.state, nextstate);
     // 此周期函数需要返回true/false
     //   返回true:允许更新,会继续执行下一个操作
     //   返回false:不允许更新,接下来啥都不处理
     return true;
   }
2、触发 componentwillupdate
componentwillupdate:更新之前,此周期函数也是不安全的, 在这个阶段,状态/属性还没有被修改。
3、修改状态值/属性值
让this.state.xxx改为最新的值
4、触发 render
进行组件渲染,处于经历下面过程:
- 按照最新的状态/属性,把返回的jsx编译为virtualdom
- 和上一次渲染出来的virtualdom进行对比「
dom-diff」 - 把差异的部分进行渲染「渲染为真实的dom」
5、 触发 componentdidupdate
componentdidupdate:组件更新完毕。
⚠️注意:如果我们是基于 this.forceupdate() 强制更新视图,会跳过 shouldcomponentupdate 周期函数的校验,直接从 componentwillupdate 开始进行更新,也就是视图一定会触发更新。
第二种:父组件更新,触发的子组件更新
1、触发 componentwillreceiveprops
componentwillreceiveprops:接收最新属性之前,该周期函数是不安全的。
  unsafe_componentwillreceiveprops(nextprops) {
      // this.props:存储之前的属性
      // nextprops:传递进来的最新属性值
      console.log('componentwillreceiveprops:', this.props, nextprops);
  }
2、触发 shouldcomponentupdate 周期函数
接下来的逻辑跟第一种一样
组件卸载的逻辑
触发 componentwillunmount
componentwillunmount:组件销毁之前
销毁
扩展:父子组件嵌套更新逻辑
父子组件嵌套,处理机制上遵循深度优先原则:父组件在操作中,遇到子组件,一定是把子组件处理完,父组件才能继续处理
父组件第一次渲染
父 willmount -> 父 render「子 willmount -> 子 render -> 子didmount」 -> 父didmount
父组件更新
父 shouldupdate -> 父willupdate -> 父 render 「子willreceiveprops -> 子 shouldupdate -> 子willupdate -> 子 render -> 子 didupdate」-> 父 didupdate
父组件销毁
父 willunmount -> 处理中「子willunmount -> 子销毁」-> 父销毁
源码
import react from "react";
import proptypes from 'prop-types';
class vote extends react.component {
/* 属性规则校验 */
static defaultprops = {
num: 0
};
static proptypes = {
title: proptypes.string.isrequired,
num: proptypes.number
};
/* 初始化状态 */
state = {
supnum: 20,
oppnum: 10
};
render() {
console.log('render:渲染');
let { title } = this.props,
{ supnum, oppnum } = this.state;
return <div classname="vote-box">
<div classname="header">
<h2 classname="title">{title}</h2>
<span>{supnum + oppnum}人</span>
</div>
<div classname="main">
<p>支持人数:{supnum}人</p>
<p>反对人数:{oppnum}人</p>
</div>
<div classname="footer">
<button onclick={() => {
this.setstate({
supnum: supnum + 1
});
}}>支持</button>
<button onclick={() => {
this.state.oppnum++;
this.forceupdate();
}}>反对</button>
</div>
</div>;
}
unsafe_componentwillmount() {
console.log('componentwillmount:第一次渲染之前');
}
componentdidmount() {
console.log('componentdidmount:第一次渲染完毕');
}
shouldcomponentupdate(nextprops, nextstate) {
console.log('shouldcomponentupdate:', this.state, nextstate);
return true;
}
unsafe_componentwillupdate(nextprops, nextstate) {
console.log('componentwillupdate:', this.state, nextstate);
}
componentdidupdate() {
console.log('componentdidupdate:组件更新完毕');
}
unsafe_componentwillreceiveprops(nextprops) {
console.log('componentwillreceiveprops:', this.props, nextprops);
}
componentwillunmount() {
console.log('componentwillunmount:组件销毁之前');
}
}
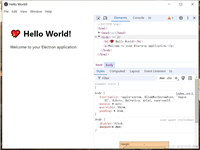
export default vote;初始渲染:

点击支持:更新渲染:

点击反对,更新渲染,因为使用了forceupdate(),所以直接跳过了shouldcomponentupdate周期:

父组件更新,触发的子组件更新,这次回触发componentwillreceiveprops

组件更新渲染逻辑如下图所示
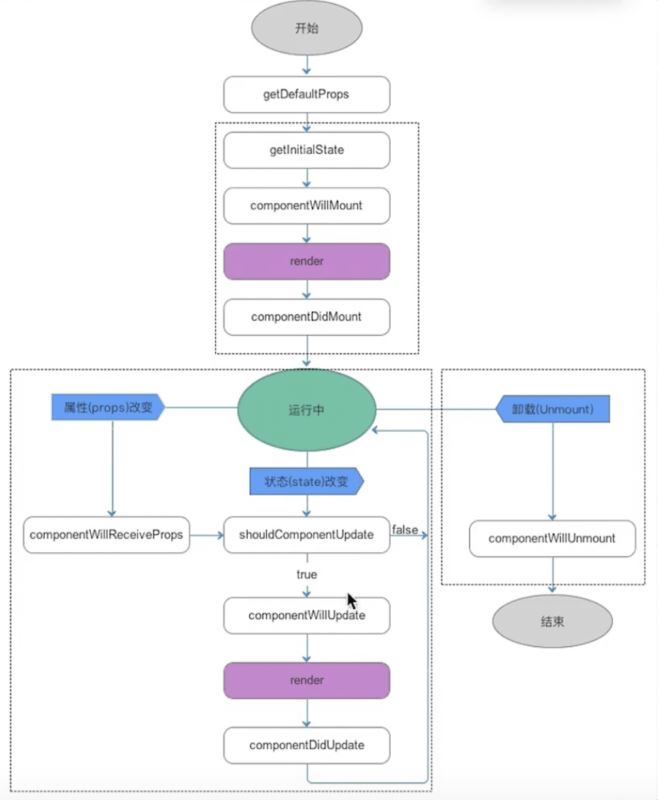
简单总结一下:
组件初始化阶段
constructor(props):用于初始化组件的属性和状态。unsafe_componentwillmount():在组件渲染前调用,但不推荐使用,可能在未来版本中被移除。render():渲染组件,返回 jsx 元素。componentdidmount():在组件渲染完成后调用,可以在此进行异步操作或 dom 操作。
组件更新阶段
shouldcomponentupdate(nextprops, nextstate):用于决定组件是否需要更新,返回 true 或 false。unsafe_componentwillupdate(nextprops, nextstate):在组件更新前调用,但不推荐使用,未来可能移除。- `render():再次渲染组件。
componentdidupdate(prevprops, prevstate):组件更新后调用,可以在此进行后续操作。
组件卸载阶段
componentwillunmount():在组件销毁之前调用,可以在此进行清理操作,如取消订阅、清除定时器等。
到此这篇关于react类组件更新的底层逻辑的文章就介绍到这了,更多相关react类组件内容请搜索代码网以前的文章或继续浏览下面的相关文章希望大家以后多多支持代码网!
赞 (0)
您想发表意见!!点此发布评论


发表评论