Nginx内网环境开启https双协议的实现
143人参与 • 2025-02-21 • 网络协议
前言
nginx开启https前提:
- 服务器支持open-ssl
- nginx 包含
--with-http_ssl_module --with-stream --with-stream_ssl_preread_module模块
一、open-ssl
1. 验证
openssl version
2. 安装
- 下载openssl安装包openssl安装包
- 安装openssl
 mkdir /usr/local/ssl
 cd /usr/local/ssl
 # 解压
 tar -xf openssl-3.0.1.tar.gz
 # 设置ssl库文件路径
 ./config --prefix=/usr/local/ssl/
 make
 make install
vi /etc/ld.so.conf
# 最后一行添加/usr/local/ssl/ 路径
sudo ldconfig
常见报错:openssl: error while loading shared libraries: libssl.so.10: cannot open shared object file: no such file or directory系统版本和openssl版本不一致,具体哪里的日志记录需要的版本忘记了
3.生成ssl证书
# 第一步:生成私钥
mkdir /etc/ssl/certs/www.abc.com
cd /etc/ssl/certs/www.abc.com
openssl genrsa -des3 -out server.key 2048
# 输入一个4位以上的密码
# 确认密码
#第二步:生成csr(证书签名请求)
openssl req -new -key server.key -out server.csr -subj "/c=cn/st=jilin/l=changchun/o=commany/ou=commany/cn=www.abc.com"
#第三步:去除私钥中的密码
#在第1步创建私钥的过程中,由于必须要指定一个密码。而这个密码会带来一个副作用,那就是在每次启动web服务器时,都会要求输入密码
#这显然非常不方便。要删除私钥中的密码,操作如下:
openssl rsa -in server.key -out server.key
#第四步:生成自签名ssl证书
# -days 证书有效期-天
openssl x509 -req -days 3650 -in server.csr -signkey server.key -out server.crt
一、nginx
1. 验证支持模块
nginx -v
2. 安装必要模块
可以参考我之前的博客 nginx 平滑升级
2.1 重新编译nginx
./configure --prefix=/usr/local/nginx --with-http_ssl_module --with-pcre --with-http_gzip_static_module --with-stream --with-stream_ssl_preread_module
生成nginx二进制执行文件到当前目录 /objs
make
2.2 替换原文件
替换
mv /usr/local/nginx/sbin/nginx /usr/local/nginx/sbin/nginx.bak
cp /usr/local/nginx-1.13.3/objs/nginx /usr/local/nginx/sbin/
验证
[root@web nginx-1.21.5]# make upgrade
/usr/local/nginx/sbin/nginx -t
nginx: the configuration file /usr/local/nginx/conf/nginx.conf syntax is ok
nginx: configuration file /usr/local/nginx/conf/nginx.conf test is successful
kill -usr2 `cat /usr/local/nginx/logs/nginx.pid`
sleep 1
test -f /usr/local/nginx/logs/nginx.pid.oldbin
kill -quit `cat /usr/local/nginx/logs/nginx.pid.oldbin`
升级
#验证模块是否加载成功
nginx -v
3. 配置https
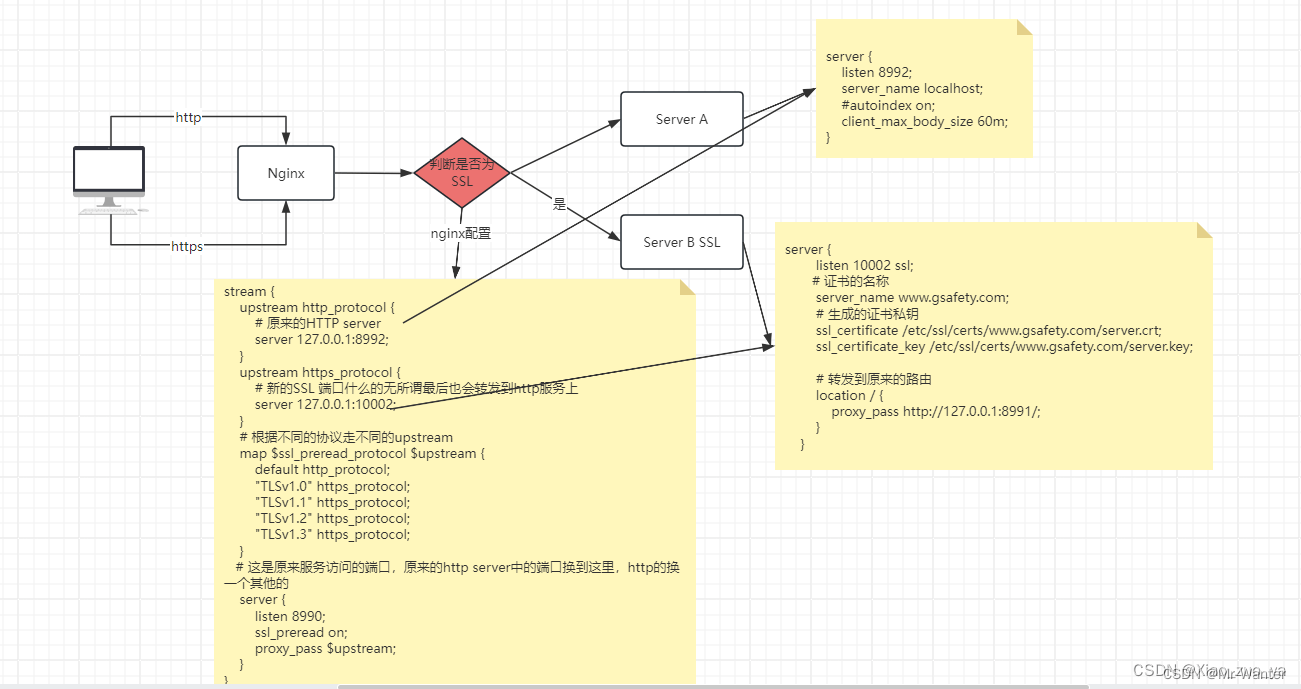
下面是一段双协议支持的配置代码
请允许我抄袭一下小左同学的代码
stream {
    upstream http_protocol {
        # 8991端口是一个开启http的端口
        server 127.0.0.1:8991;
    }
    upstream https_protocol {
        # 10002端口是一个开启https的端口
        server 127.0.0.1:10002;
    }
    # 根据不同的协议走不同的upstream
    map $ssl_preread_protocol $upstream {
        default http_protocol;
        "tlsv1.0" https_protocol;
        "tlsv1.1" https_protocol;
        "tlsv1.2" https_protocol;
        "tlsv1.3" https_protocol;
    }
    server {
        listen 8990;
        ssl_preread on;
        proxy_pass $upstream;
    }
}
  server {
        listen 10002 ssl;
        server_name www.xxx.com;
        ssl_certificate /etc/ssl/certs/www.abc.com/server.crt;
        ssl_certificate_key /etc/ssl/certs/www.abc.com/server.key;
        #减少点击劫持
        #add_header x-frame-options deny;
        add_header x-frame-options allowall;
        #禁止服务器自动解析资源类型
        add_header x-content-type-options nosniff;
        #防xss攻击
        add_header x-xss-protection 1;
        #优先采取服务器算法
        ssl_prefer_server_ciphers on;
        #协议
        ssl_protocols tlsv1 tlsv1.1 tlsv1.2;
        ssl_session_cache shared:ssl:10m;
        ssl_session_timeout 10m;

        location / {
            proxy_pass http://127.0.0.1:8991/;
        }
    }
总结
openssl: error while loading shared libraries: libssl.so.10: cannot open shared object file: no such file or directory这个问题是很大的难点,排查好久才找到一个对应版本安装成功(我的是麒麟银河v10,版本openssl 1.1.1f),关键是怎么找到对应版本的过程当时没有记录,现在也想不起来了,😫- open-ssl验证时本地发现有open-ssl,所以就跳过了第一步 结果nginx make报错
make -f objs/makefile
make[1]: entering directory '/opt/nginx-1.21.5'
cd /usr/local/ssl/ \
&& if [ -f makefile ]; then make clean; fi \
&& ./config --prefix=/usr/local/ssl//.openssl no-shared no-threads  \
&& make \
&& make install_sw libdir=lib
/bin/sh: line 2: ./config: no such file or directory
make[1]: *** [objs/makefile:1447: /usr/local/ssl//.openssl/include/openssl/ssl.h] error 127
openssl源代码未正确指定:在nginx的配置过程中,你可能没有正确指定openssl的源代码目录。你需要确保–with-openssl选项指向的是openssl的源代码目录,而不是安装目录。
上传openssl-1.1.1f.tar.gz包(和验证时的版本一致即可)解压后指定–with-openssl到解压目录--with-openssl=/opt/openssl-1.1.1f
./configure \
  --prefix=/usr/local/nginx \
  --user=nginx \
  --group=nginx \
  --with-pcre \
  --with-openssl=/opt/openssl-1.1.1f \
  --with-http_ssl_module \
  --with-http_v2_module \
  --with-http_realip_module \
  --with-http_addition_module \
  --with-http_sub_module \
  --with-http_dav_module \
  --with-http_flv_module \
  --with-http_mp4_module \
  --with-http_gunzip_module \
  --with-http_gzip_static_module \
  --with-http_random_index_module \
  --with-http_secure_link_module \
  --with-http_stub_status_module \
  --with-http_auth_request_module \
  --with-http_image_filter_module \
  --with-mail \
  --with-threads \
  --with-mail_ssl_module \
  --with-stream_ssl_module \
  --with-stream --with-stream_ssl_preread_module \
 && make
- 双协议不支持获取访问ip穿透
更改为https或者http单协议可获取到客户端访问ip,如果代理中包含websocket需要把响应代理放到和ssl配置的配置文件中
关键配置:
proxy_set_header host $host;
proxy_set_header x-real-ip $remote_addr;
proxy_set_header x-forwarded-for $proxy_add_x_forwarded_for;
nginx.conf 示例
user root;
worker_processes auto;
error_log /usr/local/nginx/logs/error.log;

events {
    worker_connections  1024;
}

http {
    # log_format  main  '$remote_addr - $remote_user [$time_local] "$request" '
    #                   '$status $body_bytes_sent "$http_referer" '
    #                   '"$http_user_agent" "$http_x_forwarded_for"';
    log_format  main  '$year$month$day $hour:$minutes:$seconds ' '[$status] ' '【$http_x_forwarded_for $remote_addr $http_host】' '[$request_uri] ' ;

    access_log  /usr/local/nginx/logs/access.log  main;

    underscores_in_headers on;
    sendfile            on;
    tcp_nopush          on;
    tcp_nodelay         on;
    keepalive_timeout   65;
    types_hash_max_size 4096;

    include /etc/nginx/mime.types;
    client_max_body_size 10m;

    default_type        application/octet-stream;
    #default_type         text/html;


    #gzip
    gzip on;
    gzip_min_length 1024;
    gzip_comp_level 6;
    gzip_types text/plain application/json application/javascript application/x-javascript text/css application/xml text/javascript application/x-httpd-php image/jpeg image/gif image/png application/vnd.ms-fontobject font/ttf font/opentype font/x-woff image/svg+xml  font/woff;
    gzip_vary on;
    gzip_disable "msie [1-6]\.";
    gzip_buffers 32 16k;
    gzip_http_version 1.0;

    include /usr/local/nginx/conf/conf.d/*.conf;

     server {
	    listen 8990 ssl;
		server_name www.bbcc.com;
        ssl_certificate /etc/ssl/certs/www.bbcc.com/server.crt;
        ssl_certificate_key /etc/ssl/certs/www.bbcc.com/server.key;
        #减少点击劫持
        #add_header x-frame-options deny;
        add_header x-frame-options allowall;
        #禁止服务器自动解析资源类型
        add_header x-content-type-options nosniff;
        #防xss攻击
        add_header x-xss-protection 1;
        #优先采取服务器算法
        ssl_prefer_server_ciphers on;
        #协议
        ssl_protocols tlsv1 tlsv1.1 tlsv1.2;
        ssl_session_cache shared:ssl:10m;
        ssl_session_timeout 10m;

        # 自定义时间变量
		if ($time_iso8601 ~ "^(\d{4})-(\d{2})-(\d{2})t(\d{2}):(\d{2}):(\d{2})") {
			set $year $1;
			set $month $2;
			set $day $3;
			set $hour $4;
			set $minutes $5;
			set $seconds $6;
		}

        location / {
            autoindex off;
        	proxy_set_header host $host;
            proxy_set_header x-real-ip $remote_addr;
            proxy_set_header x-forwarded-for $proxy_add_x_forwarded_for;
            proxy_pass http://172.168.18.31:8990/;
        }

        location /gws {
            proxy_http_version 1.1;
            proxy_set_header upgrade $http_upgrade;
            proxy_set_header connection "upgrade";
            proxy_pass http://172.168.18.31:8990;
        }
    }

}
到此这篇关于nginx内网环境开启https双协议的文章就介绍到这了,更多相关nginx开启https双协议内容请搜索代码网以前的文章或继续浏览下面的相关文章希望大家以后多多支持代码网!
赞 (0)
您想发表意见!!点此发布评论


发表评论