287人参与 • 2025-03-05 • https
sudo apt update
sudo apt install nginx
1)查看版本
nginx -v
# 版本
nginx version: nginx/1.18.0 (ubuntu)
2)查看安装版本及详情
nginx -v

#版本及安装详情
nginx version: nginx/1.18.0 (ubuntu)
built with openssl 1.1.1f  31 mar 2020
tls sni support enabled
configure arguments: --with-cc-opt='-g -o2 -fdebug-prefix-map=/build/nginx-lutckl/nginx-1.18.0=. -fstack-protector-strong -wformat -werror=format-security -fpic -wdate-time -d_fortify_source=2' --with-ld-opt='-wl,-bsymbolic-functions -wl,-z,relro -wl,-z,now -fpic' --prefix=/usr/share/nginx --conf-path=/etc/nginx/nginx.conf --http-log-path=/var/log/nginx/access.log --error-log-path=/var/log/nginx/error.log --lock-path=/var/lock/nginx.lock --pid-path=/run/nginx.pid --modules-path=/usr/lib/nginx/modules --http-client-body-temp-path=/var/lib/nginx/body --http-fastcgi-temp-path=/var/lib/nginx/fastcgi --http-proxy-temp-path=/var/lib/nginx/proxy --http-scgi-temp-path=/var/lib/nginx/scgi --http-uwsgi-temp-path=/var/lib/nginx/uwsgi --with-debug --with-compat --with-pcre-jit --with-http_ssl_module --with-http_stub_status_module --with-http_realip_module --with-http_auth_request_module --with-http_v2_module --with-http_dav_module --with-http_slice_module --with-threads --with-http_addition_module --with-http_gunzip_module --with-http_gzip_static_module --with-http_image_filter_module=dynamic --with-http_sub_module --with-http_xslt_module=dynamic --with-stream=dynamic --with-stream_ssl_module --with-mail=dynamic --with-mail_ssl_module
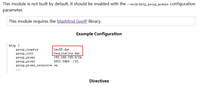
可以发现,使用在线安装方式,为我们指定了一些安装参数,
例如:--prefix=/usr/share/nginx --conf-path=/etc/nginx/nginx.conf,并为我们安装了一些module,
例如:--with-http_ssl_module,这就是我们服务器部署常用的https模块。
1)删除nginx
由于通过apt方式安装了nginx,因此需要先将其卸载掉。加上--purge删除已安装的软件包,并删除配置文件。
sudo apt --purge remove nginx
2)删除相关依赖
虽然在第一步删除nginx时,会提示使用sudo apt autoremove
注意:使用该命令会出现一些无法预知的错误,切记。
sudo apt --purge remove fontconfig-config fonts-dejavu-core libfontconfig1 libgd3 libjbig0 libjpeg-turbo8 libjpeg8 libnginx-mod-http-image-filter libnginx-mod-http-xslt-filter libnginx-mod-mail libnginx-mod-stream libtiff5 libwebp6 libxpm4 nginx-common nginx-core
下载地址:nginx: download
1)解压缩
tar zxvf nginx-1.18.0.tar.gz
2)安装编译相关模块
sudo apt install gcc
sudo apt install make
3)设置配置
cd /home/stone/nginx-1.18.0
sudo ./configure --sbin-path=/usr/local/nginx/nginx --conf-path=/usr/local/nginx/nginx.conf --pid-path=/usr/local/nginx/nginx.pid
会提示报错需要pcre,zlib模块
4)安装相关依赖
sudo apt install libpcre3-dev
sudo apt install zlib1g-dev
5)编译&安装
sudo make
sudo make install
6)启动
cd /usr/local/nginx
sudo ./nginx
7)查看进程
ps -ef|grep nginx

root       39949       1  0 12:54 ?        00:00:00 nginx: master process ./nginx
nobody     39950   39949  0 12:54 ?        00:00:00 nginx: worker process
8)查看默认安装模块
我们先使用nginx -v查看,发现其只返回了我们配置的参数,并不像apt安装方式时,会返回安装了哪些模块。
cd /usr/local/nginx
./nginx -v

# 输出结果
nginx version: nginx/1.18.0
built by gcc 9.4.0 (ubuntu 9.4.0-1ubuntu1~20.04.1)
configure arguments: --sbin-path=/usr/local/nginx/nginx --conf-path=/usr/local/nginx/nginx.conf --pid-path=/usr/local/nginx/nginx.pid
这时,我们需要去编译的文件夹去找,可以看到编译安装的方式,安装的模块比apt安装方式时还要多。
cd /home/stone/nginx-1.18.0/auto
cat options | grep "yes"

# 输出结果
http=yes
http_cache=yes
http_charset=yes
http_gzip=yes
http_ssi=yes
http_access=yes
http_auth_basic=yes
http_mirror=yes
http_userid=yes
http_autoindex=yes
http_geo=yes
http_map=yes
http_split_clients=yes
http_referer=yes
http_rewrite=yes
http_proxy=yes
http_fastcgi=yes
http_uwsgi=yes
http_scgi=yes
http_grpc=yes
http_memcached=yes
http_limit_conn=yes
http_limit_req=yes
http_empty_gif=yes
http_browser=yes
http_upstream_hash=yes
http_upstream_ip_hash=yes
http_upstream_least_conn=yes
http_upstream_random=yes
http_upstream_keepalive=yes
http_upstream_zone=yes
mail_pop3=yes
mail_imap=yes
mail_smtp=yes
stream_limit_conn=yes
stream_access=yes
stream_geo=yes
stream_map=yes
stream_split_clients=yes
stream_return=yes
stream_upstream_hash=yes
stream_upstream_least_conn=yes
stream_upstream_random=yes
stream_upstream_zone=yes
        --with-select_module)            event_select=yes           ;;
        --with-poll_module)              event_poll=yes             ;;
        --with-threads)                  use_threads=yes            ;;
        --with-file-aio)                 ngx_file_aio=yes           ;;
        --with-http_ssl_module)          http_ssl=yes               ;;
        --with-http_v2_module)           http_v2=yes                ;;
        --with-http_realip_module)       http_realip=yes            ;;
        --with-http_addition_module)     http_addition=yes          ;;
        --with-http_xslt_module)         http_xslt=yes              ;;
        --with-http_image_filter_module) http_image_filter=yes      ;;
        --with-http_geoip_module)        http_geoip=yes             ;;
        --with-http_sub_module)          http_sub=yes               ;;
        --with-http_dav_module)          http_dav=yes               ;;
        --with-http_flv_module)          http_flv=yes               ;;
        --with-http_mp4_module)          http_mp4=yes               ;;
        --with-http_gunzip_module)       http_gunzip=yes            ;;
        --with-http_gzip_static_module)  http_gzip_static=yes       ;;
        --with-http_auth_request_module) http_auth_request=yes      ;;
        --with-http_random_index_module) http_random_index=yes      ;;
        --with-http_secure_link_module)  http_secure_link=yes       ;;
        --with-http_degradation_module)  http_degradation=yes       ;;
        --with-http_slice_module)        http_slice=yes             ;;
        --with-http_perl_module)         http_perl=yes              ;;
        --with-http_stub_status_module)  http_stub_status=yes       ;;
        --with-mail)                     mail=yes                   ;;
        --with-mail_ssl_module)          mail_ssl=yes               ;;
            mail=yes
            mail_ssl=yes
        --with-stream)                   stream=yes                 ;;
        --with-stream_ssl_module)        stream_ssl=yes             ;;
        --with-stream_realip_module)     stream_realip=yes          ;;
        --with-stream_geoip_module)      stream_geoip=yes           ;;
                                         stream_ssl_preread=yes     ;;
        --with-google_perftools_module)  ngx_google_perftools=yes   ;;
        --with-cpp_test_module)          ngx_cpp_test=yes           ;;
        --with-compat)                   ngx_compat=yes             ;;
        --with-debug)                    ngx_debug=yes              ;;
        --with-pcre)                     use_pcre=yes               ;;
        --with-pcre-jit)                 pcre_jit=yes               ;;
        --with-libatomic)                ngx_libatomic=yes          ;;
        --test-build-devpoll)            ngx_test_build_devpoll=yes ;;
        --test-build-eventport)          ngx_test_build_eventport=yes ;;
        --test-build-epoll)              ngx_test_build_epoll=yes   ;;
--test-build-solaris-sendfilev) ngx_test_build_solaris_sendfilev=yes ;;以上为个人经验,希望能给大家一个参考,也希望大家多多支持代码网。
您想发表意见!!点此发布评论
版权声明:本文内容由互联网用户贡献,该文观点仅代表作者本人。本站仅提供信息存储服务,不拥有所有权,不承担相关法律责任。 如发现本站有涉嫌抄袭侵权/违法违规的内容, 请发送邮件至 2386932994@qq.com 举报,一经查实将立刻删除。


发表评论