Python使用python-docx-template的实用案例解析
4人参与 • 2026-01-31 • Python
python-docx-template是一个功能强大的word文档自动化生成库,它基于模板引擎的设计思想,允许用户通过编写模板与python代码逻辑分离的方式,高效生成结构复杂、样式多样的word文档。在文章python-docx-template模板化word文档生成指北介绍该库的基础用法之上,本文将进一步结合官方示例,提供多个实用场景的代码解析与拓展,涵盖复杂样式、自定义过滤器、嵌套循环及富文本渲染等高级功能,以提升文档生成的效率与灵活性。下文将分模块展开具体示例与实现。
python-docx-template的官方代码仓库地址为:python-docx-template,详细文档可参阅:python-docx-template doc。
本文使用的python-docx-template版本为0.20.2,安装命令如下:
pip install docxtpl
表格样式生成
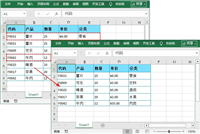
本示例用于生成包含富文本样式与单元格背景色的word表格文档。
模板内容:

渲染代码:
# python-docx-template/blob/master/tests/comments.py
from docxtpl import docxtemplate, richtext
# data: python-docx-template/blob/master/tests/templates/cellbg_tpl.docx
tpl = docxtemplate("templates/cellbg_tpl.docx")

context = {
    "alerts": [
        {
            "date": "2015-03-10",
            "desc": richtext("very critical alert", color="ff0000", bold=true),
            "type": "critical",
            "bg": "ff0000",
        },
        {
            "date": "2015-03-11",
            "desc": richtext("just a warning"),
            "type": "warning",
            "bg": "ffdd00",
        }
    ],
}

tpl.render(context)
tpl.save("output/cellbg.docx")
自定义jinja2过滤器
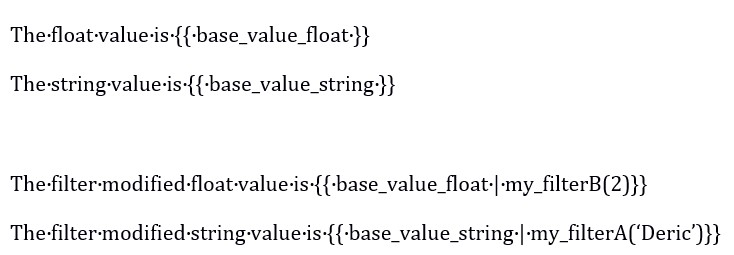
本示例主要介绍通过自定义jinja2过滤器实现动态数据渲染,jinja2模板中过滤器的核心格式为:{{ 变量名|过滤器名(参数1, 参数2, ...) }},其中:
|(竖线)是过滤器的分隔符,左侧是要处理的变量,右侧是过滤器名称;- 括号
()内是传给过滤器函数的参数(无参数时可省略括号); - 示例:
{{ base_value_float|my_filterb(2) }}中,base_value_float是变量,my_filterb是过滤器名,2是传递的参数。
模板内容:
渲染代码:
# python-docx-template/blob/master/tests/custom_jinja_filters.py
from docxtpl import docxtemplate
import jinja2

# 创建jinja2环境对象,用于管理模板渲染的配置
jinja_env = jinja2.environment()

# 自定义过滤器函数
def my_filtera(value, my_string_arg):
    # 将原始值和参数字符串拼接,中间加空格
    return_value = value + " " + my_string_arg
    return return_value
def my_filterb(value, my_float_arg):
    # 将原始值和参数数值相加
    return_value = value + my_float_arg
    return return_value

# 将自定义过滤器注册到jinja2环境中,使其能在模板中被调用
# 注册后在word模板中可通过{{ 变量名| my_filtera('参数') }}形式使用
jinja_env.filters["my_filtera"] = my_filtera
jinja_env.filters["my_filterb"] = my_filterb

context = {
    "base_value_string": " hello",
    "base_value_float": 1.5
}
# data: python-docx-template/blob/master/tests/templates/custom_jinja_filters_tpl.docx
tpl = docxtemplate("templates/custom_jinja_filters_tpl.docx")
tpl.render(context, jinja_env)
tpl.save("output/custom_jinja_filters.docx")
文档嵌入
以下代码展示了如何渲染子word文档,替换主word文档中嵌入的各类文件,填充数据后保存文档:
# python-docx-template/blob/master/tests/embedded.py
from docxtpl import docxtemplate

# 加载内嵌子模板文件
# data: python-docx-template/blob/master/tests/templates/embedded_embedded_docx_tpl.docx
embedded_docx_tpl = docxtemplate("templates/embedded_embedded_docx_tpl.docx")

# 定义模板渲染的上下文数据
context = {
    "name": "john doe",  # 要填充到模板中的姓名值
}
embedded_docx_tpl.render(context)

# 保存渲染后的子模板到指定路径,供后续主模板调用
embedded_docx_tpl.save("output/embedded_embedded_docx.docx")

# 加载主模板文件
tpl = docxtemplate("templates/embedded_main_tpl.docx")

# 定义主模板的上下文数据
context = {
    "name": "john doe",
}

# 替换主模板中嵌入的word文档
# 参数1:模原本嵌入的占位文件路径
# 参数2:要替换成的目标文件路径
tpl.replace_embedded(
    "templates/embedded_dummy.docx", "templates/embedded_static_docx.docx"
)

tpl.replace_embedded(
    "templates/embedded_dummy2.docx", "output/embedded_embedded_docx.docx"
)

# 说明:docx 本质是 zip 压缩包,嵌入的文件会存储在word/embeddings/目录下
tpl.replace_zipname(
    "word/embeddings/feuille_microsoft_office_excel3.xlsx",
    "templates/real_excel.xlsx"  # 要替换成的实际文件路径
)
tpl.replace_zipname(
    "word/embeddings/pr_sentation_microsoft_office_powerpoint4.pptx",
    "templates/real_powerpoint.pptx"
)

tpl.render(context)
tpl.save("output/embedded.docx")
自动转义
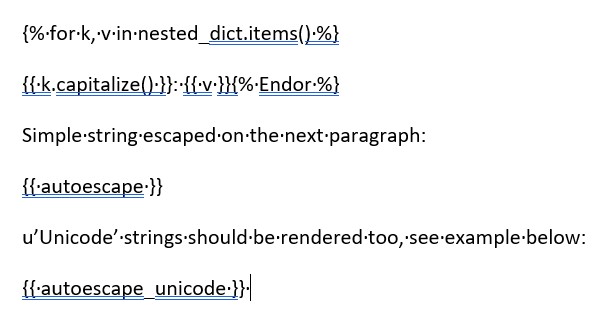
本示例展示了在自动转义模式下,将包含xml特殊字符、unicode文本和动态键值对的上下文数据渲染到模板中。
模板内容:
渲染代码:
# python-docx-template/blob/master/tests/escape_auto.py
import os
from unicodedata import name
from docxtpl import docxtemplate
xml_reserved = """<"&'>"""
# data: python-docx-template/blob/master/tests/templates/escape_tpl_auto.docx
tpl = docxtemplate("templates/escape_tpl_auto.docx")

context = {
    "nested_dict": {name(str(c)): c for c in xml_reserved},
    "autoescape": 'escaped "str & ing"!',
    "autoescape_unicode": "this is an escaped <unicode> example \u4f60 & \u6211",
    "iteritems": lambda x: x.items(),
}
# autoescape=true表示自动转义
tpl.render(context, autoescape=true)

output = "output"
if not os.path.exists(output):
    os.makedirs(output)
tpl.save(output + "/escape_auto.docx")
实际上iteritems(nested_dict)就是调用渲染定义的lambda函数,把nested_dict传进去,拿到它的所有键值对:
{% for k, v in iteritems(nested_dict) %}
{{ k.capitalize() }}: {{ v }}{% endfor %}
也可以在jinja2模板中使用python表达式,直接调用字典的item方法:
{% for k, v in nested_dict.items() %}
{{ k.capitalize() }}: {{ v }}{% endfor %}
图片替换
以下示例说明如何替换word模板文档(包含页眉页脚)中的图片,并演示如何将处理后的文档分别通过常规方式和内存文件对象保存为本地文件:
# python-docx-template/blob/master/tests/header_footer_image_file_obj.py
from docxtpl import docxtemplate
import io

# 定义两个输出文档的路径和文件名
dest_file = "output/header_footer_image_file_obj.docx"
dest_file2 = "output/header_footer_image_file_obj2.docx"
# data: python-docx-template/blob/master/tests/templates/header_footer_image_tpl.docx
tpl = docxtemplate("templates/header_footer_image_tpl.docx")

context = {
    "mycompany": "the world wide company",
}

# 读取模板中需要被替换的图片文件,并转换为内存字节流对象
dummy_pic = io.bytesio(open("templates/dummy_pic_for_header.png", "rb").read())
# 读取新的替换图片文件(python.png),并转换为内存字节流对象
new_image = io.bytesio(open("templates/python.png", "rb").read())

# 将dummy_pic对应的图片替换为new_image对应的图片
tpl.replace_media(dummy_pic, new_image)
tpl.render(context)
tpl.save(dest_file)

tpl = docxtemplate("templates/header_footer_image_tpl.docx")

# 将内存中的图片字节流指针重置到起始位置
dummy_pic.seek(0)
new_image.seek(0)

# 再次执行图片替换操作
tpl.replace_media(dummy_pic, new_image)
# 再次渲染模板变量
tpl.render(context)

# 创建一个空的内存字节流对象,用于临时存储文档内容
file_obj = io.bytesio()
# 将处理后的文档保存到内存字节流对象中
tpl.save(file_obj)
# 将内存字节流指针重置到起始位置,准备读取内容
file_obj.seek(0)

# 以二进制写入模式打开第二个输出文件,将内存中的文档内容写入文件
with open(dest_file2, "wb") as f:
    f.write(file_obj.read())
dummy_pic.close()
new_image.close()
上述代码实现图片替换并非基于文件名,而是基于二进制内容的匹配。这是因为replace_media方法根据图片的二进制内容来识别图像,而非依赖文件名或在word中显示的名称。
由于word文档 (.docx) 本质上是一个压缩包,其中的图片以二进制形式存储在word/media/目录下,且在某些word版本中,图片文件名可能被自动重命名(例如改为 image1.png),与原始文件名无关。
注意:待替换图片尺寸不宜过大,且需关闭word模板的图片压缩功能;否则word会自动压缩模板中的图片,改变其二进制数据,最终导致图片替换操作失败。
命令行执行
以下示例展示了直接在命令行中使用docxtpl模块,基于模板文件和作为上下文数据的json文件生成docx文档:
# python-docx-template/blob/master/tests/module_execute.py
import os
# data: python-docx-template/blob/master/tests/templates/module_execute_tpl.docx
template_path = "templates/module_execute_tpl.docx"
# 存储需要填充到模板中的数据
json_path = "templates/module_execute.json"
output_filename = "output/module_execute.docx"
# docxtpl命令参数:强制覆盖已存在的输出文件
overwrite = "-o"
# docxtpl命令参数:静默模式执行,不输出额外日志信息
quiet = "-q"
 # 删除已存在的输出文件
if os.path.exists(output_filename):
    os.unlink(output_filename)

# 切换工作目录到当前脚本所在的目录
os.chdir(os.path.dirname(__file__))

# 通过python模块方式调用docxtpl,传入模板、数据、输出路径和参数
# 可通过python -m docxtpl -help查看调用帮助
cmd = "python -m docxtpl %s %s %s %s %s" % (
    template_path,       # 模板文件路径
    json_path,           # 数据文件路径
    output_filename,    # 输出文件路径
    overwrite,           # 覆盖参数
    quiet                # 静默参数
)

print('executing "%s" ...' % cmd)
os.system(cmd)
if os.path.exists(output_filename):
    print("    --> file %s has been generated." % output_filename)
多层嵌套
以下示例展示了如何通过模板语法实现逐层循环渲染,最终生成包含这些嵌套数据的word文档:
# python-docx-template/blob/master/tests/nested_for.py
from docxtpl import docxtemplate
# data: python-docx-template/blob/master/tests/templates/nested_for_tpl.docx
tpl = docxtemplate("templates/nested_for_tpl.docx")

context = {
    "dishes": [
        {"name": "pizza", "ingredients": ["bread", "tomato", "ham"]},
        {
            "name": "hamburger",
            "ingredients": ["bread", "chopped steak", "cheese"],
        },
    ],
    "authors": [
        {
            "name": "saint-exupery",
            "books": [
                {"title": "le petit prince"},
                {"title": "l'aviateur"},
            ],
        },
        {
            "name": "barjavel",
            "books": [
                {"title": "ravage"},
                {"title": "la nuit des temps"},
            ],
        },
    ],
}

tpl.render(context)
tpl.save("output/nested_for.docx")
地区字体处理
若字体显示异常,通常是由于字体仅适配了特定文字区域。解决方法是在字体名前加上区域标识和冒号(如 eastasia:微软雅黑),从而指定文字的区域渲染方式。如果不清楚区域标识,也可解压模板文件后分析document.xml确认字体对应的区域。常见区域标识包括:
- eastasia:用于东亚字符如中文
- hansi:用于拉丁字符如英文
- ascii:用于兼容旧版英文
以下代码展示了如何设置不同的东亚字体:
# python-docx-template/blob/master/tests/richtext_eastasia.py
from docxtpl import docxtemplate, richtext
# data: python-docx-template/blob/master/tests/templates/richtext_eastasia_tpl.docx
tpl = docxtemplate("templates/richtext_eastasia_tpl.docx")
# 2. 创建富文本对象,分别设置不同的东亚字体
# eastasia: 前缀表示该字体设置仅作用于东亚字符(中文、日文、韩文等)
rt = richtext("测试test", font="eastasia:microsoft yahei")
ch = richtext("测试test", font="eastasia:微软雅黑")
sun = richtext("测试test", font="eastasia:simsun")
context = {
    "example": rt,
    "chinese": ch,
    "simsun": sun,
}

tpl.render(context)
tpl.save("output/richtext_eastasia.docx")
富文本使用
python-docx-template的核心功能是基于jinja2语法动态生成word文档。其richtext类进一步增强了灵活性,允许直接以编程方式插入格式丰富的文本,而无需为每种样式组合单独设置模板变量。richtext对象可在初始化时直接传入文本,通过多次调用add方法可向其追加不同格式的文本片段。最后,将该对象整体赋给模板上下文中的变量。在word模板中,只需使用{{ rich_text_var }}引用该变量,即可渲染成包含多种格式的连续段落。

add方法是构建richtext对象的核心,其所有参数均用于控制当前操作所添加文本的格式:
| 参数 | 类型 | 默认值 | 说明 |
|---|---|---|---|
| text | str | 无 | 唯一必需参数,要追加的文本内容 |
| style | str | none | 应用段落样式,这会影响整个由richtext对象生成的段落的样式 |
| color | str | none | 字体颜色支持十六进制(如#ff0000)或word预设颜色名(如red) |
| highlight | str | none | 文本背景高亮色,取值同color参数 |
| size | int | none | 字体大小 |
| subscript | bool | none | 设为true时文本显示为下标,与superscript互斥 |
| superscript | bool | none | 设为true时文本显示为上标,与subscript互斥 |
| bold | bool | false | 设为true时,文本加粗 |
| italic | bool | false | 设为true时,文本倾斜 |
| underline | bool | false | 设为true时,文本添加下划线 |
| strike | bool | false | 设为true时,文本添加删除线 |
| font | str | none | 字体名称 |
| url_id | str | none | 添加超链接,需要传入一个链接id,该id一般通过文档对象的build_url_id()方法生成 |
| rtl | bool | false | 设为true时,文本从右向左排列,仅对阿拉伯语、希伯来语等有效 |
| lang | str | none | 设置文本的语言,用于拼写检查和断字 |
重要提示:style(段落样式)参数比较特殊。它通常只在第一次调用add方法时有效,后续调用中再设置style通常会被忽略。
以下是一段使用示例代码,按顺序介绍richtext.add()方法的各个参数:
from docxtpl import docxtemplate, richtext
import os
# 1. 创建模板对象并初始化richtext
doc = docxtemplate("template.docx")
rt = richtext()

# 2. 添加基础文本(必需参数)
rt.add("这是普通文本")

# 3. 设置段落样式(影响整个段落)
rt.add("\n标题文本", style="heading1")

# 4. 设置字体颜色
rt.add(" 红色文字", color="#ff0000")
rt.add(" 蓝色文字", color="blue")

# 5. 设置背景高亮
rt.add(" 黄底文字", highlight="yellow")

# 6. 设置字体大小(单位:磅)
rt.add(" 小号字", size=8)
rt.add(" 大号字", size=20)

# 7. 上下标设置
rt.add(" 正常文字")
rt.add(" 上标", superscript=true)
rt.add(" 下标", subscript=true)

# 8. 字体样式
rt.add(" 加粗", bold=true)
rt.add(" 倾斜", italic=true)
rt.add(" 下划线", underline=true)
rt.add(" 删除线", strike=true)

# 9. 字体设置
rt.add(" 宋体", font="eastasia:simsun")
rt.add(" 微软雅黑", font="eastasia:microsoft yahei")

# 10. 超链接(需要先生成链接id)
url_id = doc.build_url_id("https://www.example.com")
rt.add(" 超链接文本", url_id=url_id)

# 11. 文字方向
rt.add(" 正常方向")
rt.add(" 从右向左文字", rtl=true) # 中文设置无效果

# 12. 语言设置
rt.add(" english text", lang="en-us")
rt.add(" 中文文本", lang="zh-cn")

context = {
    'rich_text_var': rt
}
doc.render(context)
os.makedirs('output',exist_ok=true)
doc.save("output/generated_document.docx")
在模板中只需简单引用:
{{ rich_text_var }}
错误管理
templateerror类是jinja2模板引擎中所有模板相关异常的基类,在python-docx-template中专门用于捕获模板渲染过程中出现的各类错误。当使用tpl.render()渲染 word 模板时,以下情况会抛出templateerror异常:
- 模板中引用了未传入的变量(如模板写了
{{ name }},但render只传了test_variable); - 模板中的jinja2语法错误(如缺少闭合的
{% endif %}、变量引用格式错误); - 模板中使用了不存在的过滤器/函数(如
{{ test_variable | xxx }},xxx不是 jinja2 内置过滤器)。
以下代码展示了如何测捕获word模板渲染时的templateerror异常,并打印详细的错误信息:
from docxtpl import docxtemplate
from jinja2.exceptions import templateerror

print("=" * 50)
print("正在生成测试用的模板错误")
print("." * 50)

try:
    tpl = docxtemplate("templates/template_error_tpl.docx")
    # 如果模板中存在语法错误或变量缺失,会触发templateerror异常
    tpl.render({"test_variable": "测试变量值"})
# 捕获模板渲染过程中出现的所有templateerror异常
except templateerror as the_error:
    # 打印错误的基本描述信息
    print(f"模板渲染错误:{str(the_error)}")
    # 检查异常对象是否包含docx_context属性
    if hasattr(the_error, "docx_context"):
        # 打印上下文信息的标题
        print("错误上下文详情:")
        # 遍历并打印错误上下文的每一行内容
        for line in the_error.docx_context:
            print(line)
# 确保tpl变量存在时再执行保存操作
if 'tpl' in locals():
    # 将渲染后的文档保存到指定路径
    tpl.save("output/template_error.docx")
    print(f"文档已保存至:output/template_error.docx")
print("." * 50)
print(" 模板错误测试完成 ")
print("=" * 50)
到此这篇关于python使用python-docx-template的实用案例解析的文章就介绍到这了,更多相关python python-docx-template用法内容请搜索代码网以前的文章或继续浏览下面的相关文章希望大家以后多多支持代码网!
赞 (0)
您想发表意见!!点此发布评论


发表评论