AngularJS 的生命周期和基础语法使用详解
408人参与 • 2024-05-26 • AngularJs
angularjs 的生命周期和基础语法
1. 使用步骤
// 1. 要使用哪个钩子函数,就先引入
import { oninit } from ...
// 2. 再实现
export class 组件名 implements onint...
// 3. 再使用
ngoninit(){
....
}
2. 生命周期钩子函数
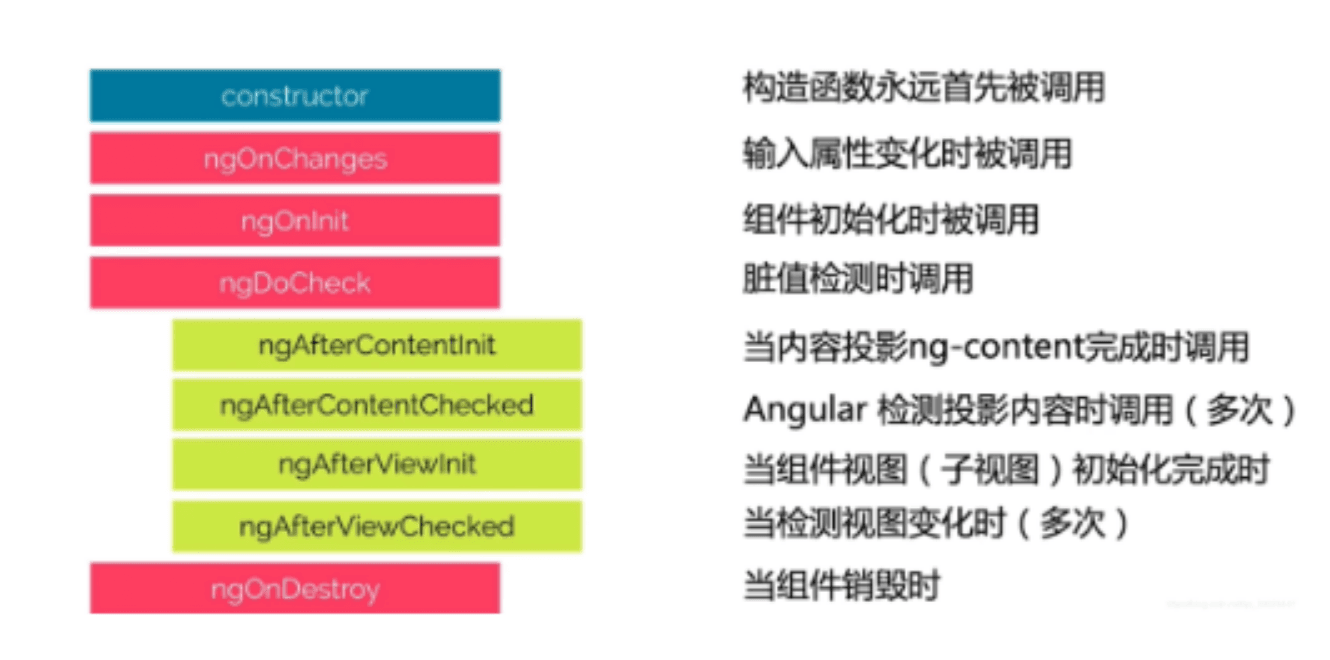
- ngonchanges()
当输入属性的值发生变化时调用。
在组件被创建并且输入属性绑定发生变化时调用。首次调用一定会发生在ngoninit()之前。
- ngoninit()
在组件初始化时调用。
通常用于执行初始化逻辑,例如获取初始数据。在第一轮 ngonchanges()完成之后调用,只调用一次。
- ngdocheck()
当 angular 安排检查时调用。
用于自定义的变更检测逻辑,通常与 changedetectorref 结合使用。在ngonchanges()和ngoninit()之后。
- ngaftercontentinit()
在组件内容投影完成后调用。
用于执行需要在组件内容初始化后执行的逻辑。第一次ngdocheck()之后调用,只调用一次,只适用于组件。
- ngaftercontentchecked()
在每次 angular 完成对组件内容的检查之后调用。
用于执行在内容检查之后需要执行的逻辑。ngaftercontentinit()和每次ngdocheck()之后调用,只适用于组件。
- ngafterviewinit()
在组件视图初始化完成后调用。
用于执行需要访问视图的初始化逻辑。第一次ngaftercontentchecked()之后调用,只调用一次,只适合组件。
- ngafterviewchecked()
在每次 angular 完成对组件视图的检查之后调用。
用于执行在视图检查之后需要执行的逻辑。ngafterviewinit()和每次ngaftercontentchecked()之后调用,只适合组件。
- ngondestroy()
在组件销毁时调用。
通常用于清理资源,取消订阅等。
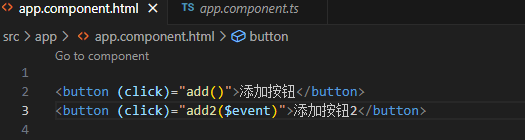
3. 点击事件
将 app.component.html 文件内容清空,只保留<router-outlet/>
在 app.component.html 中添加button标签,并按下面代码添加点击事件
<button (click)="add()">添加按钮</button>
<button (click)="add2($event)">添加按钮2</button>
<router-outlet/>
import { commonmodule } from '@angular/common';
import { component } from '@angular/core';
import { routeroutlet } from '@angular/router';
import { formsmodule } from '@angular/forms';
@component({
selector: 'app-root',
standalone: true,
imports: [commonmodule,routeroutlet,formsmodule],
templateurl: './app.component.html',
styleurl: './app.component.css'
})
export class appcomponent {
title = 'testdemo';
add(){
alert('这是一个测试框!')
}
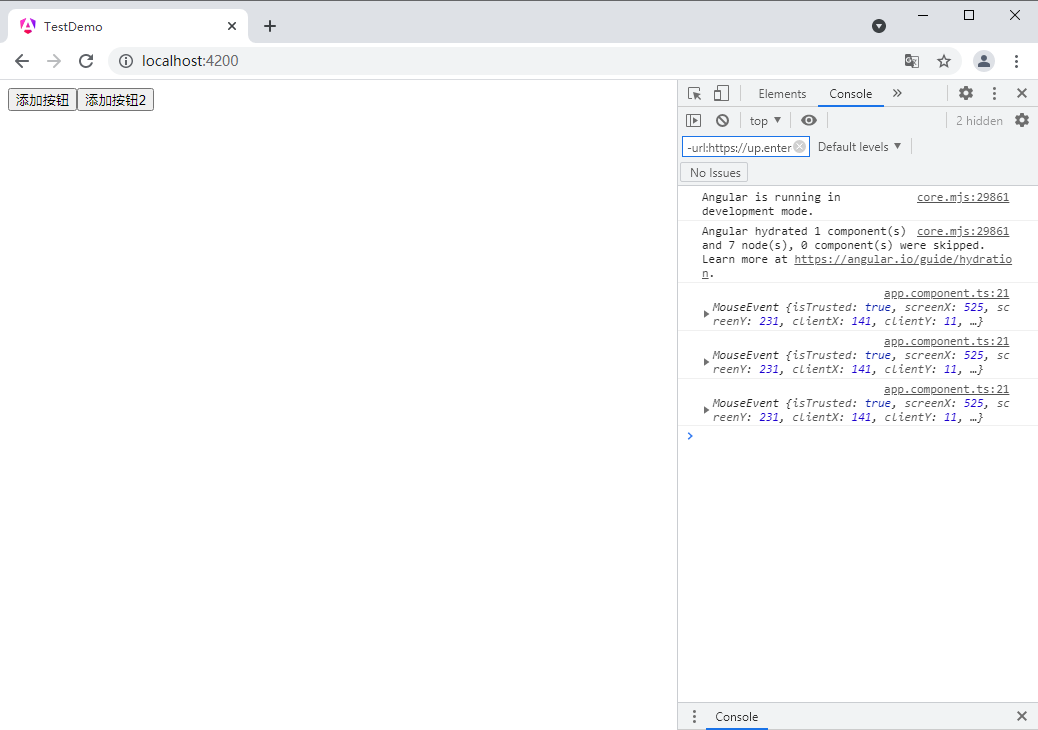
add2(e:mouseevent){
console.log(e)
}
}按钮1
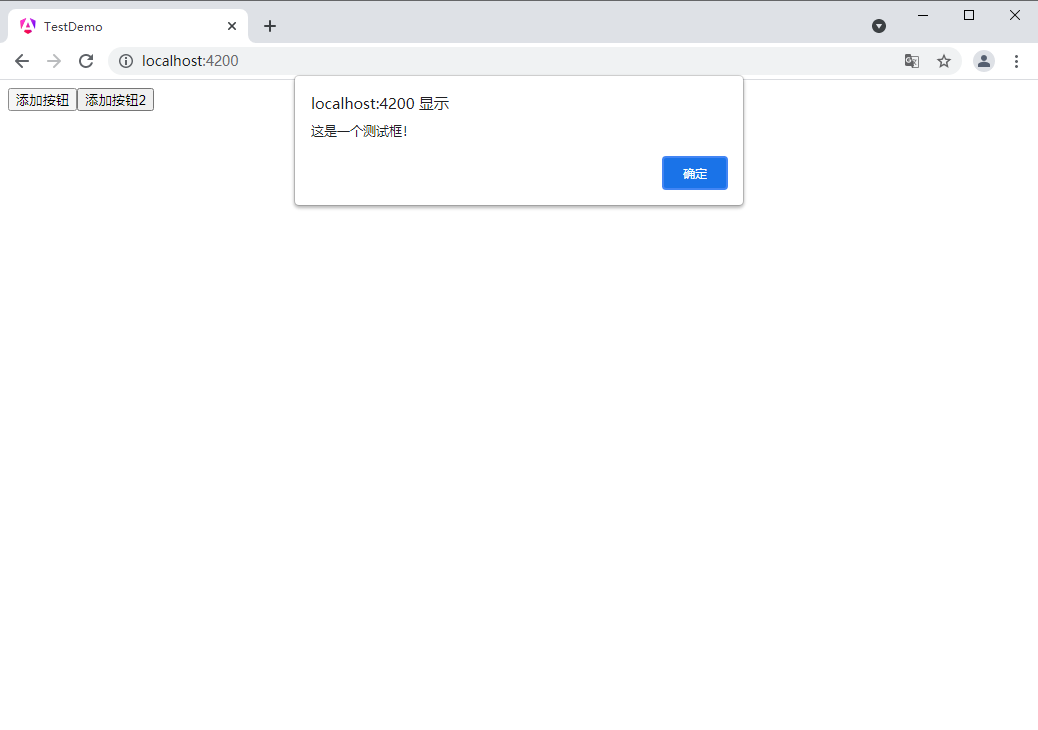
按钮2
4. if 语句
1. if 形式
在 app.component.ts 中定义变量 isshow
isshow : boolean = true
app.component.html 中写 if 判断
<p *ngif="isshow">
    这个测试一个bool值!
</p>
2. if else 形式
import { commonmodule } from '@angular/common';
import { component } from '@angular/core';
import { routeroutlet } from '@angular/router';
import { formsmodule } from '@angular/forms';
@component({
  selector: 'app-root',
  standalone: true,
  imports: [commonmodule,routeroutlet,formsmodule],
  templateurl: './app.component.html',
  styleurl: './app.component.css'
})
export class appcomponent {
  title = 'testdemo';
  add(){
    alert('这是一个测试框!')
  }
  add2(e:mouseevent){
    console.log(e)
  }
  isshow : boolean = true
  isshow2 : boolean = true
  changeshow(){
    this.isshow2 = !this.isshow2
  }
}
app.component.html
<button (click)="add()">添加按钮</button>
<button (click)="add2($event)">添加按钮2</button>
<p *ngif="isshow">
    这个测试一个bool值!
</p>
<button (click)="changeshow()">修改show</button>
<p>第一种if写法</p>
@if (isshow2) {
  <p>test3</p>
}
@else {
  <p>test4</p>
}
<p>第二种if写法</p>
<ng-container *ngif="isshow2;else elsetemplate">
  <p>test1</p>
</ng-container>
<ng-template #elsetemplate>
  <p>test2</p>
</ng-template>
<router-outlet />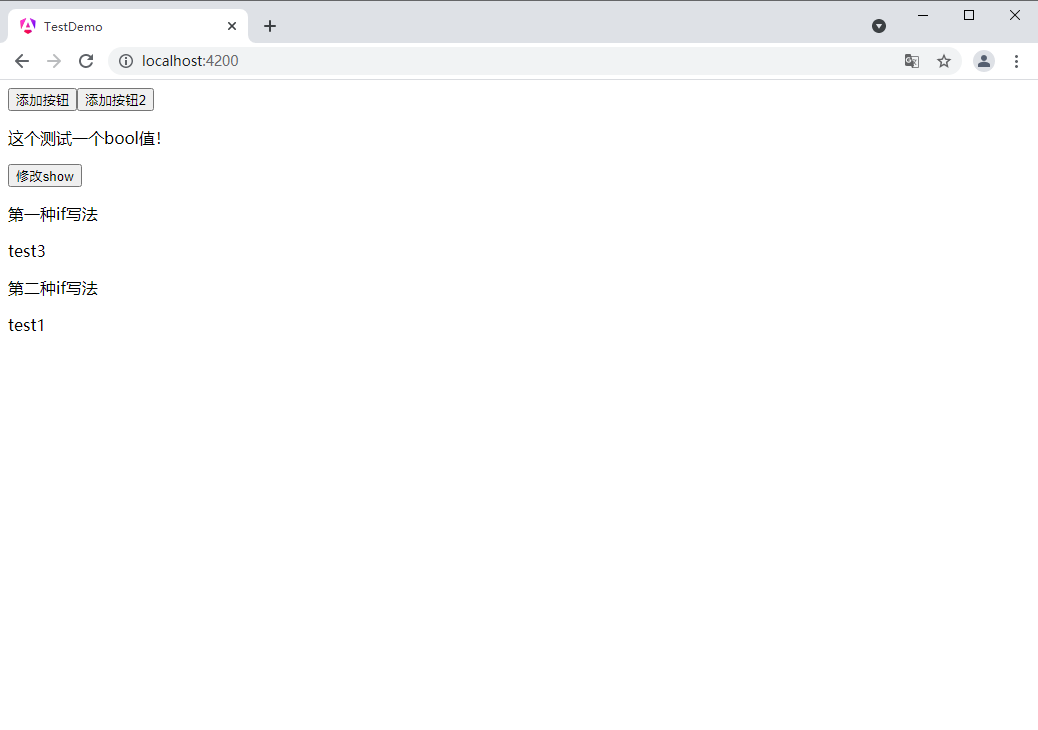
点击按钮

5. for 语句
app.component.ts
import { commonmodule } from '@angular/common';
import { component } from '@angular/core';
import { routeroutlet } from '@angular/router';
import { formsmodule } from '@angular/forms';
@component({
  selector: 'app-root',
  standalone: true,
  imports: [commonmodule,routeroutlet,formsmodule],
  templateurl: './app.component.html',
  styleurl: './app.component.css'
})
export class appcomponent {
  title = 'testdemo';
  add(){
    alert('这是一个测试框!')
  }
  add2(e:mouseevent){
    console.log(e)
  }
  isshow : boolean = true
  isshow2 : boolean = true
  changeshow(){
    this.isshow2 = !this.isshow2
  }
  mylist:array<string> = [
    '死生契阔,与子成说',
    '执子之手,与子偕老',
    '我心匪石,不可转也',
    '有一美人兮,见之不忘'
  ]
}
app.component.html
<button (click)="add()">添加按钮</button>
<button (click)="add2($event)">添加按钮2</button>
<p *ngif="isshow">
这个测试一个bool值!
</p>
<button (click)="changeshow()">修改show</button>
<p>第一种if写法</p>
@if (isshow2) {
<p>test3</p>
}
@else {
<p>test4</p>
}
<p>第二种if写法</p>
<ng-container *ngif="isshow2;else elsetemplate">
<p>test1</p>
</ng-container>
<ng-template #elsetemplate>
<p>test2</p>
</ng-template>
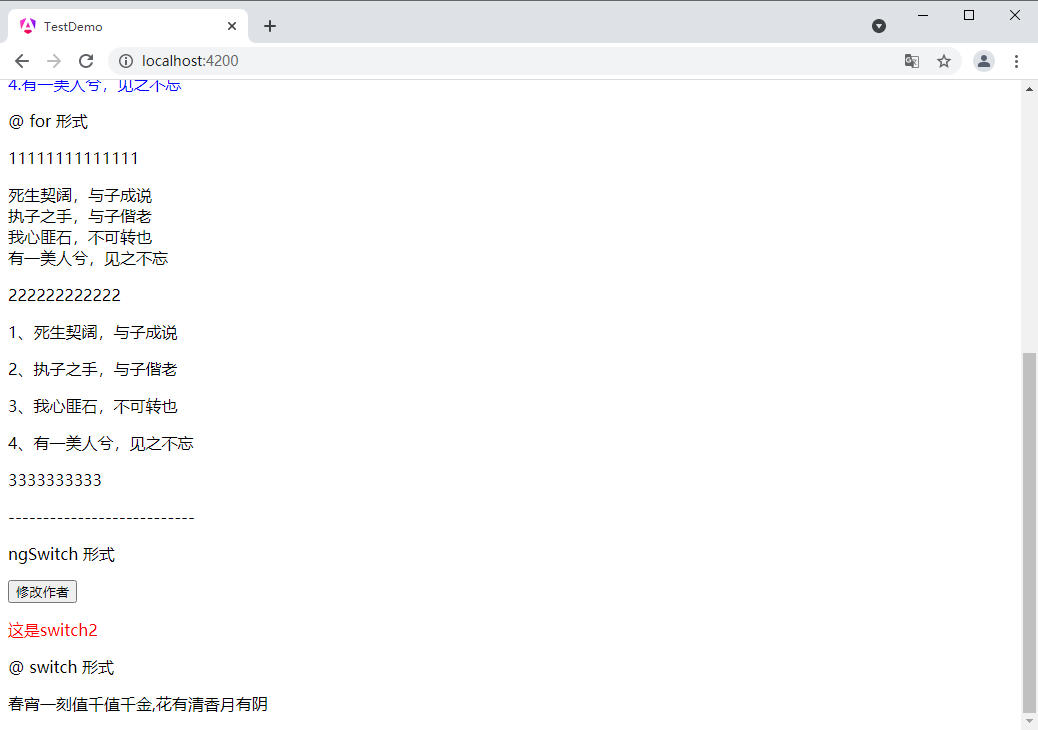
<p>---------------------------</p>
<p>*ngfor 形式</p>
<p *ngfor="let item of mylist let i=index" [style.color]="i % 2 === 0 ? 'red' : 'blue'">
{{i+1}}.{{item}}
</p>
<p> @ for 形式 </p>
<p>11111111111111</p>
@for (item of mylist; track item) {
<div>
{{item}}
</div>
}@empty {
empty mylist
}
<p>222222222222</p>
@for (item of mylist; track $index) {
<p>{{$index+1}}、{{item}}</p>
}
<p>3333333333</p>
<p>---------------------------</p>
<router-outlet />
6. switch 语句
app.component.ts
import { commonmodule } from '@angular/common';
import { component } from '@angular/core';
import { routeroutlet } from '@angular/router';
import { formsmodule } from '@angular/forms';
@component({
  selector: 'app-root',
  standalone: true,
  imports: [commonmodule,routeroutlet,formsmodule],
  templateurl: './app.component.html',
  styleurl: './app.component.css'
})
export class appcomponent {
  title = 'testdemo';
  add(){
    alert('这是一个测试框!')
  }
  add2(e:mouseevent){
    console.log(e)
  }
  isshow : boolean = true
  isshow2 : boolean = true
  changeshow(){
    this.isshow2 = !this.isshow2
  }
  mylist:array<string> = [
    '死生契阔,与子成说',
    '执子之手,与子偕老',
    '我心匪石,不可转也',
    '有一美人兮,见之不忘'
  ]
  author:number = 0
  changauthor() {
    this.author =   this.author+1
    console.log(this.author)
  }
}
app.component.html
<button (click)="add()">添加按钮</button>
<button (click)="add2($event)">添加按钮2</button>
<p *ngif="isshow">
这个测试一个bool值!
</p>
<button (click)="changeshow()">修改show</button>
<p>第一种if写法</p>
@if (isshow2) {
<p>test3</p>
}
@else {
<p>test4</p>
}
<p>第二种if写法</p>
<ng-container *ngif="isshow2;else elsetemplate">
<p>test1</p>
</ng-container>
<ng-template #elsetemplate>
<p>test2</p>
</ng-template>
<p>---------------------------</p>
<p>*ngfor 形式</p>
<p *ngfor="let item of mylist let i=index" [style.color]="i % 2 === 0 ? 'red' : 'blue'">
{{i+1}}.{{item}}
</p>
<p> @ for 形式 </p>
<p>11111111111111</p>
@for (item of mylist; track item) {
<div>
{{item}}
</div>
}@empty {
empty mylist
}
<p>222222222222</p>
@for (item of mylist; track $index) {
<p>{{$index+1}}、{{item}}</p>
}
<p>3333333333</p>
<p>---------------------------</p>
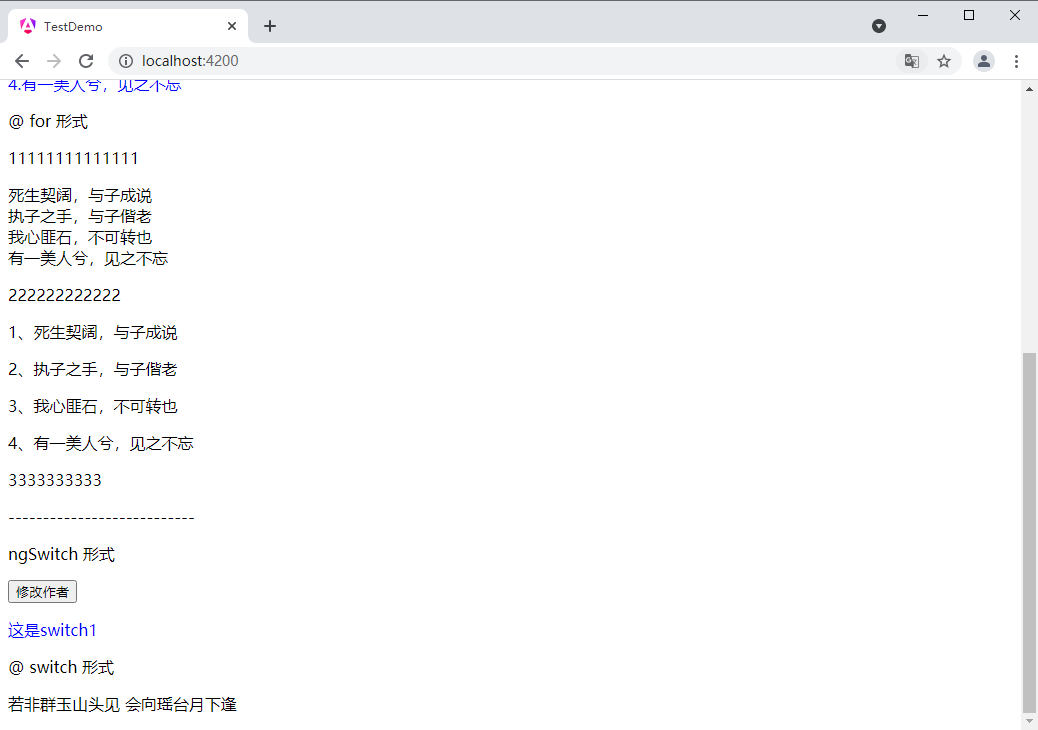
<p>ngswitch 形式</p>
<button (click)="changauthor()">修改作者</button>
<div [ngswitch]="author" [style.color]="author % 2 === 0 ? 'red' : 'blue'">
<p *ngswitchcase="1">
这是switch1
</p>
<p *ngswitchcase="2">
这是switch2
</p>
<p *ngswitchcase="3">
这是switch3
</p>
<p *ngswitchdefault>
这是默认{{author}}
</p>
</div>
<p>@ switch 形式</p>
@switch (author) {
@case (1) {
<p>若非群玉山头见 会向瑶台月下逢</p>
}
@case (2) {
<p>春宵一刻值千值千金,花有清香月有阴</p>
}
@default {
<p>情催桃李艳,心寄管弦飞</p>
}
}
<router-outlet />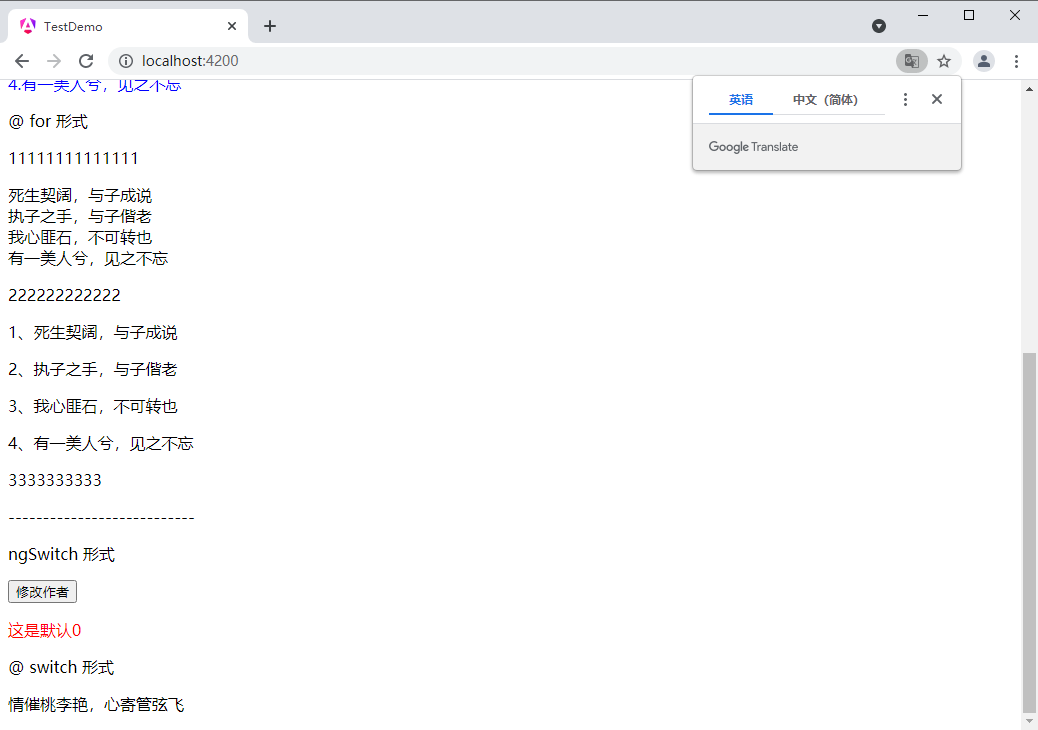
点击按钮
7. 双向数据绑定
实现双向数据绑定,需要引入angular 内置的 formsmodule 模块
在 app.component.ts 文件中引入
import { formsmodule } from '@angular/forms';并在 @component 的 import 中添加 formsmodule
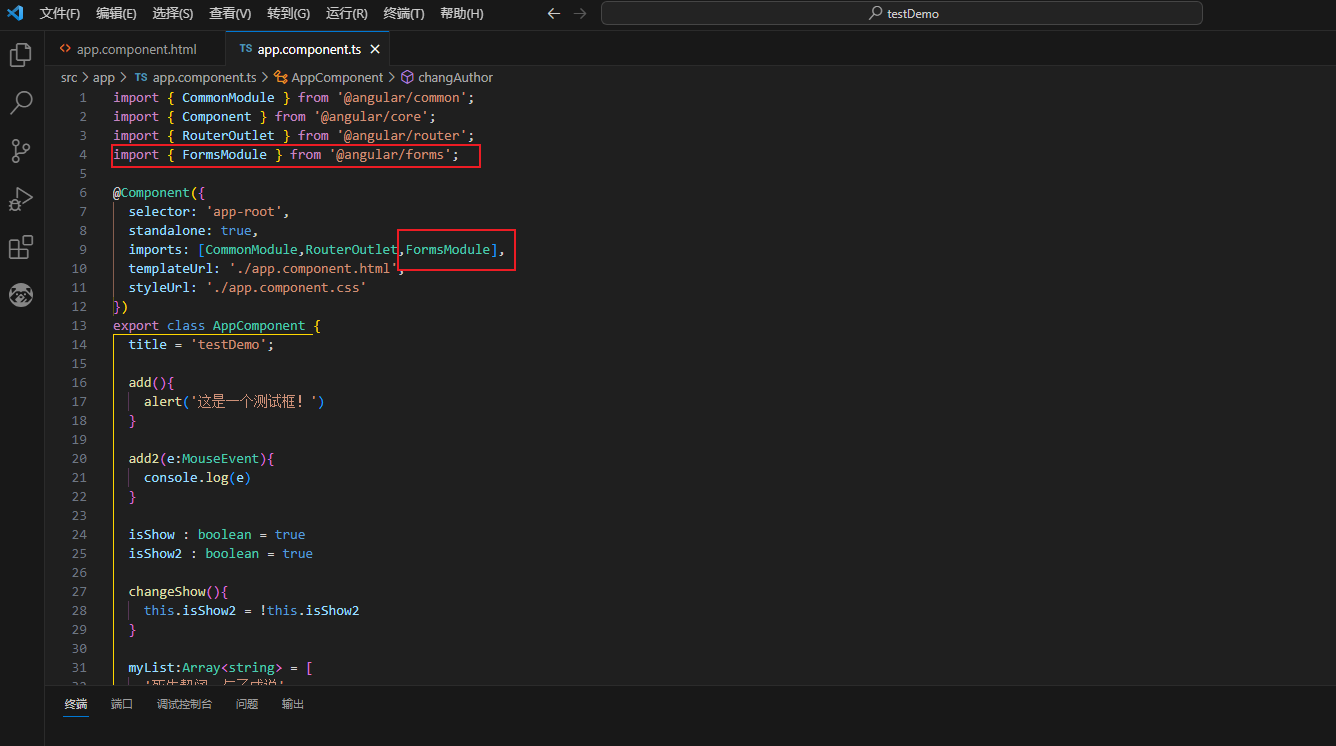
app.component.ts
import { commonmodule } from '@angular/common';
import { component } from '@angular/core';
import { routeroutlet } from '@angular/router';
import { formsmodule } from '@angular/forms';
@component({
  selector: 'app-root',
  standalone: true,
  imports: [commonmodule,routeroutlet,formsmodule],
  templateurl: './app.component.html',
  styleurl: './app.component.css'
})
export class appcomponent {
  title = 'testdemo';
  add(){
    alert('这是一个测试框!')
  }
  add2(e:mouseevent){
    console.log(e)
  }
  isshow : boolean = true
  isshow2 : boolean = true
  changeshow(){
    this.isshow2 = !this.isshow2
  }
  mylist:array<string> = [
    '死生契阔,与子成说',
    '执子之手,与子偕老',
    '我心匪石,不可转也',
    '有一美人兮,见之不忘'
  ]
  author:number = 0
  changauthor() {
    this.author =   this.author+1
    console.log(this.author)
  }
  teststring:string='test001'
}
app.component.html
<button (click)="add()">添加按钮</button>
<button (click)="add2($event)">添加按钮2</button>
<p *ngif="isshow">
这个测试一个bool值!
</p>
<button (click)="changeshow()">修改show</button>
<p>第一种if写法</p>
@if (isshow2) {
<p>test3</p>
}
@else {
<p>test4</p>
}
<p>第二种if写法</p>
<ng-container *ngif="isshow2;else elsetemplate">
<p>test1</p>
</ng-container>
<ng-template #elsetemplate>
<p>test2</p>
</ng-template>
<p>---------------------------</p>
<p>*ngfor 形式</p>
<p *ngfor="let item of mylist let i=index" [style.color]="i % 2 === 0 ? 'red' : 'blue'">
{{i+1}}.{{item}}
</p>
<p> @ for 形式 </p>
<p>11111111111111</p>
@for (item of mylist; track item) {
<div>
{{item}}
</div>
}@empty {
empty mylist
}
<p>222222222222</p>
@for (item of mylist; track $index) {
<p>{{$index+1}}、{{item}}</p>
}
<p>3333333333</p>
<p>---------------------------</p>
<p>ngswitch 形式</p>
<button (click)="changauthor()">修改作者</button>
<div [ngswitch]="author" [style.color]="author % 2 === 0 ? 'red' : 'blue'">
<p *ngswitchcase="1">
这是switch1
</p>
<p *ngswitchcase="2">
这是switch2
</p>
<p *ngswitchcase="3">
这是switch3
</p>
<p *ngswitchdefault>
这是默认{{author}}
</p>
</div>
<p>@ switch 形式</p>
@switch (author) {
@case (1) {
<p>若非群玉山头见 会向瑶台月下逢</p>
}
@case (2) {
<p>春宵一刻值千值千金,花有清香月有阴</p>
}
@default {
<p>情催桃李艳,心寄管弦飞</p>
}
}
<input [(ngmodel)]="teststring" type="text" >{{teststring}}
<input name="firstinput" [(ngmodel)]="teststring" type="text" style="width: 200px;">
{{teststring}}
<router-outlet />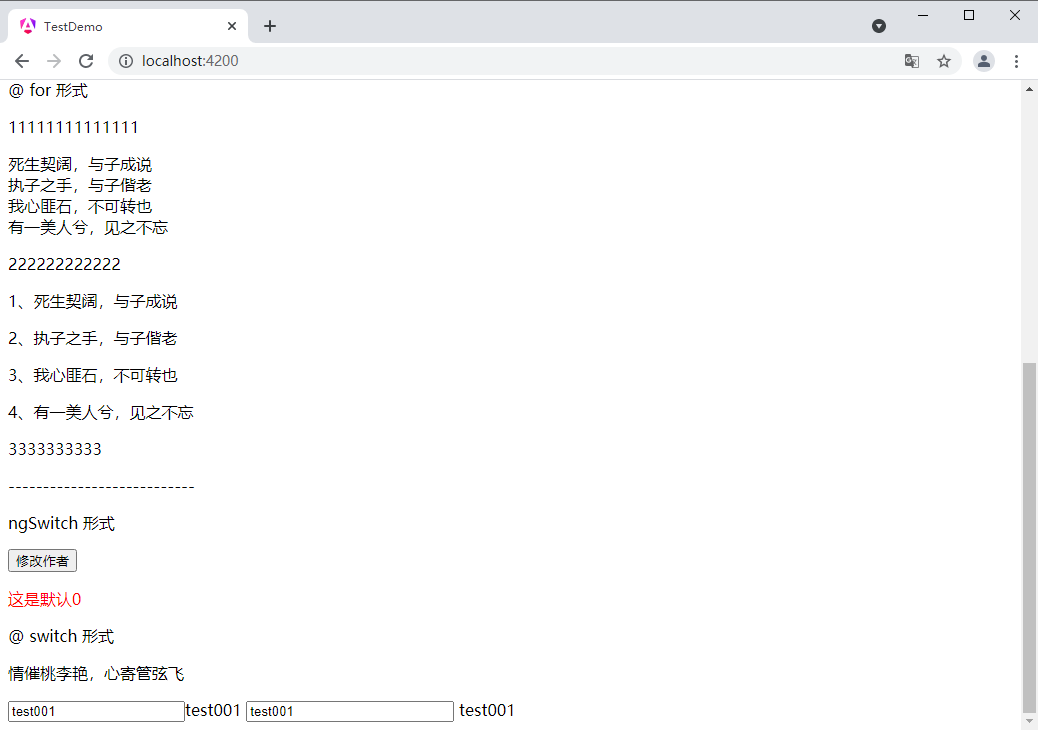
输入之后
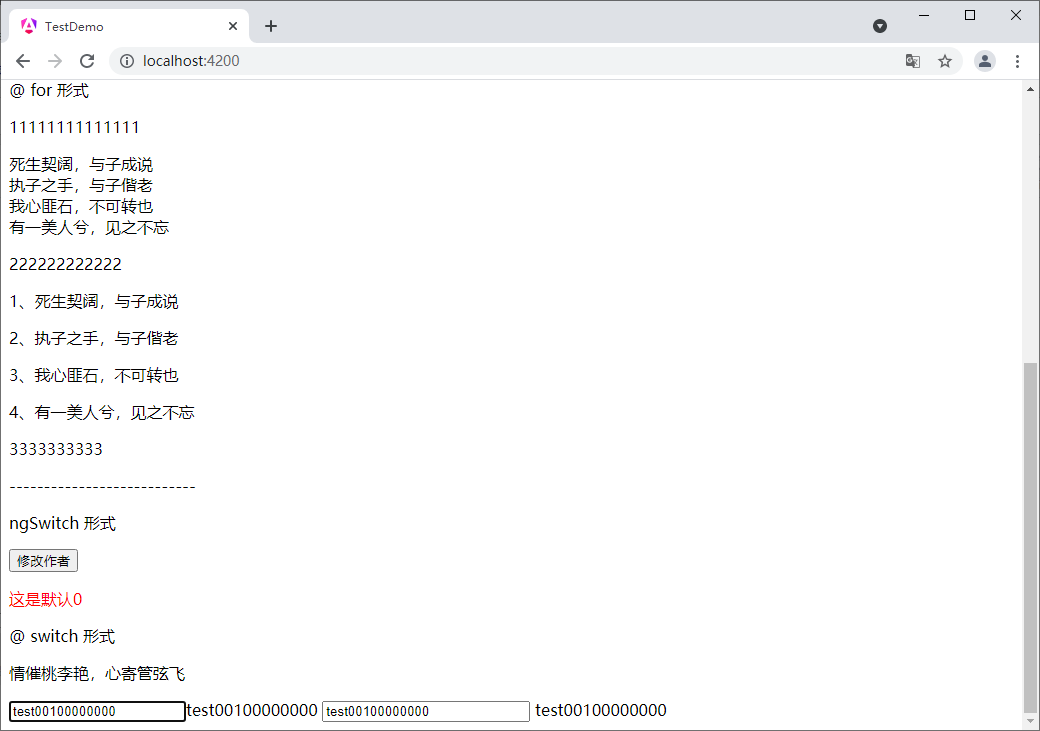
这里解释一下
<input [(ngmodel)]="teststring" type="text" >
[(ngmodel)] 实际上展开为:
<input [ngmodel]="teststring" (ngmodelchange)="teststring=$event" type="text" >
这里有两个关键部分:
- [ngmodel]=“teststring”:这是一个属性绑定,它将 ngmodel 的值设置为组件的 teststring属性。这意味着当 teststring 在组件类中改变时,ngmodel 的值(即输入框的值)也会自动更新。
- (ngmodelchange)=“teststring=$event”:这是一个事件绑定,它监听 ngmodelchange事件。当输入框的值改变时,这个事件会被触发,并将新的值作为 $event 传递给事件处理器。事件处理器将 $event 的值赋给teststring,从而实现了从视图到组件的数据更新。
所以,当你在输入框中键入文本时,这个文本会立即反映到 teststring 属性上,反之亦然,如果你在组件类中改变 teststring 的值,输入框的内容也会相应更新。
到此这篇关于angularjs 的生命周期和基础语法的文章就介绍到这了,更多相关angularjs 的生命周期内容请搜索代码网以前的文章或继续浏览下面的相关文章希望大家以后多多支持代码网!
赞 (0)
您想发表意见!!点此发布评论


发表评论