keepalived+nginx实现双服务器主备方案
339人参与 • 2024-12-28 • 缓存
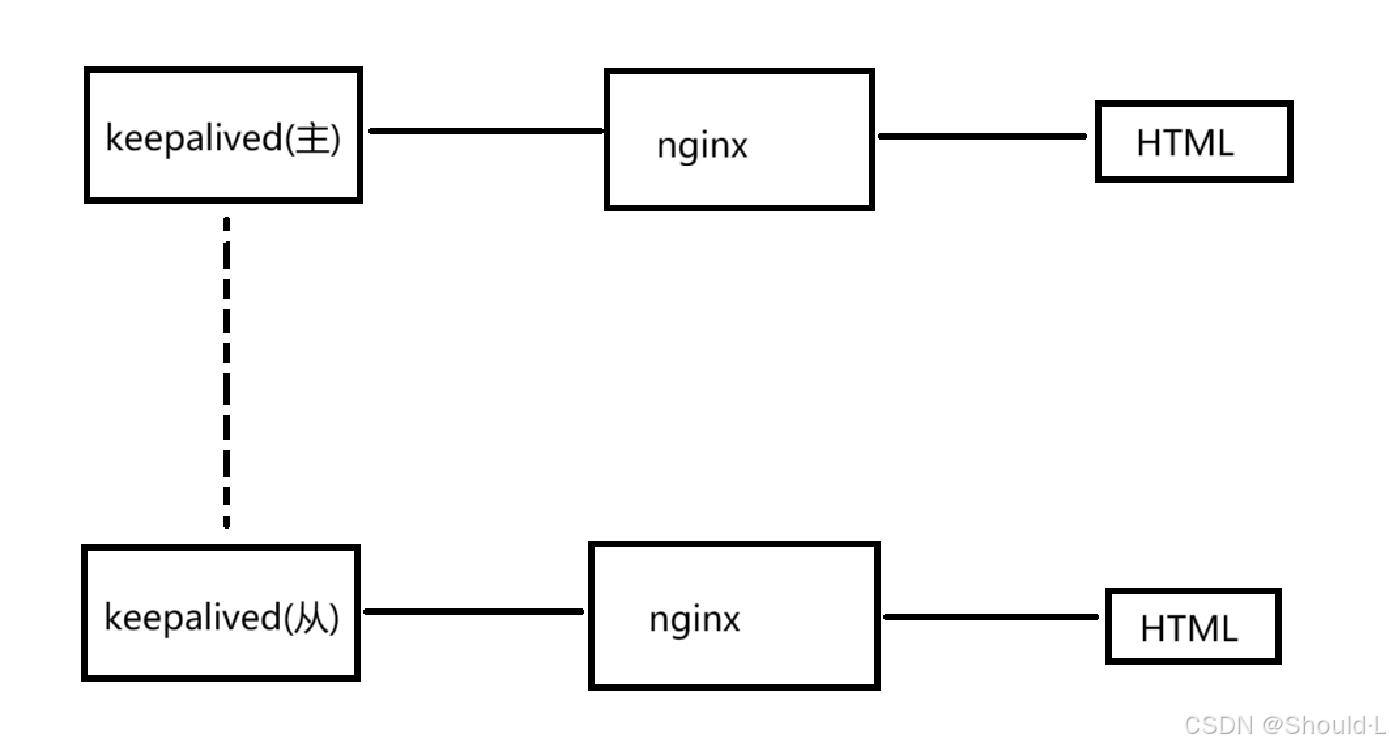
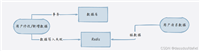
一、keepalived + nginx 主备方案
1. 架构图
服务器为centos 7系统
2. nginx 部署
两台服务器应用同样的配置,仅html文件不一样。
2.1 服务器环境初始化
(1)时间同步
# 安装时间同步工具ntpdata
yum -y install ntp ntpdate

# 同步网络时间
ntpdate cn.pool.ntp.org
(2)创建一个cron任务,设置每天同步服务器时间
# 打开cron作业任务列表的编辑器
crontab -e
# 每天0点同步一次
* 00 * * *  /usr/sbin/ntpdate cn.pool.ntp.org
(3)关闭防火墙
在 windows 系统中访问 linux 中 nginx,默认不能访问的,因为防火墙问题 (1)关闭防火墙 (2)开放访问的端口号.
iptables和firewalld是两种不同的防火墙,两个都关闭,有哪个关哪个。
systemctl stop iptables
systemctl stop firewalld

# 两种防火墙,个人比较习惯使用iptables,后面做策略也是使用iptables;没有的话可以安装一个;
yum install iptables-services   #安装这个比较方便管理。
或者,设置开放访问端口号
# 查看开放的端口号
firewall-cmd --list-all

# 设置开放的端口号
firewall-cmd --add-service=http –permanent
firewall-cmd --add-port=80/tcp --permanent

# 重启防火墙
firewall-cmd -reload
2.2 安装 nginx
(1)安装依赖包
pcre-8.3.7.tar.gz, openssl-1.0.1t.tar.gz, zlib-1.2.8.tar.gz
- nginx的http模块使用pcre来解析正则表达式,需要在linux上安装
pcre库 - nginx使用zlib对http包的内容进行gzip,需要在linux上安装安装
zlib库 - 安装
openssl库,让 nginx 支持 https(即在ssl协议上传输http)
yum -y install gcc zlib zlib-devel pcre-devel openssl openssl-devel
(2)下载并解压安装包
# 创建一个nginx文件夹
cd /usr/local
mkdir nginx
cd nginx

# 下载tar包
wget http://nginx.org/download/nginx-1.22.1.tar.gz

# 解压
tar -xvf nginx-1.22.1.tar.gz

# 进入nginx-1.22目录
cd nginx-1.22.1
(2)添加 ssl 证书模块
./configure --with-http_stub_status_module --with-http_ssl_module
(3)编译安装
- -j 4 : 此参数代表用4核心编译
make -j 4 && make install
(4)配置 nginx.conf
- 如果可以正常启动,正常访问页面的话可以忽略此步骤
# root html; 改成自己的路径 /usr/local/nginx/html;
# index 后面加一个 index.php 否则无法显示网页内容,报403错误的。
    location / {
       root   /usr/local/nginx/html;
       index index.html index.php index.htm,;
- 关闭显示nginx版本号(此内容在http模块下找个地方写)
server_tokens off;
(5)校验配置文件是否正确
/usr/local/nginx/sbin/nginx -t

# 看到如下显示代表正常:
# nginx.conf syntax is ok
# nginx.conf test is successful
(6)启动nginx
/usr/local/nginx/sbin/nginx -c /usr/local/nginx/conf/nginx.conf
重新加载配置命令:
/usr/local/nginx/sbin/nginx -s reload
(7)验证
浏览器页面输入自己的服务器地址出现nginx字样的网页,表示安装成功:
(8)修改环境变量
添加环境变量,使nginx在任意目录都可以执行启动操作;
# 编辑/etc/profile文件在最后添加如下命令:
vim /etc/profile

# 添加命令
path=$path:/usr/local/nginx/sbin
export pat

# 保存退出
:wq

# 执行生效命令
source /etc/profile
所有的服务器部署方法相同
3. keepalived 部署
(1)安装依赖
yum install -y gcc openssl-devel libnl3-devel net-snmp-devel
(2)安装keepalived
yum install keepalived -y
- 配置文件的位置:
/etc/keepalived/
3.1 主 keepalived 配置文件解析
- 需要设置一个vip的地址,作为虚拟ip地址
cd /etc/keepalived/
vim keepalived.conf
# --- ---- keepalived.conf --- ----

! configuration file for keepalived

# 管理员邮箱(系统故障通知)
global_defs {
 notification_email {
 	acassen@firewall.loc
 	failover@firewall.loc
	sysadmin@firewall.loc
 }

notification_email_from alexandre.cassen@firewall.loc   # 邮件发件人邮箱
smtp_server 127.0.0.1	# smtp服务器地址(邮箱服务器地址)
smtp_connect_timeout 30	#超时时间
router_id nginx	# 路由器标识,一般不用改,也可改成应用名,主从服务器要一致
}

#一个vrrp_instance就是定义一个虚拟路由器的,实例名称
vrrp_script check_nginx {	 #脚本模块
	script "/etc/keepalived/check_nginx.sh"  #脚本模块
	interval 2  #每2秒钟检测一次脚本
#weight 10    #优先级
}

vrrp_instance vi_1 {
	state master	# 定义初始状态,可以是master或者backup
	interface eth0	#当前使用的网卡名
	virtual_router_id 51	#虚拟路由id号
	priority 100	 #当前服务器优先级,数字越大越优先
	advert_int 1	#检测心跳时间为1秒
	authentication {	#身份验证方式通信认证机制,这里是明文认证还有一种是加密认证
    	auth_type pass	#密码验证
    	auth_pass 1111	#密码为1111

    	## 如果使用加密认证(所有节点必须一致)
    	# auth_type ah
    	# auth_pass <key>  # 通常为一个长度为8或者16的字符串
	}
virtual_ipaddress {
    192.168.10.100     #vip地址
	}
track_script{        #添加监控条件
	check_nginx	 #脚本模块后边定义的名称
	}
}
3.2 监控nginx状态
新建一个脚本文件,并打开
vim /etc/keepalived/check_nginx.sh
编写监控脚本
#!/bin/bash
#1、判断 nginx 是否存活
counter=`ps -c nginx --no-header | wc -l`
if [ $counter -eq 0 ]; then
#2、如果不存活则尝试启动 nginx
/usr/local/nginx/sbin/nginx
sleep 5
#3、等待 5 秒后再次获取一次 nginx 状态
counter=`ps -c nginx --no-header | wc -l`
#4、再次进行判断,如 nginx 还不存活则停止 keepalived,让地址进行漂移
	if [ $counter -eq 0 ]; then
	systemctl stop keepalived  #停用keepalived服务
	fi
fi
注意,这里的重启nginx命令/usr/local/nginx/sbin/nginx被注释掉,测试时关闭才能看到效果。
3.3 从 keepalived配置
! configuration file for keepalived

global_defs {
notification_email {
 acassen@firewall.loc
 failover@firewall.loc
 sysadmin@firewall.loc
}
notification_email_from alexandre.cassen@firewall.loc
smtp_server 127.0.0.1
smtp_connect_timeout 30
router_id nginx
}

vrrp_script check_nginx {  #这个地方名字不能乱改,系统不认识,
	script "/etc/keepalived/check_nginx.sh"
	interval 2  #每2秒钟检测一次脚本
}

vrrp_instance vi_1 {
	state backup	#改这里
	interface eth0
	virtual_router_id 51
	priority 80		#改这里
	advert_int 1
	authentication {
    	auth_type pass
    	auth_pass 1111
}
virtual_ipaddress {
    172.28.127.100
}
track_script {
	check_nginx
	}
}
keepalived相关命令
启动:systemctl start keepalived
重启:systemctl restart keepalived
动态持续查看日志:tail -f /var/log/messages
二、nginx 端口转发/反向代理
1. nginx 端口转发
1.1 修改nginx.conf
server {
    listen      19100;  # 监听19180端口
    server_name  192.168.248.10;

    location / {
            # 请求头转发
            proxy_set_header host $host;
            # 获得真实ip
            proxy_set_header x-real-ip $remote_addr;
            proxy_set_header x-forwarded-for $proxy_add_x_forwarded_for;
            # 转发到目标地址
            proxy_pass http://192.168.0.100:60080;

            # 还可以写root和index字段,只不过端口默认优先转发,当转发不成功时,才会选择走root字段下的目录和html
            # root /usr/local/nginx/html;
            # index index.html index.php index.htm;
        }
    # ... ...
}

# 这个60086端口,目前没有服务,访问是被拒绝的!
保存退出
nginx -s reload;
# 输入vip地址访问
192.168.248.10:19180
1.2 分离nginx中的server模块为单独的文件
# 在nginx配置的最后一个中括号上方添加如下命令
include /usr/local/nginx/conf/conf.d/*.conf;
另外在conf.d文件夹下新建conf文件,单独编写server模块。
到这里配置就告一段落了,后面算是补充的 nginx 配置
2. nginx 多端口转发
2.1 配置文件
- 每个 http 块可以包括多个 server 块,而每个 server 块就相当于一个虚拟主机。
- 而每个 server 块也分为全局 server 块,以及可以同时包含多个 locaton 块。
server {
	listen	8001;
	server_name	208.208.128.122;

	location ~/vod/ {
		proxy_pass	http://127.0.0.1:8081;
	}

	location ~/edu/ {
		proxy_pass	http://127.0.0.1:8082;
	}
}
2.1 匹配规则
- = :用于不含正则表达式的 uri 前,要求请求字符串与 uri 严格匹配,如果匹配 成功,就停止继续向下搜索并立即处理该请求。
- ~:用于表示 uri 包含正则表达式,并且区分大小写。
- ~*:用于表示 uri 包含正则表达式,并且不区分大小写。
- ^~:用于不含正则表达式的 uri 前,要求 nginx 服务器找到标识 uri 和请求字 符串匹配度最高的 location 后,立即使用此 location 处理请求,而不再使用 location 块中的正则 uri 和请求字符串做匹配。
2.3 实现效果
- 如果请求
208.208.128.122:8001/vod/,就会自动跳转到127.0.0.1:8081 - 如果请求
208.208.128.122:8001/edu/,就会自动跳转到127.0.0.1:8082
四、nginx 负载均衡
1. 配置说明
1.1 修改 nginx.conf
# 定义myserver结构体
upstream myserver {
server 208.208.128.122:8081;
server 208.208.128.122:8082;
}
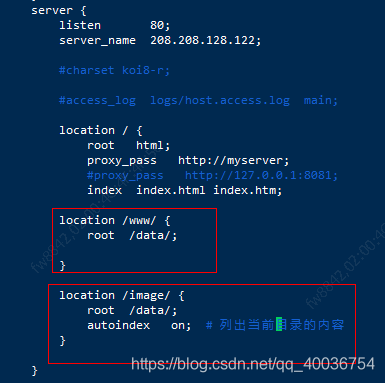
server {
listen 80;
server_name 208.208.128.122;
#charset koi8-r;
#access_log logs/host.access.log main;
location / {
root html;
# 在这里调用
#proxy_pass http://myserver;
proxy_pass http://127.0.0.1:8081;
index index.html index.htm;
}
1.2 实现效果
- 请求
208.208.128.122:80/edu/,负载均衡平均到127.0.0.1:8081/edu/和127.0.0.1:8082/edu/当中。
2. 修改负载均衡分配策略
- 轮询(默认):按时间顺序逐一分配,如果down掉,自动剔除
- weight:默认为1,权重越高分配客户越多。
upstream myserver {
    server 208.208.128.122:8081 weight=10;   #  在这儿
    server 208.208.128.122:8082 weight=10;
}
server {
    listen       80;
    server_name  208.208.128.122;
    location / {
        root   html;
        proxy_pass   http://myserver;
        index  index.html index.htm;
}
- ip_hash:每个请求按访问 ip 的 hash 结果分配,这样每个访客固定访问一个后端服务器。
upstream myserver {
    ip_hash;		#  在这儿
    server 208.208.128.122:8081 ;
    server 208.208.128.122:8082 ;
}
server {
    listen       80;
    server_name  208.208.128.122;
    location / {
        root   html;
        proxy_pass   http://myserver;
        index  index.html index.htm;
}
- fair(第三方):按后端服务器的响应时间来分配请求,响应时间短的优先分配。
    upstream myserver {
        server 208.208.128.122:8081 ;
        server 208.208.128.122:8082 ;
        fair; 	#  在这儿
    }
    server {
        listen       80;
        server_name  208.208.128.122;
        location / {
            root   html;
            proxy_pass   http://myserver;
            index  index.html index.htm;
    }
五、架构
1. 动静分离
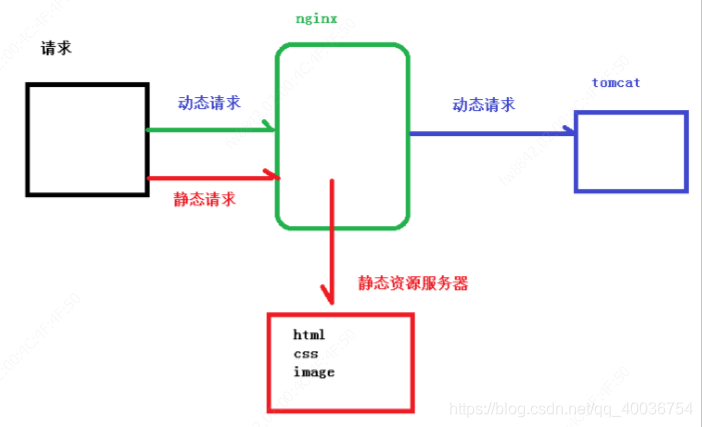
nginx 动静分离简单来说就是把动态跟静态请求分开,不能理解成只是单纯的把动态页面和 静态页面物理分离。严格意义上说应该是动态请求跟静态请求分开,可以理解成使用 nginx 处理静态页面,tomcat 处理动态页面。动静分离从目前实现角度来讲大致分为两种:
- 一种是纯粹把静态文件独立成单独的域名,放在独立的服务器上,也是目前主流推崇的方案;
- 另外一种方法就是动态跟静态文件混合在一起发布,通过 nginx 来分开。
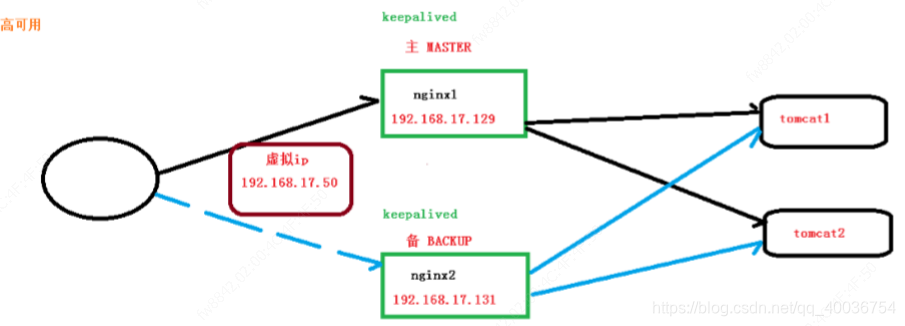
2. 高可用集群
keepalived + nginx 模式
3. 其他
- master-worker架构,只能有一个master,其他worker通过争抢获取请求。
- worker数和cpu数相等最为适宜。
- 发送请求,占用了worker的几个连接数:2~4个
- 普通静态访问最大并发数是:
worker_connections * worker_processes / 2 - http做反向代理,最大并发数
worker_connections * worder_processes / 4
这个值是表示每个 worker 进程所能建立连接的最大值,所以,一个 nginx 能建立的最大连接 数,应该是 worker_connections * worker_processes。当然,这里说的是最大连接数,对于 http 请 求 本 地 资 源 来 说 , 能 够 支 持 的 最 大 并 发 数 量 是 worker_connections * worker_processes,如果是支持 http1.1 的浏览器每次访问要占两个连接,所以普通的静态访 问最大并发数是: worker_connections * worker_processes /2,而如果是 http 作 为反向代 理来说,最大并发数量应该是 worker_connections * worker_processes/4。因为作为反向代理服务器,每个并发会建立与客户端的连接和与后端服 务的连接,会占用两个连接。
到此这篇关于keepalived+nginx实现双服务器主备方案的文章就介绍到这了,更多相关keepalived nginx双服务器主备内容请搜索代码网以前的文章或继续浏览下面的相关文章希望大家以后多多支持代码网!
赞 (0)
您想发表意见!!点此发布评论


发表评论