详解Monaco Editor中的Keybinding机制
110人参与 • 2024-05-19 • AngularJs
一、前言
前段时间碰到了一个 keybinding 相关的问题,于是探究了一番,首先大家可能会有两个问题:monaco editor 是啥?keybinding 又是啥?
- monaco editor: 微软开源的一个代码编辑器,为 vs code 的编辑器提供支持,monaco editor 核心代码与 vs code 是共用的(都在 vs code github 仓库中)。
- keybinding: monaco editor 中实现快捷键功能的机制(其实准确来说,应该是部分机制),可以使得通过快捷键来执行操作,例如打开命令面板、切换主题以及编辑器中的一些快捷操作等。
本文主要是针对 monaco editor 的 keybinding 机制进行介绍,由于源码完整的逻辑比较庞杂,所以本文中的展示的源码以及流程会有一定的简化。
文中使用的代码版本:
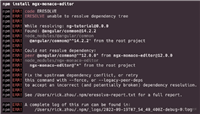
monaco editor:0.30.1
vs code:1.62.1
二、举个🌰
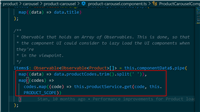
这里使用 monaco-editor 创建了一个简单的例子,后文会基于这个例子来进行介绍。
import react, { useref, useeffect, usestate } from "react";
import * as monaco from "monaco-editor";
import { codetext } from "./help";
const editor = () => {
    const domref = useref<htmldivelement>(null);
    const [actiondispose, setactiondispose] = usestate<monaco.idisposable>();
    useeffect(() => {
        const editorins = monaco.editor.create(domref.current!, {
            value: codetext,
            language: "typescript",
            theme: "vs-dark",
        });
        const action = {
            id: 'test',
            label: 'test',
            precondition: 'ischrome == true',
            keybindings: [monaco.keymod.ctrlcmd | monaco.keycode.keyl],
            run: () => {
                window.alert('chrome: cmd + k');
            },
        };
        setactiondispose(editorins.addaction(action));
        editorins.focus();
        return () => {
            editorins.dispose();
        };
    }, []);
    const onclick = () => {
        actiondispose?.dispose();
        window.alert('已卸载');
    };
    return (
        <div>
            <div ref={domref} classname='editor-container' />
            <button classname='cancel-button' onclick={onclick}>卸载keybinding</button>
        </div>
    );
};
export default editor;
三、原理机制
1. 概览
根据上面的例子,keybinding 机制的总体流程可以简单的分为以下几步:
- 初始化:主要是初始化服务以及给 dom 添加监听事件
- 注册:注册 keybinding 和 command
- 执行:通过按快捷键触发执行对应的 keybinding 和 command
- 卸载:清除注册的 keybinding 和 command
2. 初始化
回到上面例子中创建 editor 的代码:
const editorins = monaco.editor.create(domref.current!, {
    value: codetext,
    language: "typescript",
    theme: "vs-dark",
});
初始化过程如下:

创建 editor 之前会先初始化 services,通过实例化 dynamicstandaloneservices 类创建服务:
let services = new dynamicstandaloneservices(domelement, override);
在 constructor 函数中会执行以下代码注册 keybindingservice:
let keybindingservice = ensure(ikeybindingservice, () =>
    this._register(
        new standalonekeybindingservice(
            contextkeyservice,
            commandservice,
            telemetryservice,
            notificationservice,
            logservice,
            domelement
        )
    )
);
其中 this._register 方法和 ensure 方法会分别将 standalonekeybindingservices 实例保存到 disposable 对象(用于卸载)和 this._servicecollection 中(用于执行过程查找keybinding)。
实例化 standalonekeybindingservice,在 constructor 函数中添加 dom 监听事件:
this._register(
    dom.adddisposablelistener(
        domnode,
        dom.eventtype.key_down,
        (e: keyboardevent) => {
            const keyevent = new standardkeyboardevent(e);
            const shouldpreventdefault = this._dispatch(
                keyevent,
                keyevent.target
            );
            if (shouldpreventdefault) {
                keyevent.preventdefault();
                keyevent.stoppropagation();
            }
        }
    )
);
以上代码中的 dom.adddisposablelistener 方法,会通过 addeventlistener 的方式,在 domnode 上添加一个 keydown 事件的监听函数,并且返回一个 domlistener 的实例,该实例包含一个用于移除事件监听的 dispose 方法。然后通过 this._register 方法将 domlistener 的实例保存起来。
3. 注册 keybindings
回到例子中的代码:
const action = {
    id: 'test',
    label: 'test',
    precondition: 'ischrome == true',
    keybindings: [monaco.keymod.ctrlcmd | monaco.keycode.keyl],
    run: () => {
        window.alert('chrome: cmd + k');
    },
};
setactiondispose(editorins.addaction(action));
注册过程如下:

当通过 editorins.addaction 来注册 keybinding 时,会调用 standalonekeybindingservices 实例的 adddynamickeybinding 方法来注册 keybinding。
public adddynamickeybinding(
    commandid: string,
    _keybinding: number,
    handler: icommandhandler,
    when: contextkeyexpression | undefined
): idisposable {
    const keybinding = createkeybinding(_keybinding, os);
    const todispose = new disposablestore();
    if (keybinding) {
        this._dynamickeybindings.push({
            keybinding: keybinding.parts,
            command: commandid,
            when: when,
            weight1: 1000,
            weight2: 0,
            extensionid: null,
            isbuiltinextension: false,
        });
        todispose.add(
            todisposable(() => {
                for (let i = 0; i < this._dynamickeybindings.length; i++) {
                    let kb = this._dynamickeybindings[i];
                    if (kb.command === commandid) {
                        this._dynamickeybindings.splice(i, 1);
                        this.updateresolver({
                            source: keybindingsource.default,
                        });
                        return;
                    }
                }
            })
        );
    }
    todispose.add(commandsregistry.registercommand(commandid, handler));
    this.updateresolver({ source: keybindingsource.default });
    return todispose;
}
会先根据传入的 _keybinding 创建 keybinding 实例,然后连同 command、when 等其他信息存入_dynamickeybindings 数组中,同时会注册对应的 command,当后面触发 keybinding 时便执行对应的 command。返回的 todispose 实例则用于取消对应的 keybinding 和 command。
回到上面代码中创建 keybinding 实例的地方,createkeybinding 方法会根据传入的 _keybinding 数字和 os 类型得到实例,大致结构如下(已省略部分属性):
{
    parts: [
        {
            ctrlkey: boolean,
            shiftkey: boolean,
            altkey: boolean,
            metakey: boolean,
            keycode: keycode,
        }
    ],
}
那么,是怎么通过一个 number 得到所有按键信息的呢?往下看↓↓↓
4. key的转换
先看看一开始传入的 keybinding 是什么:
const action = {
    id: 'test',
    label: 'test',
    precondition: 'ischrome == true',
    keybindings: [monaco.keymod.ctrlcmd | monaco.keycode.keyl],
    run: () => {
        window.alert('chrome: cmd + k');
    },
};
传入的 keybinding 就是上面代码中的 keybindings 数组中的元素,monaco.keymod.ctrlcmd = 2048,monaco.keycode.keyl = 42,对应的数字是 monaco-editor 中定义的枚举值,与真实的 keycode 存在对应关系。所以注册时传入的 keybinding 参数为: 2048 | 42 = 2090
先简单了解下 js 中的位运算(操作的是32位带符号的二进制整数,下面例子中只用8位简单表示):
按位与(and)&
对应的位都为1则返回1,否则返回0
例如:
00001010 // 10
00000110 // 6
------
00000010 // 2
按位或(or)|
对应的位,只要有一个为1则返回1,否则返回0
00001010 // 10
00000110 // 6
-------
00001110 // 14
左移(left shift)<<
将二进制数每一位向左移动指定位数,左侧移出的位舍弃,右侧补0
00001010 // 10
------- // 10 << 2
00101000 // 40
右移 >>
将二进制数每位向右移动指定位数,右侧移出的位舍弃,左侧用原来最左边的数补齐
00001010 // 10
------- // 10 >> 2
00000010 // 2
无符号右移 >>>
将二进制数每位向右移动指定位数,右侧移出的位舍弃,左侧补0
00001010 // 10
------- // 10 >> 2
00000010 // 2
接下来看下是怎么根据一个数字,创建出对应的 keybinding 实例:
export function createkeybinding(keybinding: number, os: operatingsystem): keybinding | null {
    if (keybinding === 0) {
        return null;
    }
    const firstpart = (keybinding & 0x0000ffff) >>> 0;
    // 处理分两步的keybinding,例如:shift shift,若无第二部分,则chordpart = 0
    const chordpart = (keybinding & 0xffff0000) >>> 16;
    if (chordpart !== 0) {
        return new chordkeybinding([
            createsimplekeybinding(firstpart, os),
            createsimplekeybinding(chordpart, os)
        ]);
    }
    return new chordkeybinding([createsimplekeybinding(firstpart, os)]);
}
看下 createsimplekeybinding 方法做了什么
const enum binarykeybindingsmask {
    ctrlcmd = (1 << 11) >>> 0, // 2048
    shift = (1 << 10) >>> 0,   // 1024
    alt = (1 << 9) >>> 0,      // 512
    winctrl = (1 << 8) >>> 0,  // 256
    keycode = 0x000000ff       // 255
}
export function createsimplekeybinding(keybinding: number, os: operatingsystem): simplekeybinding {
    const ctrlcmd = (keybinding & binarykeybindingsmask.ctrlcmd ? true : false);
    const winctrl = (keybinding & binarykeybindingsmask.winctrl ? true : false);
    const ctrlkey = (os === operatingsystem.macintosh ? winctrl : ctrlcmd);
    const shiftkey = (keybinding & binarykeybindingsmask.shift ? true : false);
    const altkey = (keybinding & binarykeybindingsmask.alt ? true : false);
    const metakey = (os === operatingsystem.macintosh ? ctrlcmd : winctrl);
    const keycode = (keybinding & binarykeybindingsmask.keycode);
    return new simplekeybinding(ctrlkey, shiftkey, altkey, metakey, keycode);
}
拿上面的例子:
keybinding = monaco.keymod.ctrlcmd | monaco.keycode.keyl,即 keybinding = 2048 | 42 = 2090
然后看上面代码中的:
const ctrlcmd = (keybinding & binarykeybindingsmask.ctrlcmd ? true : false);
运算如下:
100000101010 // 2090 -> keybinding
100000000000 // 2048 -> ctrlcmd
----------- // &
100000000000 // 2048 -> ctrlcmd
再看keycode的运算:
const keycode = (keybinding & binarykeybindingsmask.keycode)
100000101010 // 2090 -> keybinding
000011111111 // 255 -> keycode
----------- // &
000000101010 // 42 -> keyl
于是便得到了 ctrlkey,shiftkey,altkey,metakey,keycode 这些值,接下来便由这些值生成simplekeybinding实例,该实例包含了上面的这些按键信息以及一些操作方法。
至此,已经完成了 keybinding 的注册,将 keybinding 实例及相关信息存入了 standalonekeybindingservice 实例的 _dynamickeybindings 数组中,对应的 command 也注册到了 commandsregistry 中。
5.执行
当用户在键盘上按下快捷键时,便会触发 keybinding 对应 command 的执行,执行过程如下:

回到 standalonekeybindingservices 初始化的时候,在 domnode 上绑定了 keydown 事件监听函数:
(e: keyboardevent) => {
    const keyevent = new standardkeyboardevent(e);
    const shouldpreventdefault = this._dispatch(keyevent, keyevent.target);
    if (shouldpreventdefault) {
        keyevent.preventdefault();
        keyevent.stoppropagation();
    }
};
当 keydown 事件触发后,便会执行这个监听函数,首先会实例化一个 standardkeyboardevent 实例,该实例包含了一些按键信息和方法,大致结构如下(已省略部分属性):
{
    target: htmlelement,
    ctrlkey: boolean,
    shiftkey: boolean,
    altkey: boolean,
    metakey: boolean,
    keycode: keycode,
}
其中 keycode 是经过处理后得到的,由原始键盘事件的 keycode 转换为 monoco-editor 中的 keycode,转换过程主要就是兼容一些不同的浏览器,并根据映射关系得到最终的 keycode。准换方法如下:
function extractkeycode(e: keyboardevent): keycode {
    if (e.charcode) {
        // "keypress" events mostly
        let char = string.fromcharcode(e.charcode).touppercase();
        return keycodeutils.fromstring(char);
    }
    const keycode = e.keycode;
    // browser quirks
    if (keycode === 3) {
        return keycode.pausebreak;
    } else if (browser.isfirefox) {
        if (keycode === 59) {
            return keycode.semicolon;
        } else if (keycode === 107) {
            return keycode.equal;
        } else if (keycode === 109) {
            return keycode.minus;
        } else if (platform.ismacintosh && keycode === 224) {
            return keycode.meta;
        }
    } else if (browser.iswebkit) {
        if (keycode === 91) {
            return keycode.meta;
        } else if (platform.ismacintosh && keycode === 93) {
            // the two meta keys in the mac have different key codes (91 and 93)
            return keycode.meta;
        } else if (!platform.ismacintosh && keycode === 92) {
            return keycode.meta;
        }
    }
    // cross browser keycodes:
    return event_key_code_map[keycode] || keycode.unknown;
}
得到了 keyevent 实例对象后,便通过 this._dispatch(keyevent, keyevent.target) 执行。
protected _dispatch(
    e: ikeyboardevent,
    target: icontextkeyservicetarget
): boolean {
    return this._dodispatch(
        this.resolvekeyboardevent(e),
        target,
        /*issinglemodiferchord*/ false
    );
}
直接调用了 this._dodispatch 方法,通过 this.resolvekeyboardevent(e) 方法处理传入的 keyevent,得到一个包含了许多 keybinding 操作方法的实例。
接下来主要看下 _dodispatch 方法主要干了啥(以下仅展示了部分代码):
private _dodispatch(
    keybinding: resolvedkeybinding,
    target: icontextkeyservicetarget,
    issinglemodiferchord = false
): boolean {
    const resolveresult = this._getresolver().resolve(
        contextvalue,
        currentchord,
        firstpart
    );
    if (resolveresult && resolveresult.commandid) {
        if (typeof resolveresult.commandargs === 'undefined') {
            this._commandservice
                .executecommand(resolveresult.commandid)
                .then(undefined, (err) =>
                    this._notificationservice.warn(err)
                );
        } else {
            this._commandservice
                .executecommand(
                    resolveresult.commandid,
                    resolveresult.commandargs
                )
                .then(undefined, (err) =>
                    this._notificationservice.warn(err)
                );
        }
    }
}
主要是找到 keybinding 对应的 command 并执行,_getresolver 方法会拿到已注册的 keybinding,然后通过 resolve 方法找到对应的 keybinding 及 command 信息。而执行 command 则会从 commandsregistry 中找到对应已注册的 command,然后执行 command 的 handler 函数(即keybinding 的回调函数)。
6.卸载
先看看一开始的例子中的代码:
const onclick = () => {
    actiondispose?.dispose();
    window.alert('已卸载');
};
卸载过程如下:

回到刚开始注册时:setactiondispose(editorins.addaction(action)),addaction 方法会返回一个 disposable 对象,setactiondispose 将该对象保存了起来。通过调用该对象的 dispose 方法:actiondispose.dispose(),便可卸载该 action,对应的 command 和 keybinding 便都会被卸载。
四、结语
对 monaco editor 的 keybinding 机制进行简单描述,就是通过监听用户的键盘输入,找到对应注册的 keybinding 和 command,然后执行对应的回调函数。但仔细探究的话,每个过程都有很多处理逻辑,本文也只是对其做了一个大体的介绍,实际上还有许多相关的细节没有讲到,感兴趣的同学可以探索探索。
以上就是详解monaco editor中的keybinding机制的详细内容,更多关于monaco editor keybinding的资料请关注代码网其它相关文章!
赞 (0)
您想发表意见!!点此发布评论


发表评论